This quickstart walks through integrating Paddle end to end, including sandbox setup, product catalog, pricing page, checkout, and webhooks. It's framework-agnostic, with all the moving parts in one place.
If you'd rather start from a working app or jump straight to your SDK, skip to Pick a starting point at the bottom.
Working with AI?
Install the Paddle MCP server and docs MCP server in your AI client to integrate faster.
What we're building
By the end of this quickstart, you'll have a typical three-tier pricing page connected to Paddle Checkout, with webhooks flowing for provisioning.
You'll learn how to:
- Sign up for Paddle and set up an account.
- Create products and prices.
- Work with Paddle.js to present localized prices.
- Open a checkout and take a test payment.
- Create a notification destination and preview webhooks.
Explore the working code for this quickstart using our getting started CodePen.
Overview
- Sign up for Paddle
Create a sandbox account. - Set up your product catalog
Create products and prices for the items you offer. - Build your pricing page
Show products from your catalog on a pricing page. - Open a checkout
Launch a checkout from your pricing page, then take a test payment. - Listen for webhooks
Preview the webhooks that occur during checkout for handling provisioning.
Sign up for Paddle
Paddle has two types of account:
- Sandbox — for testing and evaluation.
- Live — for selling to customers.
For the best experience while testing, sign up for a sandbox account. You can sign up for a live account later when your integration is ready.
Set up your product catalog
Your product catalog includes subscription plans, recurring addons, one-time charges, and things like additional seats. There's no rigid hierarchy — everything you offer is a product.
Create products and related prices to start billing.
Model your pricing
A complete product in Paddle is made up of two parts:
- A product entity that describes the item — name, description, image.
- At least one related price entity that describes how much and how often a product is billed.
You can create as many prices for a product as you want to describe all the ways it's billed.

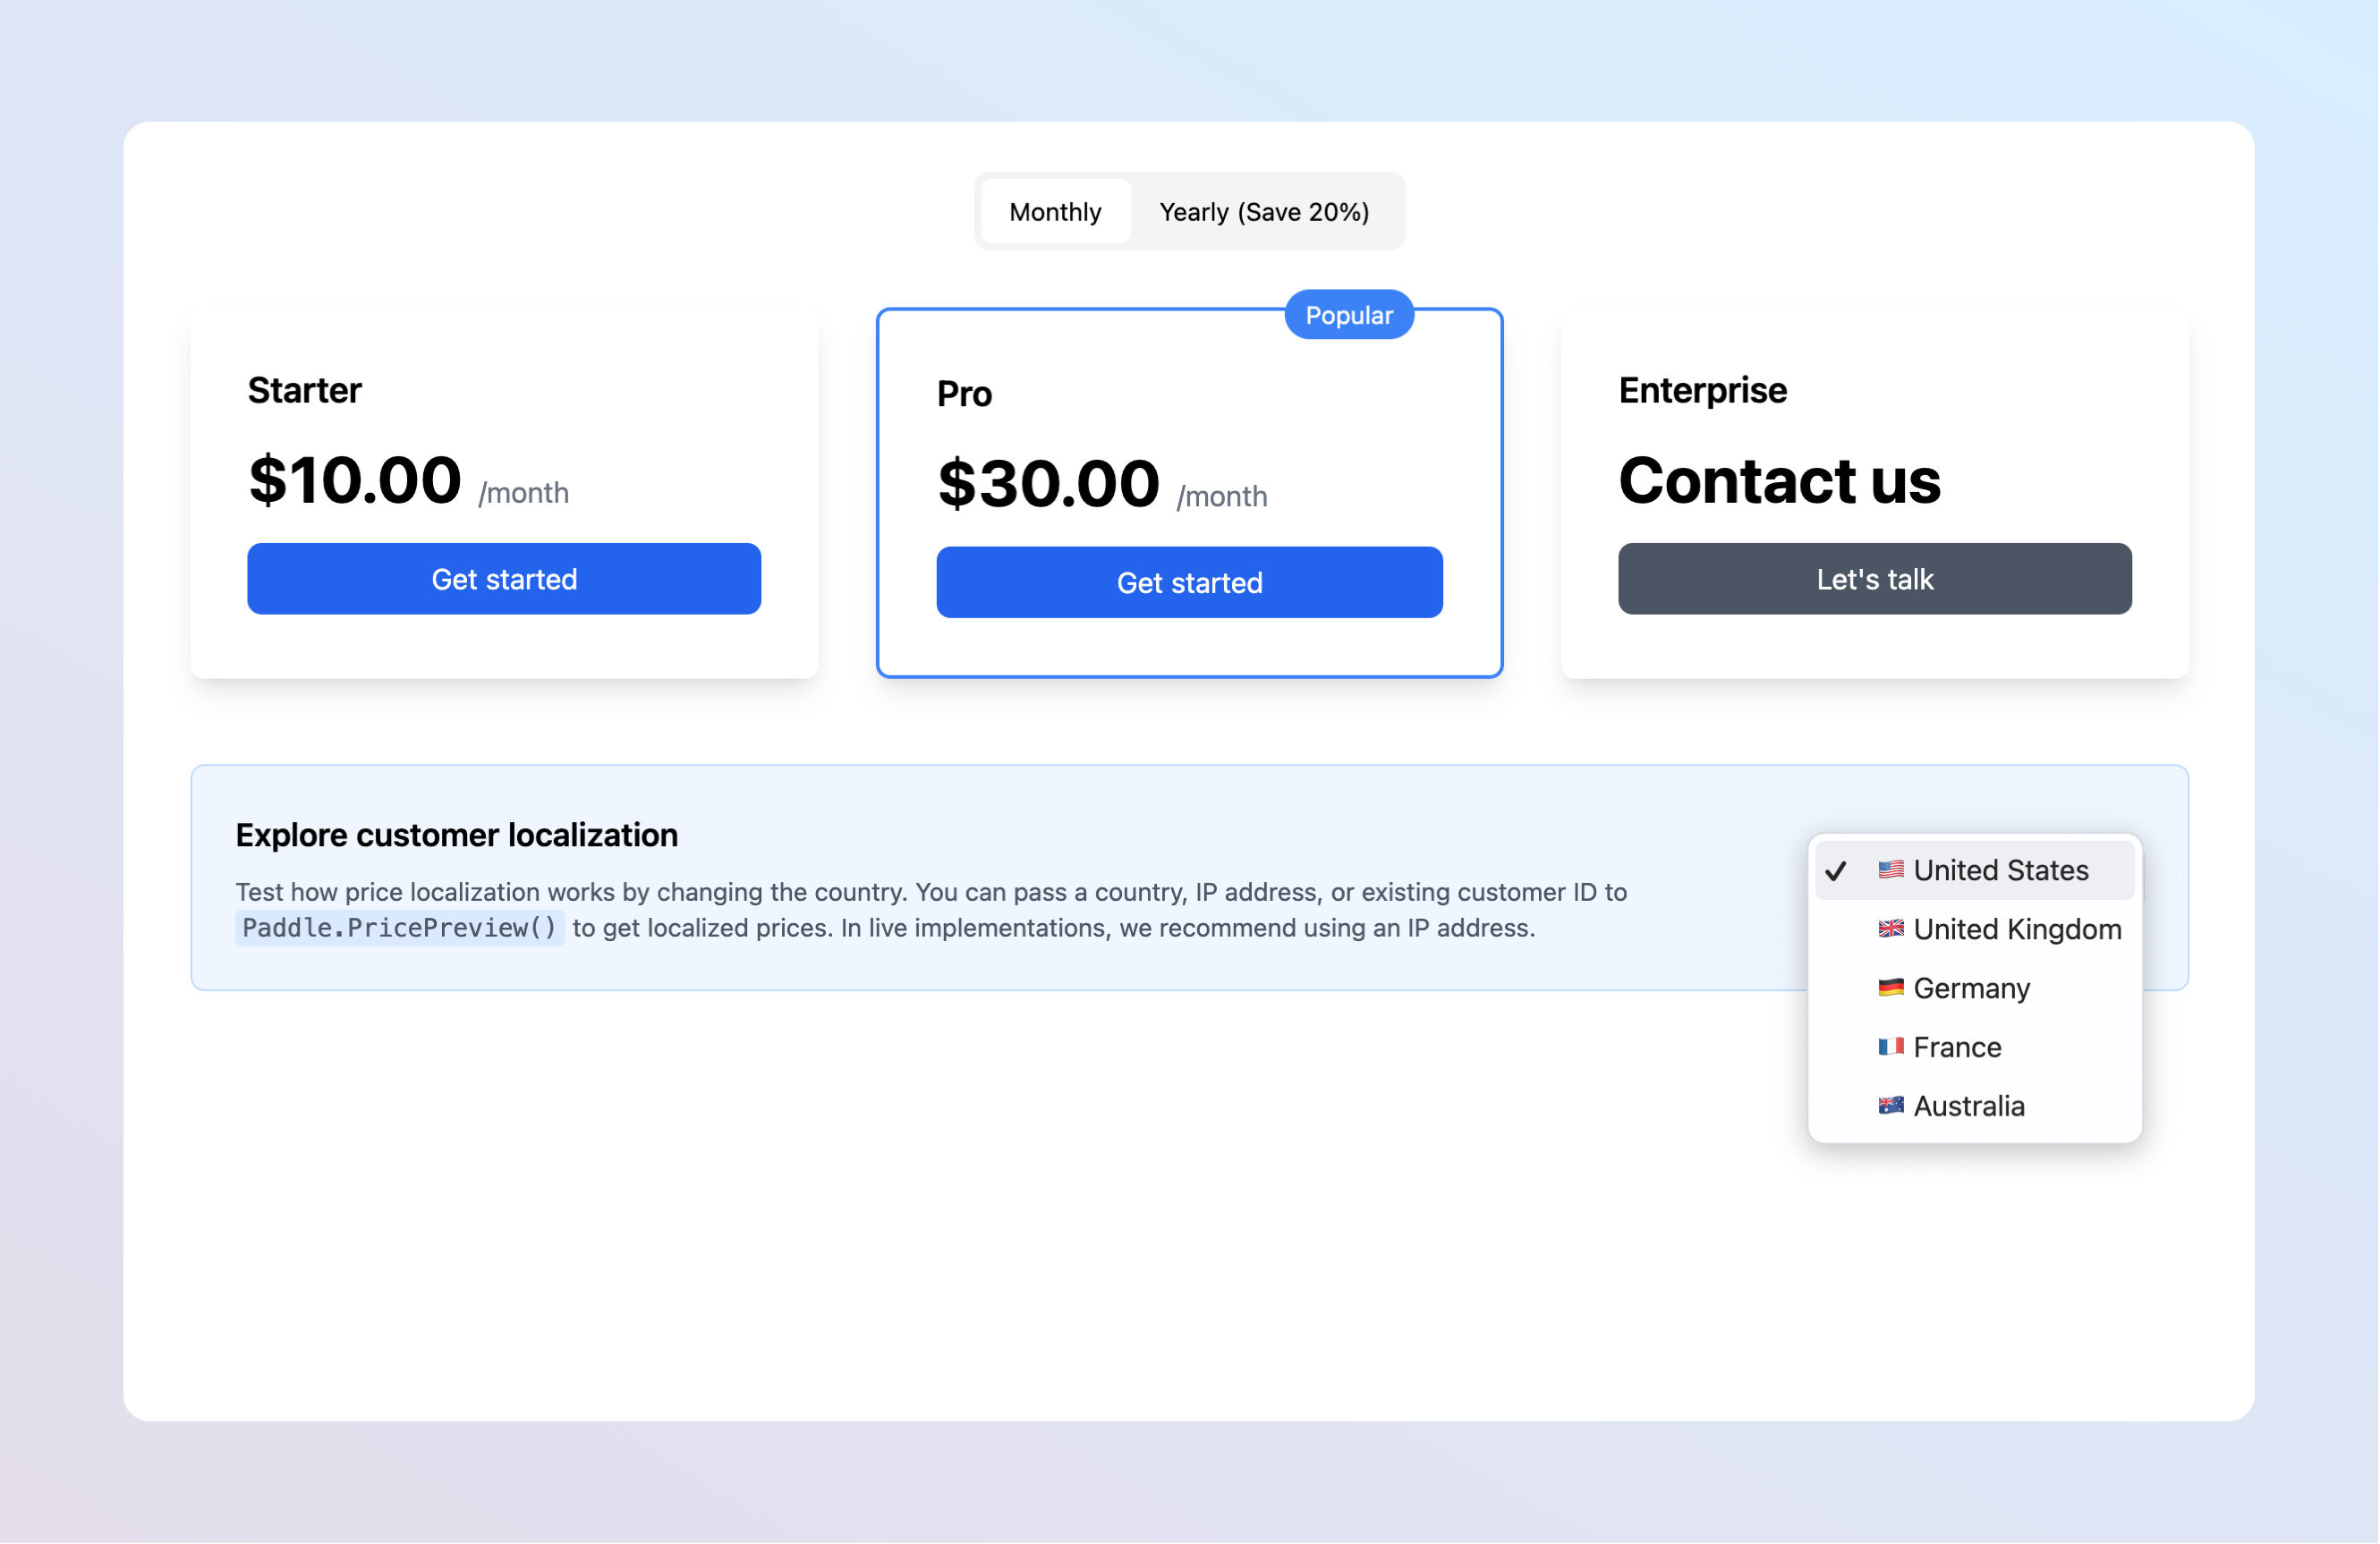
We'll start with a three-tier pricing structure — Starter, Pro, and Enterprise — each with monthly and annual options:
| Starter | Pro | Enterprise | |
|---|---|---|---|
| Monthly | $10.00 | $30.00 | $300.00 |
| Annual | $100.00 | $300.00 | $3000.00 |
We'll model this in Paddle as three products with two prices each:
graph LR
  Starter["Product: Starter"]
  Pro["Product: Pro"]
  Enterprise["Product: Enterprise"]

  Starter_Monthly["Price: Starter (monthly)"]
  Starter_Yearly["Price: Starter (yearly)"]
  Pro_Monthly["Price: Pro (monthly)"]
  Pro_Yearly["Price: Pro (yearly)"]
  Enterprise_Monthly["Price: Enterprise (monthly)"]
  Enterprise_Yearly["Price: Enterprise (yearly)"]

  Starter --> Starter_Monthly
  Starter --> Starter_Yearly
  Pro --> Pro_Monthly
  Pro --> Pro_Yearly
  Enterprise --> Enterprise_Monthly
  Enterprise --> Enterprise_Yearly
Create products and prices
You can create products and prices using the Paddle dashboard or the API.
For now, we'll create products and prices for Starter and Pro only. Instead of letting customers self-serve Enterprise, we'll ask them to contact us.
- Go to Paddle > Catalog > Products.
- Click New product
- Enter details for your new product, then click Save when you're done.
- Under the Prices section on the page for your product, click New price
- Enter details for your new price. Set the billing period to Monthly to create a monthly price.
- Click Save when you're done.
- Create another price, setting the billing period to Annually and Save

Repeat so you have two products for Starter and Pro, each with a monthly and annual price.
Build your pricing page
Pricing pages show potential customers the subscription plans you offer and how much they cost. They're typically a key part of customer conversion.
Paddle includes Paddle.js, a lightweight JavaScript library for securely interacting with Paddle in your frontend. Use Paddle.js to build pricing pages that show prospects prices localized for their country, displayed in their local currency with estimated taxes.
Get a client-side token
Client-side tokens let you interact with the Paddle platform in frontend code, like webpages or mobile apps. They have limited access to the data in your system, so they're safe to publish.
- Go to Paddle > Developer tools > Authentication.
- Click the Client-side tokens tab.
- Click New client-side token
- Give your client-side token a name and description, then click Save
- From the list, click the button next to the token you just created, then choose Copy token from the menu.

We'll use your client-side token in the next step.
Update constants
Now we've created a client-side token and products and prices, let's add them to a pricing page. We'll use the getting started CodePen.
Open the getting started CodePen
In the CodePen, change the values in the CONFIG constant at the top of the JavaScript section:
| Value | Description |
|---|---|
clientToken | Client-side token you copied in the last step. |
prices.starter.month | Paddle ID for the monthly price of the starter product we created previously. |
prices.starter.year | Paddle ID for the annual price for the starter product we created previously. |
prices.pro.month | Paddle ID for the monthly price for the pro product we created previously. |
prices.pro.year | Paddle ID for the annual price for the pro product we created previously. |
You can get Paddle IDs for your prices using the dashboard:
- Go to Paddle > Catalog > Products, then click the product you want to get a price ID for.
- Click the button next to a price in the list, then choose Copy price ID from the menu.
- Paste the ID as a value for
monthoryearinprices.starterorprices.pro.

Paddle IDs are designed to be easily recognizable. Price IDs start with pri_ and product IDs start with pro_. Check that you've copied price IDs and not product IDs.
Test your pricing page
If you've added a valid client-side token and passed your price IDs correctly, you should see your prices on your pricing page. Prices are fetched dynamically from Paddle.js, so changes you make in the dashboard show up on the next call.
Use the monthly/annual toggle to change prices, then test how localized pricing works using the country dropdown at the bottom.
We've included a country dropdown to simulate price localization for demo purposes. In real implementations, let Paddle.js auto-localize.
- We define variables for elements in our pricing page using
document.getElementById(). - We set
currentBillingCycletomonthandcurrentCountrytoUS— the defaults shown when customers first visit the page. - We call our
InitializePaddle()function. This callsPaddle.Environment.set()to set the sandbox environment, andPaddle.Initialize()to authenticate with our client-side token. We also callupdatePrices()to fetch prices from Paddle.js. - To handle plan switching,
updateBillingCycle()updatescurrentBillingCycle, changes the visual state of the buttons, and callsupdatePrices(). - In
updatePrices(), we build arequestobject with our prices andcurrentCountry, callPaddle.PricePreview(), and update the UI. - To handle country changes, an event listener updates
currentCountryand callsupdatePrices().
If prices don't appear, open the console for specific Paddle.js error messages.
Common problems
Check that:
- Your client-side token is correct. Sandbox tokens start with
test_. - The Paddle IDs for price entities are correct. Price IDs start with
pri_. - You haven't duplicated any IDs in your
Paddle.PricePreview()request — they must be unique.
Open a checkout
Paddle Checkout is where customers make purchases. You can use Paddle.js to add an overlay checkout — a full-page checkout that's optimized for conversion.
Set a default payment link
Before opening a checkout, you need a default payment link. Paddle uses your default payment link to generate URLs for customers to manage payments and subscriptions.
For now, set your default payment link to your homepage or development environment URL. You can always change it later.
- Go to Paddle > Checkout > Checkout settings.
- Enter your website homepage under the Default payment link heading. If you don't have one, enter
https://localhost/. - Click Save when you're done.

You can turn on other payment methods on this screen, too. We'll see eligible payment methods when we open a test checkout in the next step.
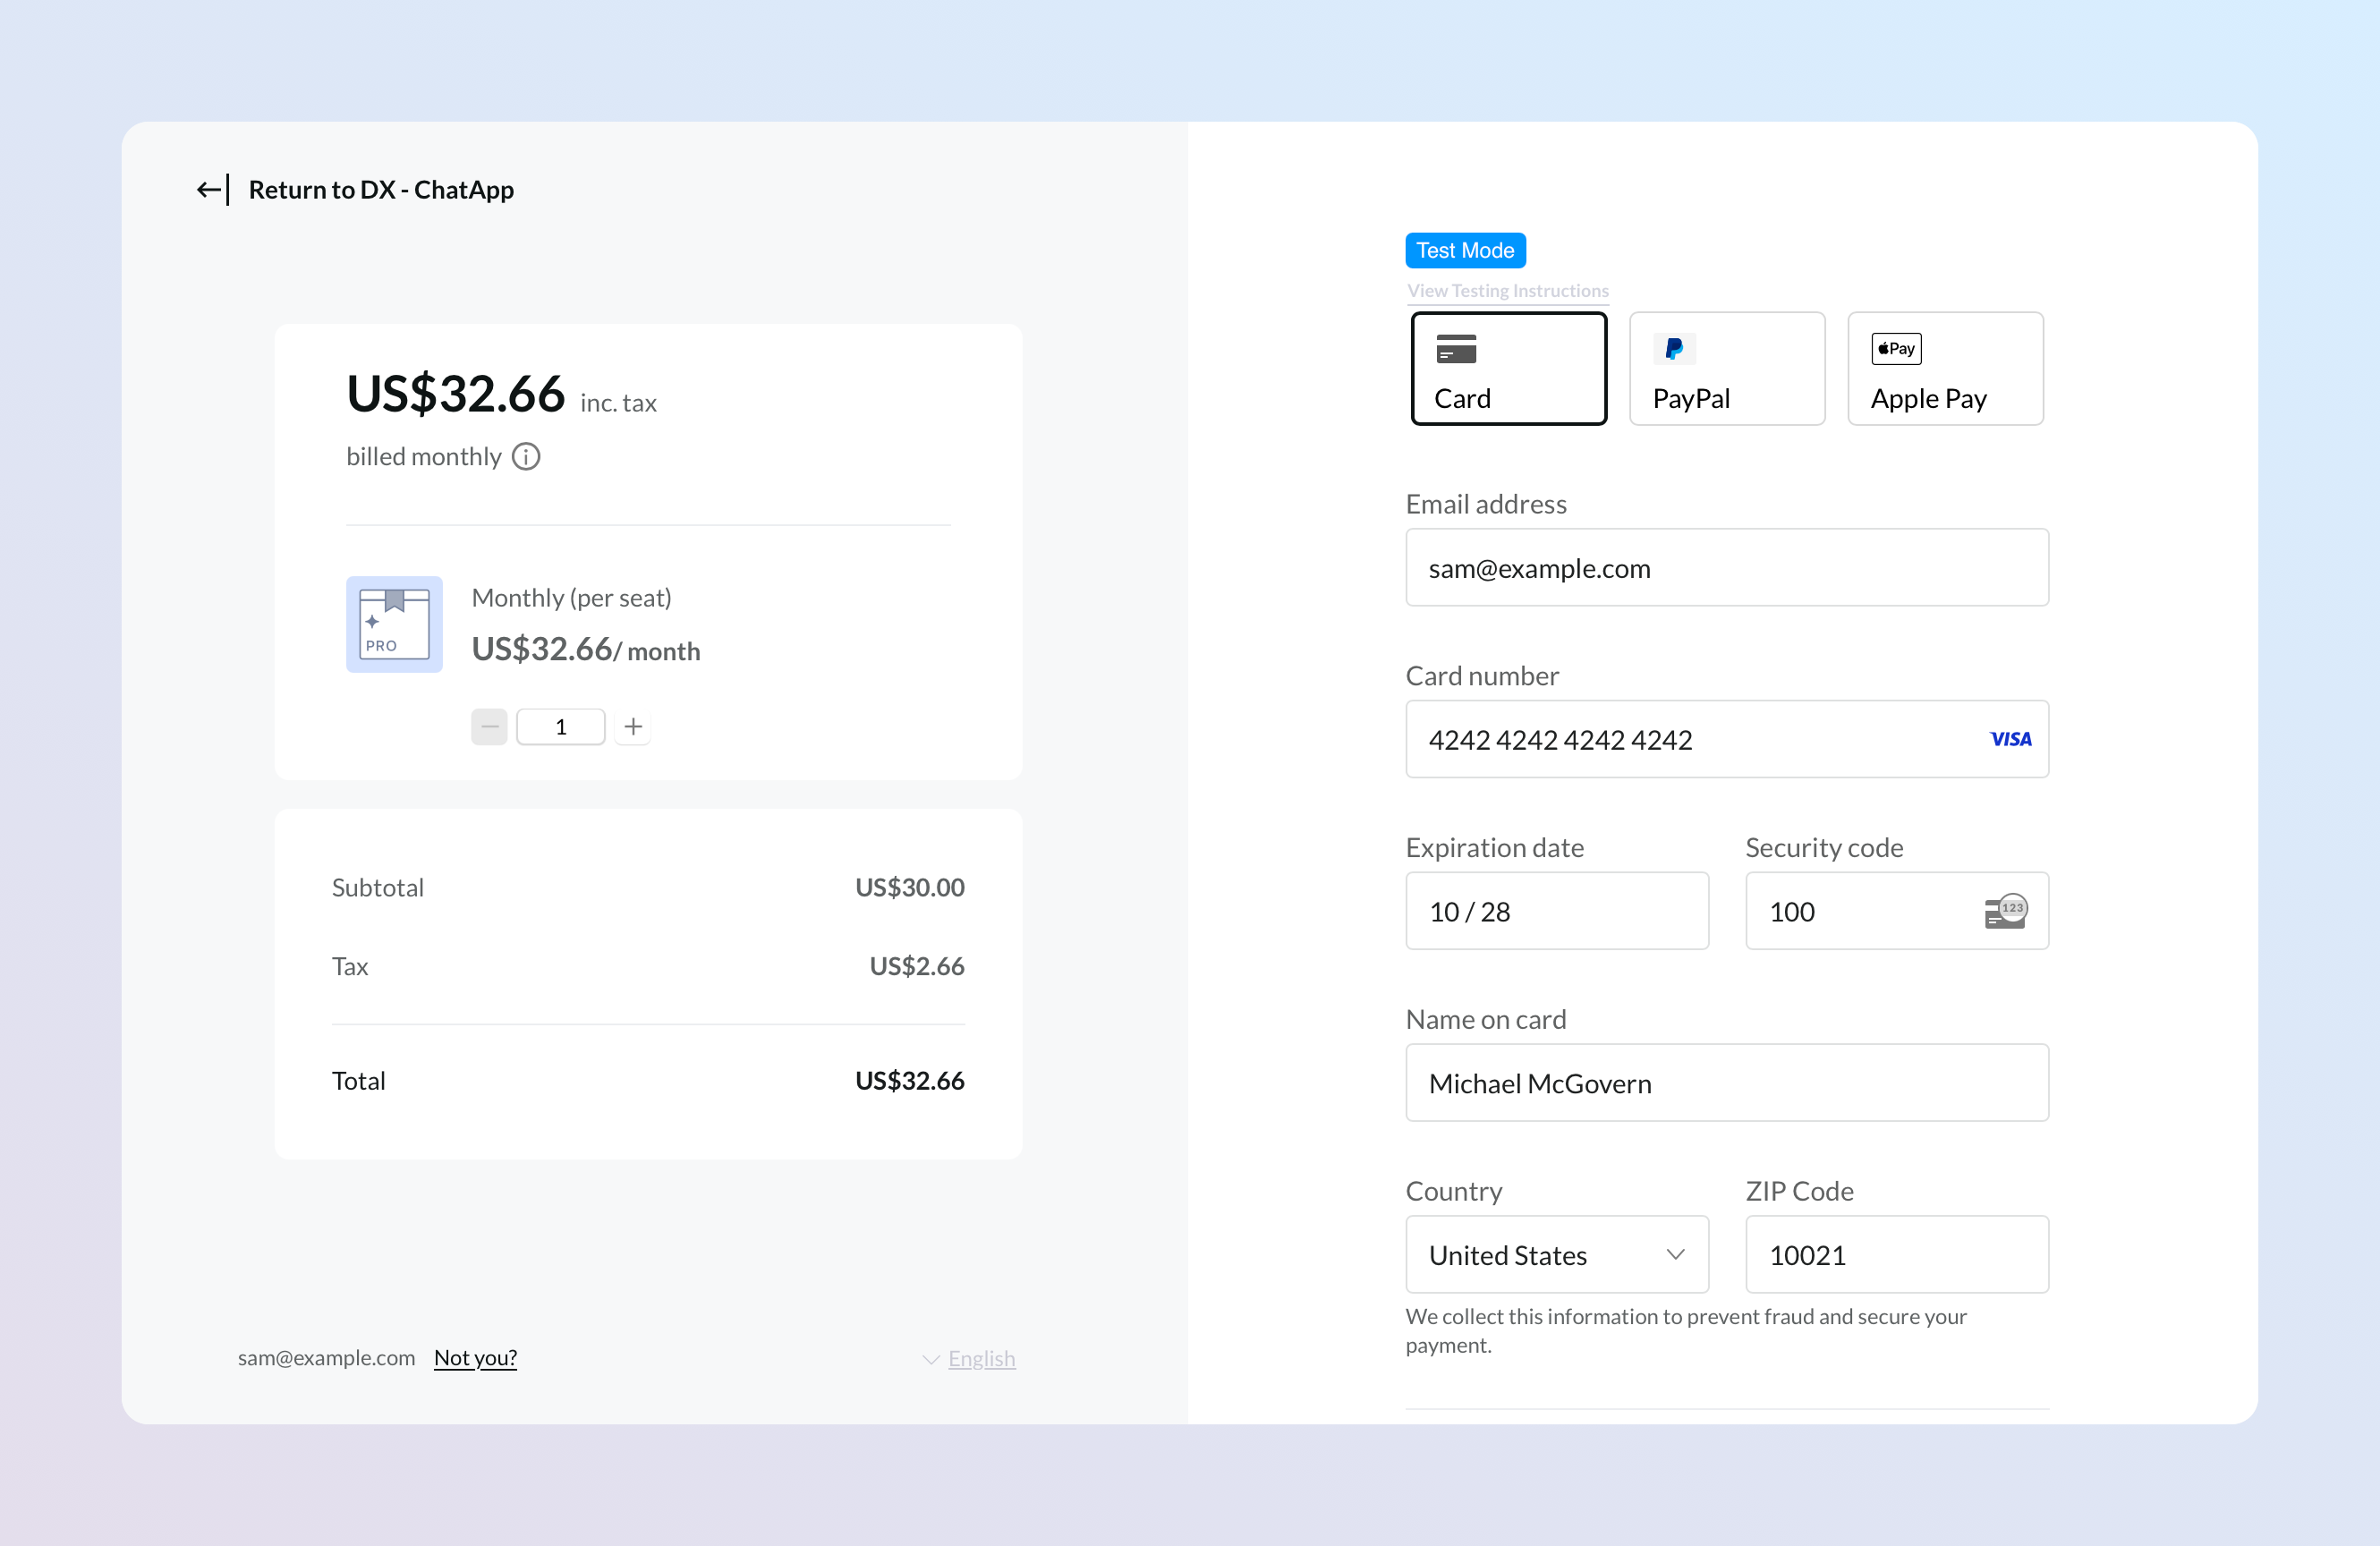
Take a test payment
In the CodePen, click Get started for a plan to open an overlay checkout. Take a test payment using our test card details:
- Email address
-
An email address you own
- Country
-
Any valid country supported by Paddle
- ZIP code (if required)
-
Any valid ZIP or postal code
- Card number
-
4242 4242 4242 4242 - Name on card
-
Any name
- Expiration date
-
Any valid date in the future.
- Security code
-
100
- Each pricing card has a button with an
onClickhandler that callsopenCheckout(), passing the plan name as a variable. - We initialize Paddle as described in the previous step using
InitializePaddle(). openCheckout()checks Paddle is initialized, then callsPaddle.Checkout.open()with an array ofitemsand object ofsettings.
If checkout doesn't load or you see "Something went wrong," open the console for Paddle.js errors.
Common problems
Check that:
- You added a default payment link under Paddle > Checkout > Checkout settings > Default payment link.
- Your client-side token is correct. Sandbox tokens start with
test_. - The price IDs you passed are correct. Price IDs start with
pri_. - You haven't duplicated any price IDs in your items list.
- You're opening a checkout from a supported country.
Listen for webhooks
Webhooks tell you when something important happens in your Paddle account. Paddle includes webhooks for the full purchase and subscription lifecycle — from new customer to cancellation.
You'll use webhooks to handle provisioning and fulfillment and to keep your app in sync with Paddle. For example: provision an account when a subscription is created, revoke access when one cancels.
Create a webhook destination
To start receiving webhooks, create a notification destination — where you tell Paddle which events you want and where to deliver them.
For this quickstart, we'll use Hookdeck Console instead of spinning up a webhook endpoint server. Hookdeck Console lets you receive webhooks in a friendly interface, with no account or setup required.
Open Hookdeck Console
- Go to Hookdeck Console, then copy the webhook endpoint URL. Keep this tab open.
- In a new tab, go to Paddle > Developer Tools > Notifications.
- Click New destination
- Give your destination a memorable name.
- Make sure notification type is set to webhook and usage type to platform — these are the defaults.
- Paste the webhook endpoint URL you copied from Hookdeck Console.
- Check the select all events box.
- Click Save destination when you're done.

Take another test payment
Now we have a notification destination, run through checkout again to see the events.
Open your CodePen and take another test payment. As you move through checkout, you should see webhooks land in Hookdeck.
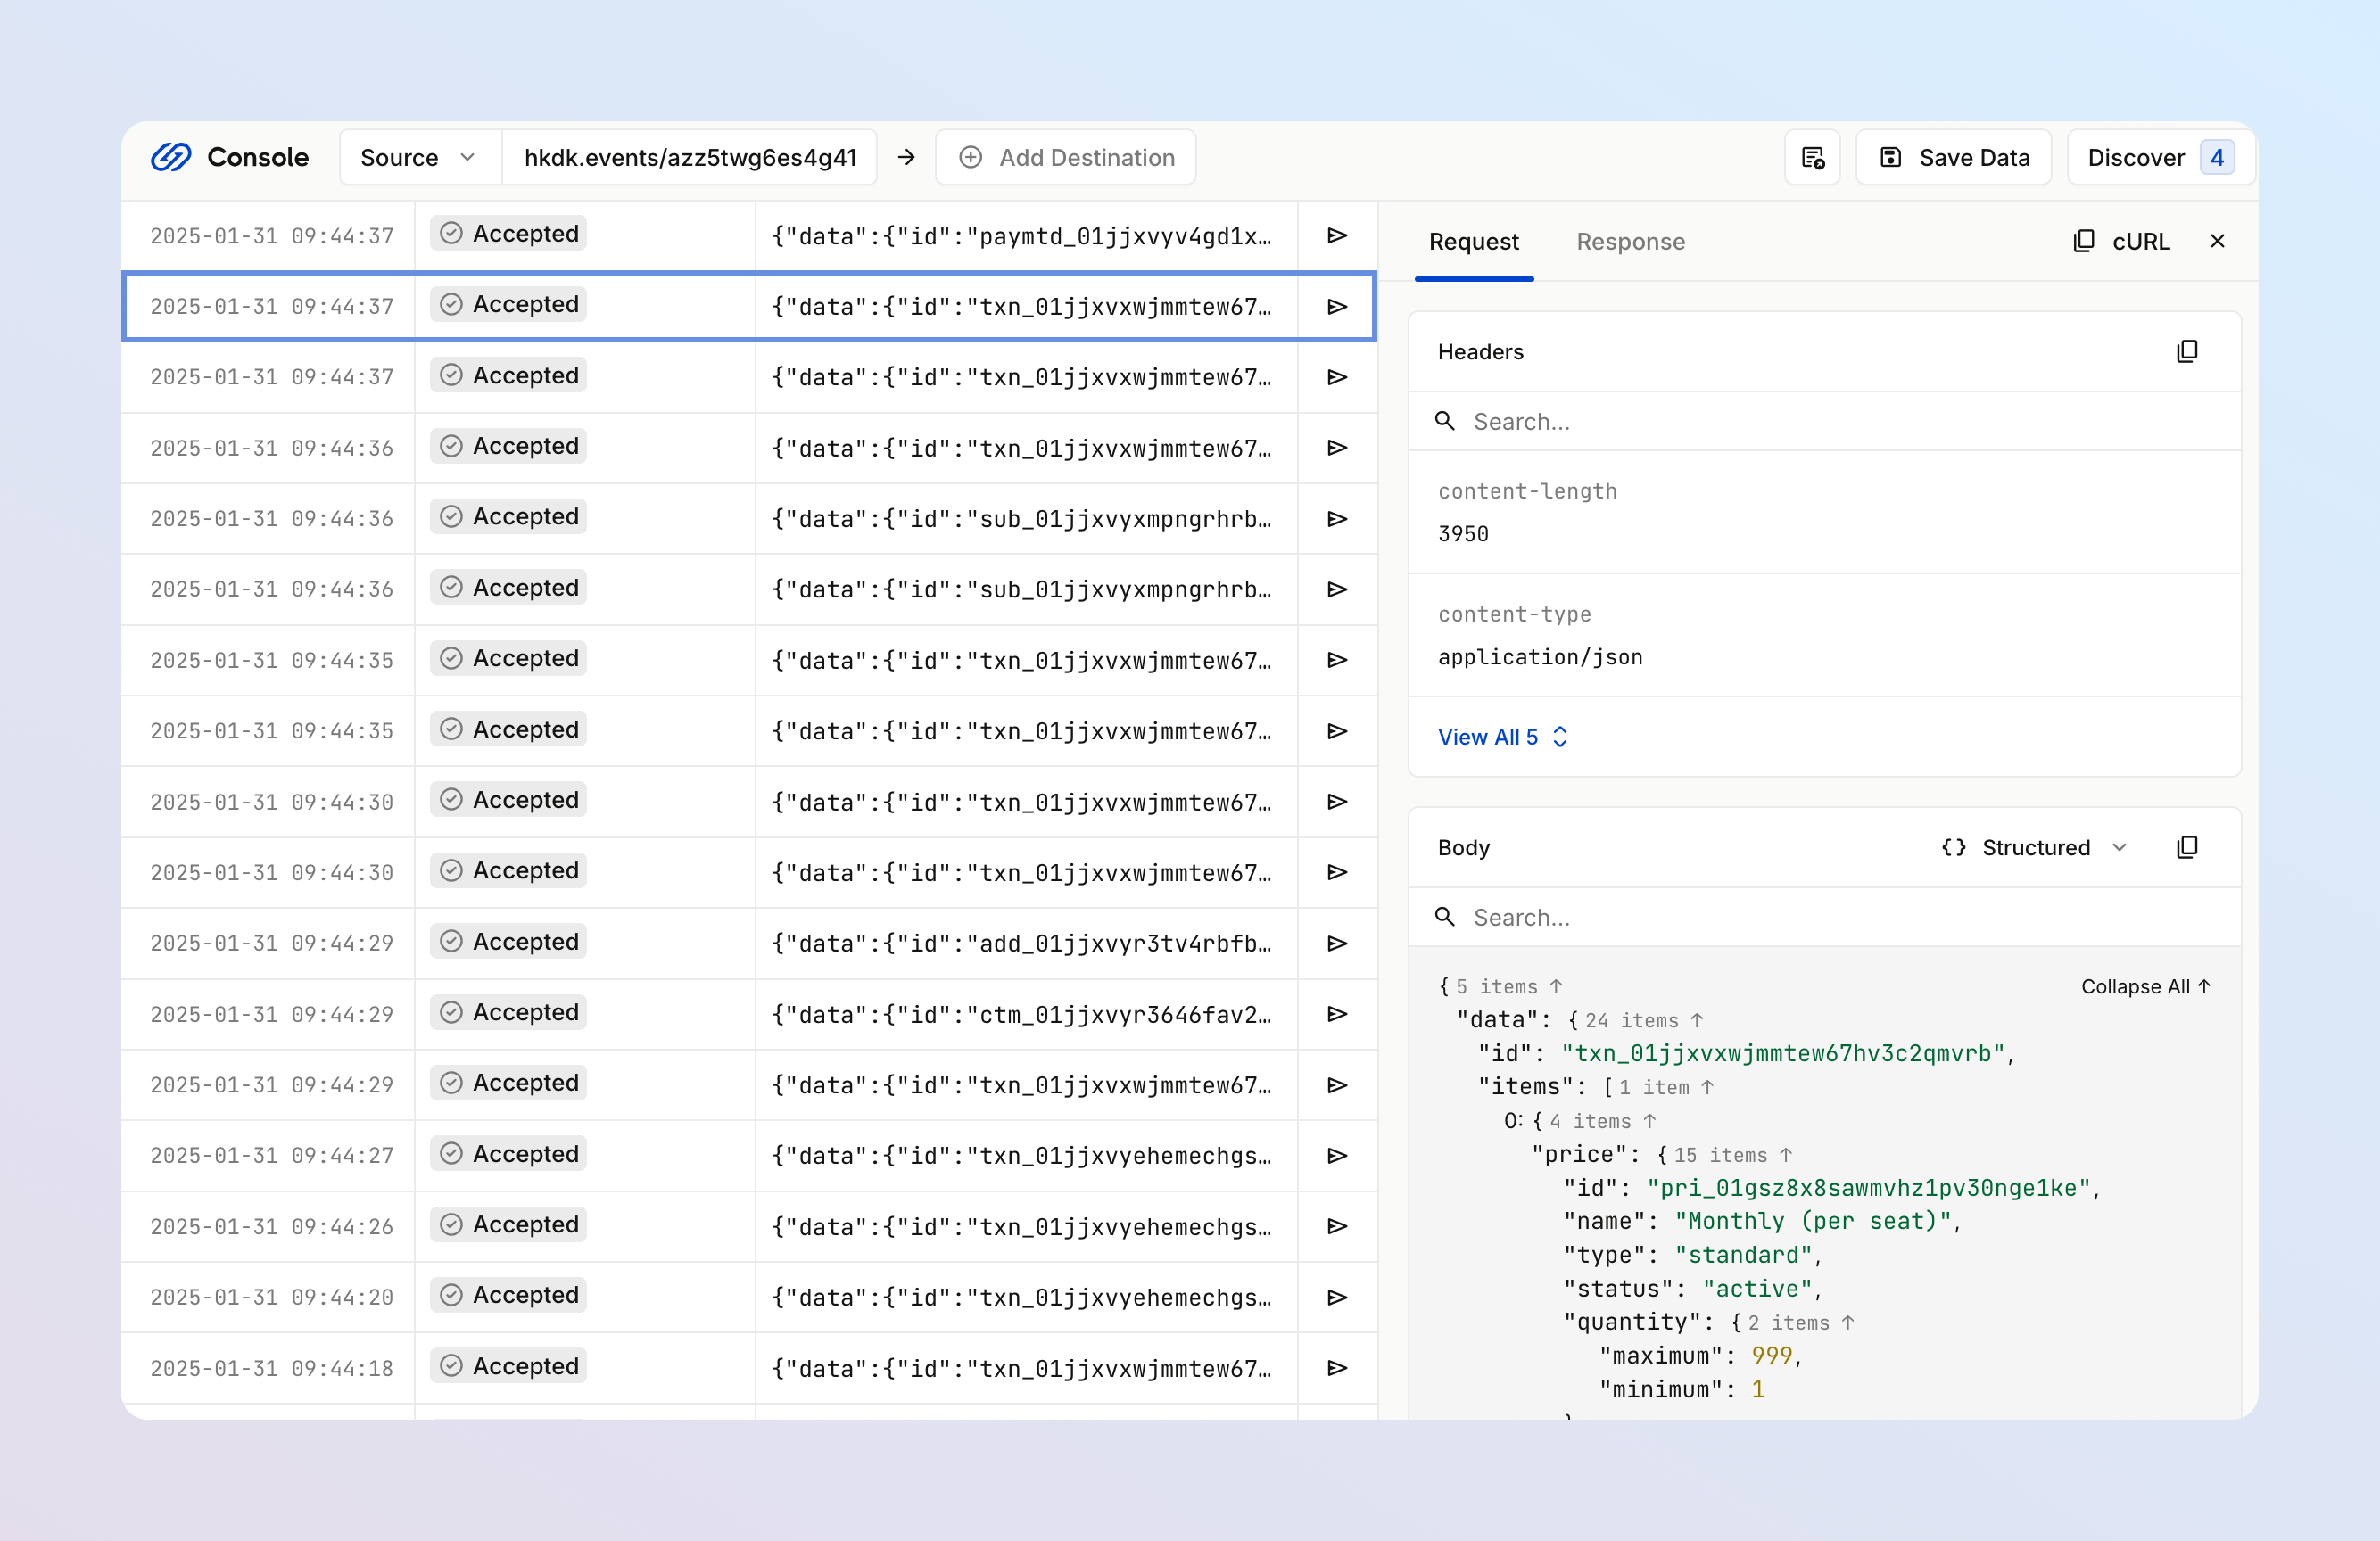
Paddle.js also emits events during the checkout lifecycle. Frontend events contain information about items and totals you can use to build advanced workflows.
As you move through checkout, Paddle creates and updates entities in your account. Webhooks fire each time an entity is created or updated.
For provisioning and order fulfillment, these core webhooks are useful:
| Webhook | Useful for |
|---|---|
transaction.created | Transactions handle capturing payment and calculating revenue. Paddle Checkout creates a transaction, then updates it as the customer enters information and completes payment. |
customer.created | When a customer enters their email address, Paddle creates a customer for you. |
address.created | When a customer enters their country and ZIP/postal code, Paddle creates an address related to this customer. |
business.created | If a customer chooses to enter a tax/VAT number, Paddle creates a business. The option to add a tax number is presented in regions that require it, like most of Europe. |
transaction.paid | When payment goes through successfully, the transaction status changes to paid. At this point you can be sure the customer paid and start provisioning. |
subscription.created | If a checkout is for recurring items, Paddle automatically creates a subscription for the customer, address, and business. Status is active or trialing, depending on the items on the subscription. |
transaction.completed | Once payment is received and a subscription is created, Paddle continues processing — adding subscription details, an invoice number, and information about fees, payouts, and earnings. |
If you don't see webhooks in Hookdeck Console, check the notification destination in Paddle to see if they were sent and whether they're queued for retry.
Common problems
Check that:
- You set up a notification destination correctly. Your webhook endpoint should look like
https://hkdk.events/azz5twg6es4g41, nothttps://console.hookdeck.com/. - Usage type is set to platform only or both. The simulation-only option only works with the webhook simulator.
- All events are checked.
- Hookdeck accepted your webhooks. Go to Paddle > Notifications, click the button next to your destination, and choose View logs .
Pick a starting point
If you'd rather skip the framework-agnostic walkthrough and start from a working app or a specific SDK, pick a starting point:
Starter kits
Deploy a complete Paddle + Supabase + Vercel app. Includes a three-tier subscriptions, customer portal, webhook handling.
The recommended starter for mobile apps. Includes marketing, legal, and pricing pages built in.
Backend SDK quickstarts
Install the Paddle Node SDK, initialize a client, and make your first request.
Install the Paddle Python SDK — recommended for AI, data, and internal tooling.
Install the Paddle Go SDK — designed for scale and context.Context-aware backends.
Install the Paddle PHP SDK. Using Laravel? Use Cashier Paddle instead.
Next steps
That's it. Now you've covered the basics, we recommend starting your integration or learning more about the Paddle platform.
Pre-flight checks before going live with Paddle. Make sure your integration is ready.
Move from sandbox to live and start accepting real payments on Paddle.
Let customers self-serve: manage their subscriptions and payments.
Minimize churn with dunning, payment recovery, and cancellation flows.