Use webhook simulator to send test webhooks for single events or predefined scenarios without triggering real transactions.
Before you begin
Create a notification destination where the type is url (webhook), if you haven't already.
Only destinations with the Usage type (traffic_source) of Platform and simulation (all) or Simulation (simulation) work with webhook simulator. Platform destinations can only receive traffic for real events to avoid sending simulated data to production endpoints.
Use an AI agent
Create a simulation
- Go to Paddle > Developer tools > Simulations.
- Click New simulation .
- Choose where to send simulated events using the Destination dropdown box. You can create a new notification destination if you don't already have one.
- Enter a descriptive name for your simulation. You can customize payloads to send specific data, so a descriptive name helps you to identify this simulation.
- Click the Single event or Scenario tab, then choose the simulated data you want to receive.
- Click Create when you're done.

Create a simulation using the API in two steps:
- List simulation types
Query the API to learn about the events and scenarios you can simulate. - Create your simulation
Build and send a request with the event or scenario you want to simulate.
List simulation types Optional
Simulation types are events and scenarios that Paddle can send simulated events for.
Send a GET request to the /simulation-types endpoint to get a list of all simulation types. Review the response and extract data[].name for the event or scenario you want to simulate.
{ "data": [ { "name": "subscription_creation", "label": "Subscription created from a checkout", "description": "Occurs when a subscription is created.", "group": "Subscription", "type": "scenario", "events": [ "transaction.created", "customer.created", "address.created", "transaction.updated", "transaction.ready", "transaction.updated", "transaction.paid", "subscription.created", "subscription.activated", "transaction.updated", "transaction.updated", "transaction.completed" ] }, { "name": "subscription_renewal", "label": "Subscription renewed successfully", "description": "Occurs when a subscription is renewed.", "group": "Subscription", "type": "scenario", "events": [ "subscription.updated", "transaction.created", "transaction.billed", "transaction.updated", "transaction.paid", "transaction.updated", "transaction.completed" ] }, { "name": "subscription_pause", "label": "Subscription paused by customer", "description": "Occurs when a subscription is paused.", "group": "Subscription", "type": "scenario", "events": ["subscription.updated", "subscription.paused"] }, { "name": "subscription_resume", "label": "Subscription resumed after being paused", "description": "Occurs when a subscription is resumed after being paused.", "group": "Subscription", "type": "scenario", "events": [ "subscription.updated", "subscription.resumed", "transaction.created", "transaction.billed", "transaction.updated", "transaction.paid", "transaction.updated", "transaction.completed" ] }, { "name": "subscription_cancellation", "label": "Subscription canceled by customer", "description": "Occurs when a subscription is canceled.", "group": "Subscription", "type": "scenario", "events": ["subscription.updated", "subscription.canceled"] }, { "name": "subscription.activated", "label": "subscription.activated", "description": "Occurs when a subscription becomes active. Its status field changes to active. This means any trial period has elapsed and Paddle has successfully billed the customer.", "group": "Subscription", "type": "single_event", "events": ["subscription.activated"] }, { "name": "subscription.canceled", "label": "subscription.canceled", "description": "Occurs when a subscription is canceled. Its status field changes to canceled.", "group": "Subscription", "type": "single_event", "events": ["subscription.canceled"] }, { "name": "subscription.created", "label": "subscription.created", "description": "Occurs when a subscription is created. subscription.trialing or subscription.activated typically follow.", "group": "Subscription", "type": "single_event", "events": ["subscription.created"] }, { "name": "subscription.past_due", "label": "subscription.past_due", "description": "Occurs when a subscription has an unpaid transaction. Its status changes to past_due.", "group": "Subscription", "type": "single_event", "events": ["subscription.past_due"] }, { "name": "subscription.paused", "label": "subscription.paused", "description": "Occurs when a subscription is paused. Its status field changes to paused.", "group": "Subscription", "type": "single_event", "events": ["subscription.paused"] }, { "name": "subscription.resumed", "label": "subscription.resumed", "description": "Occurs when a subscription is resumed after being paused. Its status field changes to active.", "group": "Subscription", "type": "single_event", "events": ["subscription.resumed"] }, { "name": "subscription.trialing", "label": "subscription.trialing", "description": "Occurs when a subscription enters trial period.", "group": "Subscription", "type": "single_event", "events": ["subscription.trialing"] }, { "name": "subscription.updated", "label": "subscription.updated", "description": "Occurs when a subscription is updated.", "group": "Subscription", "type": "single_event", "events": ["subscription.updated"] }, { "name": "subscription.imported", "label": "subscription.imported", "description": "Occurs when a subscription is imported.", "group": "Subscription", "type": "single_event", "events": ["subscription.imported"] }, { "name": "address.created", "label": "address.created", "description": "Occurs when an address is created.", "group": "Address", "type": "single_event", "events": ["address.created"] }, { "name": "address.updated", "label": "address.updated", "description": "Occurs when an address is updated.", "group": "Address", "type": "single_event", "events": ["address.updated"] }, { "name": "address.imported", "label": "address.imported", "description": "Occurs when a address is imported.", "group": "Address", "type": "single_event", "events": ["address.imported"] }, { "name": "adjustment.created", "label": "adjustment.created", "description": "Occurs when an adjustment is created.", "group": "Adjustment", "type": "single_event", "events": ["adjustment.created"] }, { "name": "adjustment.updated", "label": "adjustment.updated", "description": "Occurs when an adjustment is updated, the only time an adjustment will be updated is when the status changes from pending to approved or from pending to rejected.", "group": "Adjustment", "type": "single_event", "events": ["adjustment.updated"] }, { "name": "business.created", "label": "business.created", "description": "Occurs when a business is created.", "group": "Business", "type": "single_event", "events": ["business.created"] }, { "name": "business.updated", "label": "business.updated", "description": "Occurs when a business is updated.", "group": "Business", "type": "single_event", "events": ["business.updated"] }, { "name": "business.imported", "label": "business.imported", "description": "Occurs when a business is imported.", "group": "Business", "type": "single_event", "events": ["business.imported"] }, { "name": "customer.created", "label": "customer.created", "description": "Occurs when a customer is created.", "group": "Customer", "type": "single_event", "events": ["customer.created"] }, { "name": "customer.updated", "label": "customer.updated", "description": "Occurs when a customer is updated.", "group": "Customer", "type": "single_event", "events": ["customer.updated"] }, { "name": "customer.imported", "label": "customer.imported", "description": "Occurs when a customer is imported.", "group": "Customer", "type": "single_event", "events": ["customer.imported"] }, { "name": "discount.created", "label": "discount.created", "description": "Occurs when a discount is created.", "group": "Discount", "type": "single_event", "events": ["discount.created"] }, { "name": "discount.updated", "label": "discount.updated", "description": "Occurs when a discount is updated.", "group": "Discount", "type": "single_event", "events": ["discount.updated"] }, { "name": "discount.imported", "label": "discount.imported", "description": "Occurs when a discount is imported.", "group": "Discount", "type": "single_event", "events": ["discount.imported"] }, { "name": "payout.created", "label": "payout.created", "description": "Occurs when a payout is created.", "group": "Payout", "type": "single_event", "events": ["payout.created"] }, { "name": "payout.paid", "label": "payout.paid", "description": "Occurs when a payout is paid.", "group": "Payout", "type": "single_event", "events": ["payout.paid"] }, { "name": "price.created", "label": "price.created", "description": "Occurs when a price is created.", "group": "Price", "type": "single_event", "events": ["price.created"] }, { "name": "price.updated", "label": "price.updated", "description": "Occurs when a price is updated.", "group": "Price", "type": "single_event", "events": ["price.updated"] }, { "name": "price.imported", "label": "price.imported", "description": "Occurs when a price is imported.", "group": "Price", "type": "single_event", "events": ["price.imported"] }, { "name": "product.created", "label": "product.created", "description": "Occurs when a product is created.", "group": "Product", "type": "single_event", "events": ["product.created"] }, { "name": "product.updated", "label": "product.updated", "description": "Occurs when a product is updated.", "group": "Product", "type": "single_event", "events": ["product.updated"] }, { "name": "product.imported", "label": "product.imported", "description": "Occurs when a product is imported.", "group": "Product", "type": "single_event", "events": ["product.imported"] }, { "name": "report.created", "label": "report.created", "description": "Occurs when a report is created.", "group": "Report", "type": "single_event", "events": ["report.created"] }, { "name": "report.updated", "label": "report.updated", "description": "Occurs when a report is updated.", "group": "Report", "type": "single_event", "events": ["report.updated"] }, { "name": "transaction.billed", "label": "transaction.billed", "description": "Occurs when a transaction is billed. Its status field changes to billed and billed_at is populated.", "group": "Transaction", "type": "single_event", "events": ["transaction.billed"] }, { "name": "transaction.canceled", "label": "transaction.canceled", "description": "Occurs when a transaction is canceled. Its status field changes to canceled.", "group": "Transaction", "type": "single_event", "events": ["transaction.canceled"] }, { "name": "transaction.completed", "label": "transaction.completed", "description": "Occurs when a transaction is completed. Its status field changes to completed.", "group": "Transaction", "type": "single_event", "events": ["transaction.completed"] }, { "name": "transaction.created", "label": "transaction.created", "description": "Occurs when a transaction is created.", "group": "Transaction", "type": "single_event", "events": ["transaction.created"] }, { "name": "transaction.paid", "label": "transaction.paid", "description": "Occurs when a transaction is paid. Its status field changes to paid.", "group": "Transaction", "type": "single_event", "events": ["transaction.paid"] }, { "name": "transaction.past_due", "label": "transaction.past_due", "description": "Occurs when a transaction becomes past due. Its status field changes to past_due.", "group": "Transaction", "type": "single_event", "events": ["transaction.past_due"] }, { "name": "transaction.payment_failed", "label": "transaction.payment_failed", "description": "Occurs when a payment fails for a transaction. The payments array is updated with details of the payment attempt.", "group": "Transaction", "type": "single_event", "events": ["transaction.payment_failed"] }, { "name": "transaction.ready", "label": "transaction.ready", "description": "Occurs when a transaction is ready to be billed. Its status field changes to ready.", "group": "Transaction", "type": "single_event", "events": ["transaction.ready"] }, { "name": "transaction.updated", "label": "transaction.updated", "description": "Occurs when a transaction is updated.", "group": "Transaction", "type": "single_event", "events": ["transaction.updated"] } ], "meta": { "request_id": "76905a23-8206-44ca-8821-7237b26f59d1" }}Create your simulation
Build a request that includes:
notification_setting_id: the Paddle ID of a notification destination withtraffic_sourceofsimulationorall.type: the name of the simulation type you want to simulate.name(optional): a descriptive name. If omitted, Paddle uses the event or scenario name.
For single event simulations, you can also include a payload object to simulate a specific payload. To learn more, see Customize a simulation payload.
{ "notification_setting_id": "ntfset_01j82d983j814ypzx7m1fw2jpz", "type": "subscription_creation", "name": "New signup from pricing page"}{ "data": { "id": "ntfsim_01j82zcm3ffc0pyvvb9tjsbvec", "notification_setting_id": "ntfset_01j82d983j814ypzx7m1fw2jpz", "name": "New signup from pricing page", "type": "subscription_creation", "status": "active", "payload": null, "last_run_at": null, "created_at": "2024-09-18T16:28:01.519675Z", "updated_at": "2024-09-18T16:28:01.519675Z" }, "meta": { "request_id": "aafc3dca-ac50-4fc3-a164-4cdda2626cfa" }}Configure a simulation Scenarios only
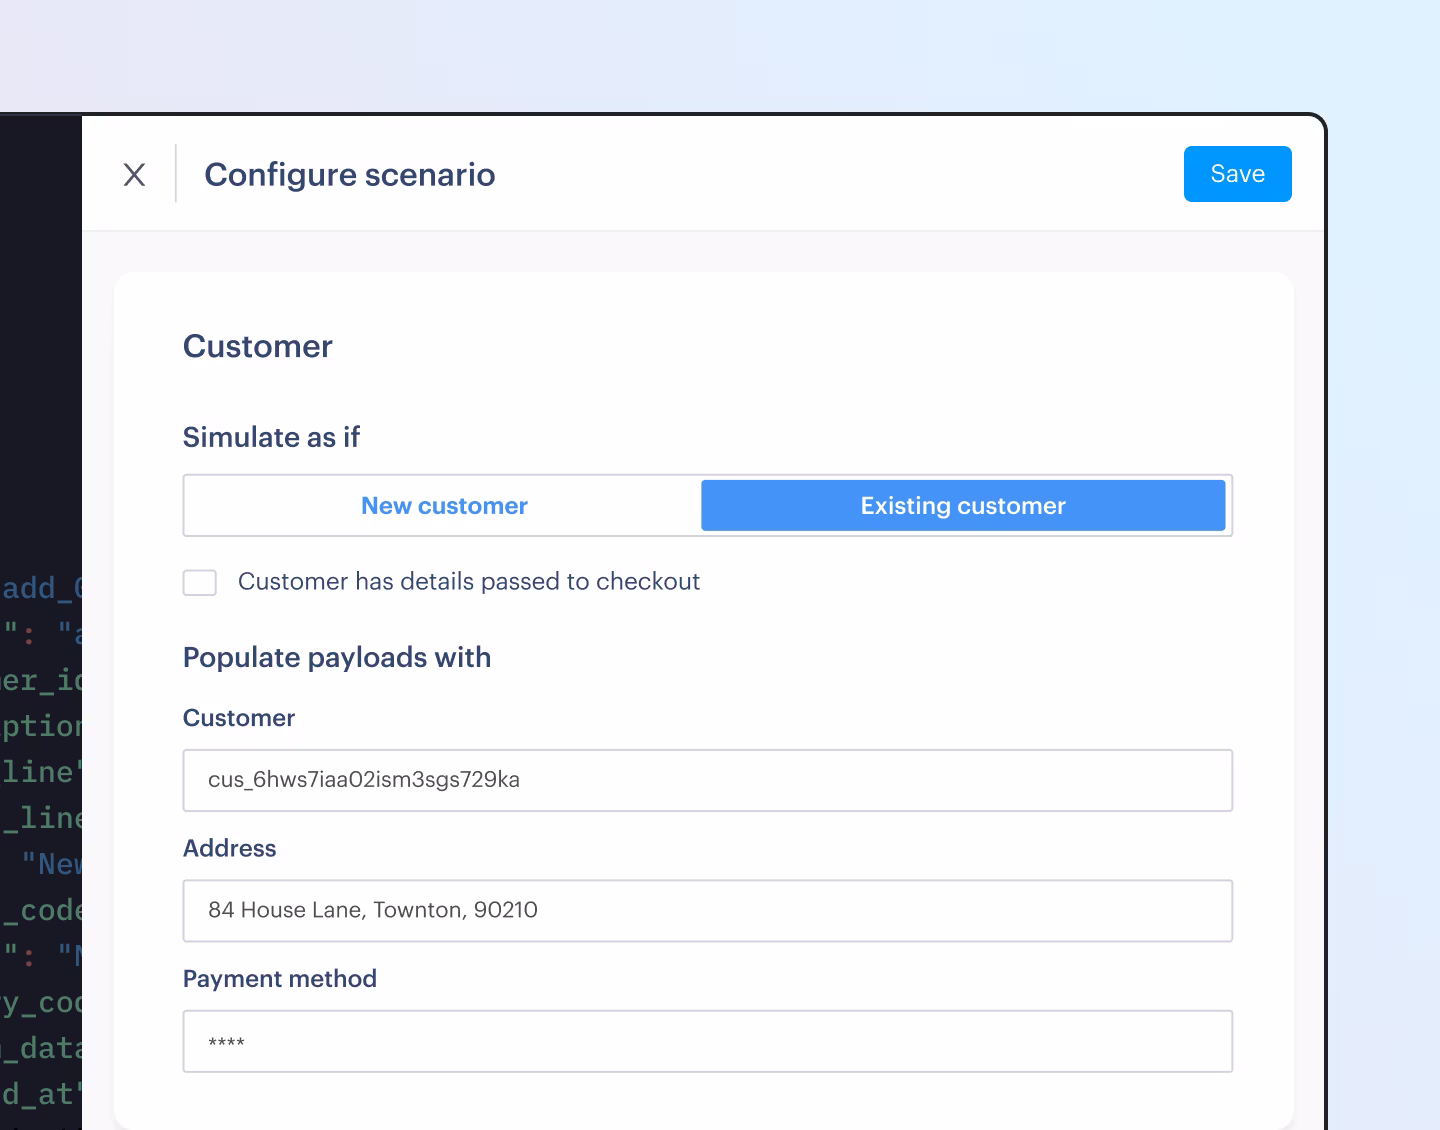
You can configure scenarios to populate simulated webhook payloads with real data and test different flows.
This only customizes scenario event simulations. For single event simulations, you can customize payloads after you've run a simulation.
- Go to Paddle > Developer tools > Simulations.
- Find your simulation in the list, then click the button and choose View . If you haven't already created a simulation, create one instead.
- Click Configure simulation .
- Select from Simulate as if options to simulate which events are sent as if that use-case happened.
- Add Paddle IDs in Populate payloads with fields to populate sent event payloads with the details of those entities.
- Click Done when you're done.
- Run the simulation to send events.
Send a PATCH request to the /simulations/{simulation_id} endpoint that includes a config object with entities and options for your scenario.
Each scenario type has its own configuration object — provide the one that matches your simulation's type.
- Entities let you populate simulated webhook payloads with your real data.
- Options let you control what flow happens in the specific scenario.
This example updates a subscription renewal scenario simulation where events are simulated as if:
- Payment fails when renewing
- The subscription pauses when all payment recovery attempts are exhausted
- Payloads for all simulated events use details from the provided subscription
If successful, Paddle updates the simulation entity with your configuration.
{ "notification_setting_id": "ntfset_01j82d983j814ypzx7m1fw2jpz", "name": "Update a subscription renewal scenario simulation with config", "type": "subscription_renewal", "config": { "subscription_renewal": { "entities": { "subscription_id": "sub_01h04vsc0qhwtsbsxh3422wjs4" }, "options": { "payment_outcome": "failed", "dunning_exhausted_action": "subscription_paused" } } }}{ "data": { "id": "ntfsim_01j82g2mggsgjpb3mjg0xq6p5k", "notification_setting_id": "ntfset_01j82d983j814ypzx7m1fw2jpz", "name": "Update a subscription renewal scenario simulation with config", "type": "subscription_renewal", "status": "active", "config": { "subscription_renewal": { "entities": { "subscription_id": "sub_01h04vsc0qhwtsbsxh3422wjs4" }, "options": { "payment_outcome": "failed", "dunning_exhausted_action": "subscription_paused" } } }, "last_run_at": null, "created_at": "2025-03-03T12:00:25.616392Z", "updated_at": "2025-02-03T12:00:25.616392Z" }, "meta": { "request_id": "72351248-13bf-45be-befe-b3a5b5234588" }}Run a simulation
- Go to Paddle > Developer tools > Simulations.
- Find your simulation in the list, then click the button and choose View . If you haven't already created a simulation, create one instead.
- Click Run simulation to run your simulation. If you've already run your simulation before, click Replay to run it again.
- Use the Payload, Request, and Response tabs to work with simulated events.

You can verify signatures for your simulation to check that events are genuinely sent by Paddle. Click View more to reveal your webhook secret key.
Send a POST request to the /simulations/{simulation_id}/runs endpoint. If successful, Paddle creates a simulation run entity and sends the simulated events.
You can verify signatures for simulated events to check that they're genuinely sent by Paddle and to test your signature verification logic.
{ "data": { "id": "ntfsimrun_01j82zmt9ejr5h7nd7a6a6henj", "status": "pending", "type": "subscription_creation", "created_at": "2024-09-18T16:32:29.998659Z", "updated_at": "2024-09-18T16:32:29.998659Z" }, "meta": { "request_id": "fb26a99c-2c03-45d8-ba2e-56ffeeaf5f39" }}Customize a simulation payload Single events only
You can customize the payload for a single event simulation to send specific data as part of your request. Paddle saves your simulated data, so you can use it in the future.
This only customizes payloads for single event simulations. For scenario simulations, you can populate payloads with existing Paddle entities by configuring those simulations.
- Go to Paddle > Developer tools > Simulations.
- Find your simulation in the list, then click the button and choose View . If you haven't already created a simulation, create one instead.
- If you haven't run your simulation before, run it.
- Click the Payload tab in the preview pane, then click the payload to start editing.
- Click Replay to run your simulation with the customized payload.

Paddle checks the data you enter is valid JSON and that values for fields are the correct type. However, you can still enter incorrect data, like passing transaction totals that don't add up correctly.
Send a PATCH request to the /simulations/{simulation_id} endpoint that includes a payload object. Your custom payload should match the schema for the event type — for example, if simulating address.created, your payload should match the address entity.
Set payload to null to clear. Paddle sends a sample payload in future runs.
If successful, Paddle updates the simulation entity with your custom payload.
{ "type": "address.created", "payload": { "id": "add_01hv8gq3318ktkfengj2r75gfx", "city": "New York", "region": "NY", "status": "active", "created_at": "2024-04-12T06:42:58.785Z", "first_line": "4050 Jefferson Plaza, 41st Floor", "updated_at": "2024-04-12T06:42:58.785Z", "custom_data": null, "customer_id": "ctm_01hv6y1jedq4p1n0yqn5ba3ky4", "description": "Head Office", "import_meta": null, "postal_code": "10021", "second_line": null, "country_code": "US" }}{ "data": { "id": "ntfsim_01j8fnpwf9rdqvqsczz5vnq5ry", "notification_setting_id": "ntfset_01j84xydheq48n3btebwf6ndn6", "name": "Create US address in CRM", "type": "address.created", "status": "active", "payload": { "id": "add_01hv8gq3318ktkfengj2r75gfx", "city": "New York", "region": "NY", "status": "active", "created_at": "2024-04-12T06:42:58.785Z", "first_line": "4050 Jefferson Plaza, 41st Floor", "updated_at": "2024-04-12T06:42:58.785Z", "custom_data": null, "customer_id": "ctm_01hv6y1jedq4p1n0yqn5ba3ky4", "description": "Head Office", "import_meta": null, "postal_code": "10021", "second_line": null, "country_code": "US" }, "last_run_at": null, "created_at": "2024-09-23T14:48:59.625987Z", "updated_at": "2024-09-23T14:52:02.386744Z" }, "meta": { "request_id": "30bb5f90-3ca6-4926-821e-d7c19190d19e" }}Work with simulated events
Paddle creates a simulation run event for the event or events that are part of a simulation.
- Go to Paddle > Developer tools > Simulations.
- Find your simulation in the list, then click the button and choose View . If you haven't already created a simulation, create one instead.
- If you haven't run your simulation before, run it.
- Inspect the Payload, Request, and Response using the tabs in the preview pane. If you're working with a scenario, click the events on the left to see information about a single event sent as part of this scenario.

- Payload
-
The simulated data sent by Paddle. Returned by the
dataobject in simulated events. - Request
-
The complete simulated event request sent by Paddle. Includes simulated fields for the event, like
occurred_atandevent_id. - Response
-
The status code and body of the response received from the destination server. May be blank where a body isn't returned.
Send a GET request to the /simulations/{simulation_id}/runs/{simulation_run_id}/events endpoint. If successful, the response includes the simulated data sent by Paddle and information about responses from your destination server.
{ "data": [ { "id": "ntfsimevt_01j82zmtqgpfpphj5236f884tx", "status": "success", "event_type": "transaction.completed", "payload": { "id": "txn_01hv8wptq8987qeep44cyrewp9", "items": [ { "price": { "id": "pri_01gsz8x8sawmvhz1pv30nge1ke", "name": "Monthly (per seat)", "type": "standard", "status": "active", "quantity": { "maximum": 999, "minimum": 1 }, "tax_mode": "account_setting", "created_at": "2023-02-23T13:55:22.538367Z", "product_id": "pro_01gsz4t5hdjse780zja8vvr7jg", "unit_price": { "amount": "3000", "currency_code": "USD" }, "updated_at": "2024-04-11T13:54:52.254748Z", "custom_data": null, "description": "Monthly", "import_meta": null, "trial_period": null, "billing_cycle": { "interval": "month", "frequency": 1 }, "unit_price_overrides": [] }, "quantity": 10, "proration": null }, { "price": { "id": "pri_01h1vjfevh5etwq3rb416a23h2", "name": "Monthly (recurring addon)", "type": "standard", "status": "active", "quantity": { "maximum": 100, "minimum": 1 }, "tax_mode": "account_setting", "created_at": "2023-06-01T13:31:12.625056Z", "product_id": "pro_01h1vjes1y163xfj1rh1tkfb65", "unit_price": { "amount": "10000", "currency_code": "USD" }, "updated_at": "2024-04-09T07:23:00.907834Z", "custom_data": null, "description": "Monthly", "import_meta": null, "trial_period": null, "billing_cycle": { "interval": "month", "frequency": 1 }, "unit_price_overrides": [] }, "quantity": 1, "proration": null }, { "price": { "id": "pri_01gsz98e27ak2tyhexptwc58yk", "name": "One-time addon", "type": "standard", "status": "active", "quantity": { "maximum": 1, "minimum": 1 }, "tax_mode": "account_setting", "created_at": "2023-02-23T14:01:28.391712Z", "product_id": "pro_01gsz97mq9pa4fkyy0wqenepkz", "unit_price": { "amount": "19900", "currency_code": "USD" }, "updated_at": "2024-04-09T07:23:10.921392Z", "custom_data": null, "description": "One-time addon", "import_meta": null, "trial_period": null, "billing_cycle": null, "unit_price_overrides": [] }, "quantity": 1, "proration": null } ], "origin": "web", "status": "completed", "details": { "totals": { "fee": "3311", "tax": "5315", "total": "65215", "credit": "0", "balance": "0", "discount": "0", "earnings": "56589", "subtotal": "59900", "grand_total": "65215", "currency_code": "USD", "credit_to_balance": "0" }, "line_items": [ { "id": "txnitm_01hv8wt98jahpbm1t1tzr06z6n", "totals": { "tax": "2662", "total": "32662", "discount": "0", "subtotal": "30000" }, "product": { "id": "pro_01gsz4t5hdjse780zja8vvr7jg", "name": "AeroEdit Pro", "type": "standard", "status": "active", "image_url": "https://paddle.s3.amazonaws.com/user/165798/bT1XUOJAQhOUxGs83cbk_pro.png", "created_at": "2023-02-23T12:43:46.605Z", "updated_at": "2024-04-05T15:53:44.687Z", "custom_data": { "features": { "sso": false, "route_planning": true, "payment_by_invoice": false, "aircraft_performance": true, "compliance_monitoring": true, "flight_log_management": true }, "suggested_addons": [ "pro_01h1vjes1y163xfj1rh1tkfb65", "pro_01gsz97mq9pa4fkyy0wqenepkz" ], "upgrade_description": "Move from Basic to Pro to take advantage of aircraft performance, advanced route planning, and compliance monitoring." }, "description": "Designed for professional pilots, including all features plus in Basic plus compliance monitoring, route optimization, and third-party integrations.", "import_meta": null, "tax_category": "standard" }, "price_id": "pri_01gsz8x8sawmvhz1pv30nge1ke", "quantity": 10, "tax_rate": "0.08875", "unit_totals": { "tax": "266", "total": "3266", "discount": "0", "subtotal": "3000" } }, { "id": "txnitm_01hv8wt98jahpbm1t1v1sd067y", "totals": { "tax": "887", "total": "10887", "discount": "0", "subtotal": "10000" }, "product": { "id": "pro_01h1vjes1y163xfj1rh1tkfb65", "name": "Analytics addon", "type": "standard", "status": "active", "image_url": "https://paddle.s3.amazonaws.com/user/165798/97dRpA6SXzcE6ekK9CAr_analytics.png", "created_at": "2023-06-01T13:30:50.302Z", "updated_at": "2024-04-05T15:47:17.163Z", "custom_data": null, "description": "Unlock advanced insights into your flight data with enhanced analytics and reporting features. Includes customizable reporting templates and trend analysis across flights.", "import_meta": null, "tax_category": "standard" }, "price_id": "pri_01h1vjfevh5etwq3rb416a23h2", "quantity": 1, "tax_rate": "0.08875", "unit_totals": { "tax": "887", "total": "10887", "discount": "0", "subtotal": "10000" } }, { "id": "txnitm_01hv8wt98jahpbm1t1v67vqnb6", "totals": { "tax": "1766", "total": "21666", "discount": "0", "subtotal": "19900" }, "product": { "id": "pro_01gsz97mq9pa4fkyy0wqenepkz", "name": "Custom domains", "type": "standard", "status": "active", "image_url": "https://paddle.s3.amazonaws.com/user/165798/XIG7UXoJQHmlIAiKcnkA_custom-domains.png", "created_at": "2023-02-23T14:01:02.441Z", "updated_at": "2024-04-05T15:43:28.971Z", "custom_data": null, "description": "Make AeroEdit truly your own with custom domains. Custom domains reinforce your brand identity and make it easy for your team to access your account.", "import_meta": null, "tax_category": "standard" }, "price_id": "pri_01gsz98e27ak2tyhexptwc58yk", "quantity": 1, "tax_rate": "0.08875", "unit_totals": { "tax": "1766", "total": "21666", "discount": "0", "subtotal": "19900" } } ], "payout_totals": { "fee": "3311", "tax": "5315", "total": "65215", "credit": "0", "balance": "0", "discount": "0", "earnings": "56589", "subtotal": "59900", "grand_total": "65215", "currency_code": "USD", "credit_to_balance": "0" }, "tax_rates_used": [ { "totals": { "tax": "5315", "total": "65215", "discount": "0", "subtotal": "59900" }, "tax_rate": "0.08875" } ], "adjusted_totals": { "fee": "3311", "tax": "5315", "total": "65215", "earnings": "56589", "subtotal": "59900", "grand_total": "65215", "currency_code": "USD" } }, "checkout": { "url": "https://aeroedit.com/pay?_ptxn=txn_01hv8wptq8987qeep44cyrewp9" }, "payments": [ { "amount": "65215", "status": "captured", "created_at": "2024-04-12T10:18:33.579142Z", "error_code": null, "captured_at": "2024-04-12T10:18:47.635628Z", "method_details": { "card": { "type": "visa", "last4": "3184", "expiry_year": 2025, "expiry_month": 1, "cardholder_name": "Michael McGovern" }, "type": "card" }, "payment_method_id": "paymtd_01hv8x1tpjfnttxddw73xnqx6s", "payment_attempt_id": "937640dd-e3dc-40df-a16c-bb75aafd8f71", "stored_payment_method_id": "281ff2ca-8550-42b9-bf39-15948e7de62d" }, { "amount": "65215", "status": "error", "created_at": "2024-04-12T10:15:57.888183Z", "error_code": "declined", "captured_at": null, "method_details": { "card": { "type": "visa", "last4": "0002", "expiry_year": 2025, "expiry_month": 1, "cardholder_name": "Michael McGovern" }, "type": "card" }, "payment_method_id": "paymtd_01hv8wx2mka7dfsqjjsxh1ne7z", "payment_attempt_id": "8f72cfa6-26b4-4a57-91dc-8f2708f7822d", "stored_payment_method_id": "a78ece50-356f-4e0c-b72d-ad5368b0a0d9" } ], "billed_at": "2024-04-12T10:18:48.294633Z", "address_id": "add_01hv8gq3318ktkfengj2r75gfx", "created_at": "2024-04-12T10:12:33.2014Z", "invoice_id": "inv_01hv8x29nsh54c2pgt0hnq0zkx", "updated_at": "2024-04-12T10:18:49.738971238Z", "business_id": null, "custom_data": null, "customer_id": "ctm_01hv6y1jedq4p1n0yqn5ba3ky4", "discount_id": null, "currency_code": "USD", "billing_period": { "ends_at": "2024-05-12T10:18:47.635628Z", "starts_at": "2024-04-12T10:18:47.635628Z" }, "invoice_number": "325-10566", "billing_details": null, "collection_mode": "automatic", "subscription_id": "sub_01hv8x29kz0t586xy6zn1a62ny" }, "request": { "body": "{\"event_id\":\"ntfsimevt_01j82zmtqgpfpphj5236f884tx\",\"event_type\":\"transaction.completed\",\"occurred_at\":\"2024-09-18T16:32:30.448740Z\",\"data\":{\"id\":\"txn_01hv8wptq8987qeep44cyrewp9\",\"items\":[{\"price\":{\"id\":\"pri_01gsz8x8sawmvhz1pv30nge1ke\",\"name\":\"Monthly (per seat)\",\"type\":\"standard\",\"status\":\"active\",\"quantity\":{\"maximum\":999,\"minimum\":1},\"tax_mode\":\"account_setting\",\"created_at\":\"2023-02-23T13:55:22.538367Z\",\"product_id\":\"pro_01gsz4t5hdjse780zja8vvr7jg\",\"unit_price\":{\"amount\":\"3000\",\"currency_code\":\"USD\"},\"updated_at\":\"2024-04-11T13:54:52.254748Z\",\"custom_data\":null,\"description\":\"Monthly\",\"import_meta\":null,\"trial_period\":null,\"billing_cycle\":{\"interval\":\"month\",\"frequency\":1},\"unit_price_overrides\":[]},\"quantity\":10,\"proration\":null},{\"price\":{\"id\":\"pri_01h1vjfevh5etwq3rb416a23h2\",\"name\":\"Monthly (recurring addon)\",\"type\":\"standard\",\"status\":\"active\",\"quantity\":{\"maximum\":100,\"minimum\":1},\"tax_mode\":\"account_setting\",\"created_at\":\"2023-06-01T13:31:12.625056Z\",\"product_id\":\"pro_01h1vjes1y163xfj1rh1tkfb65\",\"unit_price\":{\"amount\":\"10000\",\"currency_code\":\"USD\"},\"updated_at\":\"2024-04-09T07:23:00.907834Z\",\"custom_data\":null,\"description\":\"Monthly\",\"import_meta\":null,\"trial_period\":null,\"billing_cycle\":{\"interval\":\"month\",\"frequency\":1},\"unit_price_overrides\":[]},\"quantity\":1,\"proration\":null},{\"price\":{\"id\":\"pri_01gsz98e27ak2tyhexptwc58yk\",\"name\":\"One-time addon\",\"type\":\"standard\",\"status\":\"active\",\"quantity\":{\"maximum\":1,\"minimum\":1},\"tax_mode\":\"account_setting\",\"created_at\":\"2023-02-23T14:01:28.391712Z\",\"product_id\":\"pro_01gsz97mq9pa4fkyy0wqenepkz\",\"unit_price\":{\"amount\":\"19900\",\"currency_code\":\"USD\"},\"updated_at\":\"2024-04-09T07:23:10.921392Z\",\"custom_data\":null,\"description\":\"One-time addon\",\"import_meta\":null,\"trial_period\":null,\"billing_cycle\":null,\"unit_price_overrides\":[]},\"quantity\":1,\"proration\":null}],\"origin\":\"web\",\"status\":\"completed\",\"details\":{\"totals\":{\"fee\":\"3311\",\"tax\":\"5315\",\"total\":\"65215\",\"credit\":\"0\",\"balance\":\"0\",\"discount\":\"0\",\"earnings\":\"56589\",\"subtotal\":\"59900\",\"grand_total\":\"65215\",\"currency_code\":\"USD\",\"credit_to_balance\":\"0\"},\"line_items\":[{\"id\":\"txnitm_01hv8wt98jahpbm1t1tzr06z6n\",\"totals\":{\"tax\":\"2662\",\"total\":\"32662\",\"discount\":\"0\",\"subtotal\":\"30000\"},\"product\":{\"id\":\"pro_01gsz4t5hdjse780zja8vvr7jg\",\"name\":\"AeroEdit Pro\",\"type\":\"standard\",\"status\":\"active\",\"image_url\":\"https://paddle.s3.amazonaws.com/user/165798/bT1XUOJAQhOUxGs83cbk_pro.png\",\"created_at\":\"2023-02-23T12:43:46.605Z\",\"updated_at\":\"2024-04-05T15:53:44.687Z\",\"custom_data\":{\"features\":{\"sso\":false,\"route_planning\":true,\"payment_by_invoice\":false,\"aircraft_performance\":true,\"compliance_monitoring\":true,\"flight_log_management\":true},\"suggested_addons\":[\"pro_01h1vjes1y163xfj1rh1tkfb65\",\"pro_01gsz97mq9pa4fkyy0wqenepkz\"],\"upgrade_description\":\"Move from Basic to Pro to take advantage of aircraft performance, advanced route planning, and compliance monitoring.\"},\"description\":\"Designed for professional pilots, including all features plus in Basic plus compliance monitoring, route optimization, and third-party integrations.\",\"import_meta\":null,\"tax_category\":\"standard\"},\"price_id\":\"pri_01gsz8x8sawmvhz1pv30nge1ke\",\"quantity\":10,\"tax_rate\":\"0.08875\",\"unit_totals\":{\"tax\":\"266\",\"total\":\"3266\",\"discount\":\"0\",\"subtotal\":\"3000\"}},{\"id\":\"txnitm_01hv8wt98jahpbm1t1v1sd067y\",\"totals\":{\"tax\":\"887\",\"total\":\"10887\",\"discount\":\"0\",\"subtotal\":\"10000\"},\"product\":{\"id\":\"pro_01h1vjes1y163xfj1rh1tkfb65\",\"name\":\"Analytics addon\",\"type\":\"standard\",\"status\":\"active\",\"image_url\":\"https://paddle.s3.amazonaws.com/user/165798/97dRpA6SXzcE6ekK9CAr_analytics.png\",\"created_at\":\"2023-06-01T13:30:50.302Z\",\"updated_at\":\"2024-04-05T15:47:17.163Z\",\"custom_data\":null,\"description\":\"Unlock advanced insights into your flight data with enhanced analytics and reporting features. Includes customizable reporting templates and trend analysis across flights.\",\"import_meta\":null,\"tax_category\":\"standard\"},\"price_id\":\"pri_01h1vjfevh5etwq3rb416a23h2\",\"quantity\":1,\"tax_rate\":\"0.08875\",\"unit_totals\":{\"tax\":\"887\",\"total\":\"10887\",\"discount\":\"0\",\"subtotal\":\"10000\"}},{\"id\":\"txnitm_01hv8wt98jahpbm1t1v67vqnb6\",\"totals\":{\"tax\":\"1766\",\"total\":\"21666\",\"discount\":\"0\",\"subtotal\":\"19900\"},\"product\":{\"id\":\"pro_01gsz97mq9pa4fkyy0wqenepkz\",\"name\":\"Custom domains\",\"type\":\"standard\",\"status\":\"active\",\"image_url\":\"https://paddle.s3.amazonaws.com/user/165798/XIG7UXoJQHmlIAiKcnkA_custom-domains.png\",\"created_at\":\"2023-02-23T14:01:02.441Z\",\"updated_at\":\"2024-04-05T15:43:28.971Z\",\"custom_data\":null,\"description\":\"Make AeroEdit truly your own with custom domains. Custom domains reinforce your brand identity and make it easy for your team to access your account.\",\"import_meta\":null,\"tax_category\":\"standard\"},\"price_id\":\"pri_01gsz98e27ak2tyhexptwc58yk\",\"quantity\":1,\"tax_rate\":\"0.08875\",\"unit_totals\":{\"tax\":\"1766\",\"total\":\"21666\",\"discount\":\"0\",\"subtotal\":\"19900\"}}],\"payout_totals\":{\"fee\":\"3311\",\"tax\":\"5315\",\"total\":\"65215\",\"credit\":\"0\",\"balance\":\"0\",\"discount\":\"0\",\"earnings\":\"56589\",\"subtotal\":\"59900\",\"grand_total\":\"65215\",\"currency_code\":\"USD\",\"credit_to_balance\":\"0\"},\"tax_rates_used\":[{\"totals\":{\"tax\":\"5315\",\"total\":\"65215\",\"discount\":\"0\",\"subtotal\":\"59900\"},\"tax_rate\":\"0.08875\"}],\"adjusted_totals\":{\"fee\":\"3311\",\"tax\":\"5315\",\"total\":\"65215\",\"earnings\":\"56589\",\"subtotal\":\"59900\",\"grand_total\":\"65215\",\"currency_code\":\"USD\"}},\"checkout\":{\"url\":\"https://aeroedit.com/pay?_ptxn=txn_01hv8wptq8987qeep44cyrewp9\"},\"payments\":[{\"amount\":\"65215\",\"status\":\"captured\",\"created_at\":\"2024-04-12T10:18:33.579142Z\",\"error_code\":null,\"captured_at\":\"2024-04-12T10:18:47.635628Z\",\"method_details\":{\"card\":{\"type\":\"visa\",\"last4\":\"3184\",\"expiry_year\":2025,\"expiry_month\":1,\"cardholder_name\":\"Michael McGovern\"},\"type\":\"card\"},\"payment_method_id\":\"paymtd_01hv8x1tpjfnttxddw73xnqx6s\",\"payment_attempt_id\":\"937640dd-e3dc-40df-a16c-bb75aafd8f71\",\"stored_payment_method_id\":\"281ff2ca-8550-42b9-bf39-15948e7de62d\"},{\"amount\":\"65215\",\"status\":\"error\",\"created_at\":\"2024-04-12T10:15:57.888183Z\",\"error_code\":\"declined\",\"captured_at\":null,\"method_details\":{\"card\":{\"type\":\"visa\",\"last4\":\"0002\",\"expiry_year\":2025,\"expiry_month\":1,\"cardholder_name\":\"Michael McGovern\"},\"type\":\"card\"},\"payment_method_id\":\"paymtd_01hv8wx2mka7dfsqjjsxh1ne7z\",\"payment_attempt_id\":\"8f72cfa6-26b4-4a57-91dc-8f2708f7822d\",\"stored_payment_method_id\":\"a78ece50-356f-4e0c-b72d-ad5368b0a0d9\"}],\"billed_at\":\"2024-04-12T10:18:48.294633Z\",\"address_id\":\"add_01hv8gq3318ktkfengj2r75gfx\",\"created_at\":\"2024-04-12T10:12:33.2014Z\",\"invoice_id\":\"inv_01hv8x29nsh54c2pgt0hnq0zkx\",\"updated_at\":\"2024-04-12T10:18:49.738971238Z\",\"business_id\":null,\"custom_data\":null,\"customer_id\":\"ctm_01hv6y1jedq4p1n0yqn5ba3ky4\",\"discount_id\":null,\"currency_code\":\"USD\",\"billing_period\":{\"ends_at\":\"2024-05-12T10:18:47.635628Z\",\"starts_at\":\"2024-04-12T10:18:47.635628Z\"},\"invoice_number\":\"325-10566\",\"billing_details\":null,\"collection_mode\":\"automatic\",\"subscription_id\":\"sub_01hv8x29kz0t586xy6zn1a62ny\"}}", "headers": { "Paddle-Version": 1 } }, "response": { "body": "{\"status\":\"NOTICE\",\"message\":\"Unknown source ID. If you just created that source, it can take a minute to propagate. Be assured that if the source is valid, the webhook was handled successfully. Check your dashboard to inspect the request: https://dashboard.hookdeck.com/\",\"request_id\":\"req_dly5Ma8jxGZpJCEDP96V\"}", "statusCode": 200, "headers": { "Date": ["Wed, 18 Sep 2024 16:32:41 GMT"], "CF-RAY": ["8c52bbc4ee1bc9b5-IAD"], "Server": ["cloudflare"], "Connection": ["keep-alive"], "Content-Type": ["application/json"], "Content-Length": ["346"], "Access-Control-Max-Age": ["86400"], "Access-Control-Allow-Origin": ["*"], "Access-Control-Allow-Methods": [ "GET, HEAD, PUT, PATCH, DELETE, POST, OPTIONS" ] } }, "created_at": "2024-09-18T16:32:30.448740Z", "updated_at": "2024-09-18T16:32:41.776318Z" }, { "id": "ntfsimevt_01j82zmtq2zkgc1f29jwcc1ddk", "status": "success", "event_type": "transaction.updated", "payload": { "id": "txn_01hv8wptq8987qeep44cyrewp9", "items": [ { "price": { "id": "pri_01gsz8x8sawmvhz1pv30nge1ke", "name": "Monthly (per seat)", "type": "standard", "status": "active", "quantity": { "maximum": 999, "minimum": 1 }, "tax_mode": "account_setting", "created_at": "2023-02-23T13:55:22.538367Z", "product_id": "pro_01gsz4t5hdjse780zja8vvr7jg", "unit_price": { "amount": "3000", "currency_code": "USD" }, "updated_at": "2024-04-11T13:54:52.254748Z", "custom_data": null, "description": "Monthly", "import_meta": null, "trial_period": null, "billing_cycle": { "interval": "month", "frequency": 1 }, "unit_price_overrides": [] }, "quantity": 10, "proration": null }, { "price": { "id": "pri_01h1vjfevh5etwq3rb416a23h2", "name": "Monthly (recurring addon)", "type": "standard", "status": "active", "quantity": { "maximum": 100, "minimum": 1 }, "tax_mode": "account_setting", "created_at": "2023-06-01T13:31:12.625056Z", "product_id": "pro_01h1vjes1y163xfj1rh1tkfb65", "unit_price": { "amount": "10000", "currency_code": "USD" }, "updated_at": "2024-04-09T07:23:00.907834Z", "custom_data": null, "description": "Monthly", "import_meta": null, "trial_period": null, "billing_cycle": { "interval": "month", "frequency": 1 }, "unit_price_overrides": [] }, "quantity": 1, "proration": null }, { "price": { "id": "pri_01gsz98e27ak2tyhexptwc58yk", "name": "One-time addon", "type": "standard", "status": "active", "quantity": { "maximum": 1, "minimum": 1 }, "tax_mode": "account_setting", "created_at": "2023-02-23T14:01:28.391712Z", "product_id": "pro_01gsz97mq9pa4fkyy0wqenepkz", "unit_price": { "amount": "19900", "currency_code": "USD" }, "updated_at": "2024-04-09T07:23:10.921392Z", "custom_data": null, "description": "One-time addon", "import_meta": null, "trial_period": null, "billing_cycle": null, "unit_price_overrides": [] }, "quantity": 1, "proration": null } ], "origin": "web", "status": "completed", "details": { "totals": { "fee": "3311", "tax": "5315", "total": "65215", "credit": "0", "balance": "0", "discount": "0", "earnings": "56589", "subtotal": "59900", "grand_total": "65215", "currency_code": "USD", "credit_to_balance": "0" }, "line_items": [ { "id": "txnitm_01hv8wt98jahpbm1t1tzr06z6n", "totals": { "tax": "2662", "total": "32662", "discount": "0", "subtotal": "30000" }, "product": { "id": "pro_01gsz4t5hdjse780zja8vvr7jg", "name": "AeroEdit Pro", "type": "standard", "status": "active", "image_url": "https://paddle.s3.amazonaws.com/user/165798/bT1XUOJAQhOUxGs83cbk_pro.png", "created_at": "2023-02-23T12:43:46.605Z", "updated_at": "2024-04-05T15:53:44.687Z", "custom_data": { "features": { "sso": false, "route_planning": true, "payment_by_invoice": false, "aircraft_performance": true, "compliance_monitoring": true, "flight_log_management": true }, "suggested_addons": [ "pro_01h1vjes1y163xfj1rh1tkfb65", "pro_01gsz97mq9pa4fkyy0wqenepkz" ], "upgrade_description": "Move from Basic to Pro to take advantage of aircraft performance, advanced route planning, and compliance monitoring." }, "description": "Designed for professional pilots, including all features plus in Basic plus compliance monitoring, route optimization, and third-party integrations.", "import_meta": null, "tax_category": "standard" }, "price_id": "pri_01gsz8x8sawmvhz1pv30nge1ke", "quantity": 10, "tax_rate": "0.08875", "unit_totals": { "tax": "266", "total": "3266", "discount": "0", "subtotal": "3000" } }, { "id": "txnitm_01hv8wt98jahpbm1t1v1sd067y", "totals": { "tax": "887", "total": "10887", "discount": "0", "subtotal": "10000" }, "product": { "id": "pro_01h1vjes1y163xfj1rh1tkfb65", "name": "Analytics addon", "type": "standard", "status": "active", "image_url": "https://paddle.s3.amazonaws.com/user/165798/97dRpA6SXzcE6ekK9CAr_analytics.png", "created_at": "2023-06-01T13:30:50.302Z", "updated_at": "2024-04-05T15:47:17.163Z", "custom_data": null, "description": "Unlock advanced insights into your flight data with enhanced analytics and reporting features. Includes customizable reporting templates and trend analysis across flights.", "import_meta": null, "tax_category": "standard" }, "price_id": "pri_01h1vjfevh5etwq3rb416a23h2", "quantity": 1, "tax_rate": "0.08875", "unit_totals": { "tax": "887", "total": "10887", "discount": "0", "subtotal": "10000" } }, { "id": "txnitm_01hv8wt98jahpbm1t1v67vqnb6", "totals": { "tax": "1766", "total": "21666", "discount": "0", "subtotal": "19900" }, "product": { "id": "pro_01gsz97mq9pa4fkyy0wqenepkz", "name": "Custom domains", "type": "standard", "status": "active", "image_url": "https://paddle.s3.amazonaws.com/user/165798/XIG7UXoJQHmlIAiKcnkA_custom-domains.png", "created_at": "2023-02-23T14:01:02.441Z", "updated_at": "2024-04-05T15:43:28.971Z", "custom_data": null, "description": "Make AeroEdit truly your own with custom domains. Custom domains reinforce your brand identity and make it easy for your team to access your account.", "import_meta": null, "tax_category": "standard" }, "price_id": "pri_01gsz98e27ak2tyhexptwc58yk", "quantity": 1, "tax_rate": "0.08875", "unit_totals": { "tax": "1766", "total": "21666", "discount": "0", "subtotal": "19900" } } ], "payout_totals": { "fee": "3311", "tax": "5315", "total": "65215", "credit": "0", "balance": "0", "discount": "0", "earnings": "56589", "subtotal": "59900", "grand_total": "65215", "currency_code": "USD", "credit_to_balance": "0" }, "tax_rates_used": [ { "totals": { "tax": "5315", "total": "65215", "discount": "0", "subtotal": "59900" }, "tax_rate": "0.08875" } ], "adjusted_totals": { "fee": "3311", "tax": "5315", "total": "65215", "earnings": "56589", "subtotal": "59900", "grand_total": "65215", "currency_code": "USD" } }, "checkout": { "url": "https://aeroedit.com/pay?_ptxn=txn_01hv8wptq8987qeep44cyrewp9" }, "payments": [ { "amount": "65215", "status": "captured", "created_at": "2024-04-12T10:18:33.579142Z", "error_code": null, "captured_at": "2024-04-12T10:18:47.635628Z", "method_details": { "card": { "type": "visa", "last4": "3184", "expiry_year": 2025, "expiry_month": 1, "cardholder_name": "Michael McGovern" }, "type": "card" }, "payment_method_id": "paymtd_01hv8x1tpjfnttxddw73xnqx6s", "payment_attempt_id": "937640dd-e3dc-40df-a16c-bb75aafd8f71", "stored_payment_method_id": "281ff2ca-8550-42b9-bf39-15948e7de62d" }, { "amount": "65215", "status": "error", "created_at": "2024-04-12T10:15:57.888183Z", "error_code": "declined", "captured_at": null, "method_details": { "card": { "type": "visa", "last4": "0002", "expiry_year": 2025, "expiry_month": 1, "cardholder_name": "Michael McGovern" }, "type": "card" }, "payment_method_id": "paymtd_01hv8wx2mka7dfsqjjsxh1ne7z", "payment_attempt_id": "8f72cfa6-26b4-4a57-91dc-8f2708f7822d", "stored_payment_method_id": "a78ece50-356f-4e0c-b72d-ad5368b0a0d9" } ], "billed_at": "2024-04-12T10:18:48.294633Z", "address_id": "add_01hv8gq3318ktkfengj2r75gfx", "created_at": "2024-04-12T10:12:33.2014Z", "invoice_id": "inv_01hv8x29nsh54c2pgt0hnq0zkx", "updated_at": "2024-04-12T10:18:49.738971238Z", "business_id": null, "custom_data": null, "customer_id": "ctm_01hv6y1jedq4p1n0yqn5ba3ky4", "discount_id": null, "currency_code": "USD", "billing_period": { "ends_at": "2024-05-12T10:18:47.635628Z", "starts_at": "2024-04-12T10:18:47.635628Z" }, "invoice_number": "325-10566", "billing_details": null, "collection_mode": "automatic", "subscription_id": "sub_01hv8x29kz0t586xy6zn1a62ny" }, "request": { "body": "{\"event_id\":\"ntfsimevt_01j82zmtq2zkgc1f29jwcc1ddk\",\"event_type\":\"transaction.updated\",\"occurred_at\":\"2024-09-18T16:32:30.434824Z\",\"data\":{\"id\":\"txn_01hv8wptq8987qeep44cyrewp9\",\"items\":[{\"price\":{\"id\":\"pri_01gsz8x8sawmvhz1pv30nge1ke\",\"name\":\"Monthly (per seat)\",\"type\":\"standard\",\"status\":\"active\",\"quantity\":{\"maximum\":999,\"minimum\":1},\"tax_mode\":\"account_setting\",\"created_at\":\"2023-02-23T13:55:22.538367Z\",\"product_id\":\"pro_01gsz4t5hdjse780zja8vvr7jg\",\"unit_price\":{\"amount\":\"3000\",\"currency_code\":\"USD\"},\"updated_at\":\"2024-04-11T13:54:52.254748Z\",\"custom_data\":null,\"description\":\"Monthly\",\"import_meta\":null,\"trial_period\":null,\"billing_cycle\":{\"interval\":\"month\",\"frequency\":1},\"unit_price_overrides\":[]},\"quantity\":10,\"proration\":null},{\"price\":{\"id\":\"pri_01h1vjfevh5etwq3rb416a23h2\",\"name\":\"Monthly (recurring addon)\",\"type\":\"standard\",\"status\":\"active\",\"quantity\":{\"maximum\":100,\"minimum\":1},\"tax_mode\":\"account_setting\",\"created_at\":\"2023-06-01T13:31:12.625056Z\",\"product_id\":\"pro_01h1vjes1y163xfj1rh1tkfb65\",\"unit_price\":{\"amount\":\"10000\",\"currency_code\":\"USD\"},\"updated_at\":\"2024-04-09T07:23:00.907834Z\",\"custom_data\":null,\"description\":\"Monthly\",\"import_meta\":null,\"trial_period\":null,\"billing_cycle\":{\"interval\":\"month\",\"frequency\":1},\"unit_price_overrides\":[]},\"quantity\":1,\"proration\":null},{\"price\":{\"id\":\"pri_01gsz98e27ak2tyhexptwc58yk\",\"name\":\"One-time addon\",\"type\":\"standard\",\"status\":\"active\",\"quantity\":{\"maximum\":1,\"minimum\":1},\"tax_mode\":\"account_setting\",\"created_at\":\"2023-02-23T14:01:28.391712Z\",\"product_id\":\"pro_01gsz97mq9pa4fkyy0wqenepkz\",\"unit_price\":{\"amount\":\"19900\",\"currency_code\":\"USD\"},\"updated_at\":\"2024-04-09T07:23:10.921392Z\",\"custom_data\":null,\"description\":\"One-time addon\",\"import_meta\":null,\"trial_period\":null,\"billing_cycle\":null,\"unit_price_overrides\":[]},\"quantity\":1,\"proration\":null}],\"origin\":\"web\",\"status\":\"completed\",\"details\":{\"totals\":{\"fee\":\"3311\",\"tax\":\"5315\",\"total\":\"65215\",\"credit\":\"0\",\"balance\":\"0\",\"discount\":\"0\",\"earnings\":\"56589\",\"subtotal\":\"59900\",\"grand_total\":\"65215\",\"currency_code\":\"USD\",\"credit_to_balance\":\"0\"},\"line_items\":[{\"id\":\"txnitm_01hv8wt98jahpbm1t1tzr06z6n\",\"totals\":{\"tax\":\"2662\",\"total\":\"32662\",\"discount\":\"0\",\"subtotal\":\"30000\"},\"product\":{\"id\":\"pro_01gsz4t5hdjse780zja8vvr7jg\",\"name\":\"AeroEdit Pro\",\"type\":\"standard\",\"status\":\"active\",\"image_url\":\"https://paddle.s3.amazonaws.com/user/165798/bT1XUOJAQhOUxGs83cbk_pro.png\",\"created_at\":\"2023-02-23T12:43:46.605Z\",\"updated_at\":\"2024-04-05T15:53:44.687Z\",\"custom_data\":{\"features\":{\"sso\":false,\"route_planning\":true,\"payment_by_invoice\":false,\"aircraft_performance\":true,\"compliance_monitoring\":true,\"flight_log_management\":true},\"suggested_addons\":[\"pro_01h1vjes1y163xfj1rh1tkfb65\",\"pro_01gsz97mq9pa4fkyy0wqenepkz\"],\"upgrade_description\":\"Move from Basic to Pro to take advantage of aircraft performance, advanced route planning, and compliance monitoring.\"},\"description\":\"Designed for professional pilots, including all features plus in Basic plus compliance monitoring, route optimization, and third-party integrations.\",\"import_meta\":null,\"tax_category\":\"standard\"},\"price_id\":\"pri_01gsz8x8sawmvhz1pv30nge1ke\",\"quantity\":10,\"tax_rate\":\"0.08875\",\"unit_totals\":{\"tax\":\"266\",\"total\":\"3266\",\"discount\":\"0\",\"subtotal\":\"3000\"}},{\"id\":\"txnitm_01hv8wt98jahpbm1t1v1sd067y\",\"totals\":{\"tax\":\"887\",\"total\":\"10887\",\"discount\":\"0\",\"subtotal\":\"10000\"},\"product\":{\"id\":\"pro_01h1vjes1y163xfj1rh1tkfb65\",\"name\":\"Analytics addon\",\"type\":\"standard\",\"status\":\"active\",\"image_url\":\"https://paddle.s3.amazonaws.com/user/165798/97dRpA6SXzcE6ekK9CAr_analytics.png\",\"created_at\":\"2023-06-01T13:30:50.302Z\",\"updated_at\":\"2024-04-05T15:47:17.163Z\",\"custom_data\":null,\"description\":\"Unlock advanced insights into your flight data with enhanced analytics and reporting features. Includes customizable reporting templates and trend analysis across flights.\",\"import_meta\":null,\"tax_category\":\"standard\"},\"price_id\":\"pri_01h1vjfevh5etwq3rb416a23h2\",\"quantity\":1,\"tax_rate\":\"0.08875\",\"unit_totals\":{\"tax\":\"887\",\"total\":\"10887\",\"discount\":\"0\",\"subtotal\":\"10000\"}},{\"id\":\"txnitm_01hv8wt98jahpbm1t1v67vqnb6\",\"totals\":{\"tax\":\"1766\",\"total\":\"21666\",\"discount\":\"0\",\"subtotal\":\"19900\"},\"product\":{\"id\":\"pro_01gsz97mq9pa4fkyy0wqenepkz\",\"name\":\"Custom domains\",\"type\":\"standard\",\"status\":\"active\",\"image_url\":\"https://paddle.s3.amazonaws.com/user/165798/XIG7UXoJQHmlIAiKcnkA_custom-domains.png\",\"created_at\":\"2023-02-23T14:01:02.441Z\",\"updated_at\":\"2024-04-05T15:43:28.971Z\",\"custom_data\":null,\"description\":\"Make AeroEdit truly your own with custom domains. Custom domains reinforce your brand identity and make it easy for your team to access your account.\",\"import_meta\":null,\"tax_category\":\"standard\"},\"price_id\":\"pri_01gsz98e27ak2tyhexptwc58yk\",\"quantity\":1,\"tax_rate\":\"0.08875\",\"unit_totals\":{\"tax\":\"1766\",\"total\":\"21666\",\"discount\":\"0\",\"subtotal\":\"19900\"}}],\"payout_totals\":{\"fee\":\"3311\",\"tax\":\"5315\",\"total\":\"65215\",\"credit\":\"0\",\"balance\":\"0\",\"discount\":\"0\",\"earnings\":\"56589\",\"subtotal\":\"59900\",\"grand_total\":\"65215\",\"currency_code\":\"USD\",\"credit_to_balance\":\"0\"},\"tax_rates_used\":[{\"totals\":{\"tax\":\"5315\",\"total\":\"65215\",\"discount\":\"0\",\"subtotal\":\"59900\"},\"tax_rate\":\"0.08875\"}],\"adjusted_totals\":{\"fee\":\"3311\",\"tax\":\"5315\",\"total\":\"65215\",\"earnings\":\"56589\",\"subtotal\":\"59900\",\"grand_total\":\"65215\",\"currency_code\":\"USD\"}},\"checkout\":{\"url\":\"https://aeroedit.com/pay?_ptxn=txn_01hv8wptq8987qeep44cyrewp9\"},\"payments\":[{\"amount\":\"65215\",\"status\":\"captured\",\"created_at\":\"2024-04-12T10:18:33.579142Z\",\"error_code\":null,\"captured_at\":\"2024-04-12T10:18:47.635628Z\",\"method_details\":{\"card\":{\"type\":\"visa\",\"last4\":\"3184\",\"expiry_year\":2025,\"expiry_month\":1,\"cardholder_name\":\"Michael McGovern\"},\"type\":\"card\"},\"payment_method_id\":\"paymtd_01hv8x1tpjfnttxddw73xnqx6s\",\"payment_attempt_id\":\"937640dd-e3dc-40df-a16c-bb75aafd8f71\",\"stored_payment_method_id\":\"281ff2ca-8550-42b9-bf39-15948e7de62d\"},{\"amount\":\"65215\",\"status\":\"error\",\"created_at\":\"2024-04-12T10:15:57.888183Z\",\"error_code\":\"declined\",\"captured_at\":null,\"method_details\":{\"card\":{\"type\":\"visa\",\"last4\":\"0002\",\"expiry_year\":2025,\"expiry_month\":1,\"cardholder_name\":\"Michael McGovern\"},\"type\":\"card\"},\"payment_method_id\":\"paymtd_01hv8wx2mka7dfsqjjsxh1ne7z\",\"payment_attempt_id\":\"8f72cfa6-26b4-4a57-91dc-8f2708f7822d\",\"stored_payment_method_id\":\"a78ece50-356f-4e0c-b72d-ad5368b0a0d9\"}],\"billed_at\":\"2024-04-12T10:18:48.294633Z\",\"address_id\":\"add_01hv8gq3318ktkfengj2r75gfx\",\"created_at\":\"2024-04-12T10:12:33.2014Z\",\"invoice_id\":\"inv_01hv8x29nsh54c2pgt0hnq0zkx\",\"updated_at\":\"2024-04-12T10:18:49.738971238Z\",\"business_id\":null,\"custom_data\":null,\"customer_id\":\"ctm_01hv6y1jedq4p1n0yqn5ba3ky4\",\"discount_id\":null,\"currency_code\":\"USD\",\"billing_period\":{\"ends_at\":\"2024-05-12T10:18:47.635628Z\",\"starts_at\":\"2024-04-12T10:18:47.635628Z\"},\"invoice_number\":\"325-10566\",\"billing_details\":null,\"collection_mode\":\"automatic\",\"subscription_id\":\"sub_01hv8x29kz0t586xy6zn1a62ny\"}}", "headers": { "Paddle-Version": 1 } }, "response": { "body": "{\"status\":\"NOTICE\",\"message\":\"Unknown source ID. If you just created that source, it can take a minute to propagate. Be assured that if the source is valid, the webhook was handled successfully. Check your dashboard to inspect the request: https://dashboard.hookdeck.com/\",\"request_id\":\"req_SShgUwPwriiCbTAfx2WD\"}", "statusCode": 200, "headers": { "Date": ["Wed, 18 Sep 2024 16:32:40 GMT"], "CF-RAY": ["8c52bbbf2ab8c971-IAD"], "Server": ["cloudflare"], "Connection": ["keep-alive"], "Content-Type": ["application/json"], "Content-Length": ["346"], "Access-Control-Max-Age": ["86400"], "Access-Control-Allow-Origin": ["*"], "Access-Control-Allow-Methods": [ "GET, HEAD, PUT, PATCH, DELETE, POST, OPTIONS" ] } }, "created_at": "2024-09-18T16:32:30.434824Z", "updated_at": "2024-09-18T16:32:40.892153Z" }, { "id": "ntfsimevt_01j82zmtpmfd5v4bhajxs43hce", "status": "success", "event_type": "transaction.updated", "payload": { "id": "txn_01hv8wptq8987qeep44cyrewp9", "items": [ { "price": { "id": "pri_01gsz8x8sawmvhz1pv30nge1ke", "name": "Monthly (per seat)", "type": "standard", "status": "active", "quantity": { "maximum": 999, "minimum": 1 }, "tax_mode": "account_setting", "created_at": "2023-02-23T13:55:22.538367Z", "product_id": "pro_01gsz4t5hdjse780zja8vvr7jg", "unit_price": { "amount": "3000", "currency_code": "USD" }, "updated_at": "2024-04-11T13:54:52.254748Z", "custom_data": null, "description": "Monthly", "import_meta": null, "trial_period": null, "billing_cycle": { "interval": "month", "frequency": 1 }, "unit_price_overrides": [] }, "quantity": 10, "proration": null }, { "price": { "id": "pri_01h1vjfevh5etwq3rb416a23h2", "name": "Monthly (recurring addon)", "type": "standard", "status": "active", "quantity": { "maximum": 100, "minimum": 1 }, "tax_mode": "account_setting", "created_at": "2023-06-01T13:31:12.625056Z", "product_id": "pro_01h1vjes1y163xfj1rh1tkfb65", "unit_price": { "amount": "10000", "currency_code": "USD" }, "updated_at": "2024-04-09T07:23:00.907834Z", "custom_data": null, "description": "Monthly", "import_meta": null, "trial_period": null, "billing_cycle": { "interval": "month", "frequency": 1 }, "unit_price_overrides": [] }, "quantity": 1, "proration": null }, { "price": { "id": "pri_01gsz98e27ak2tyhexptwc58yk", "name": "One-time addon", "type": "standard", "status": "active", "quantity": { "maximum": 1, "minimum": 1 }, "tax_mode": "account_setting", "created_at": "2023-02-23T14:01:28.391712Z", "product_id": "pro_01gsz97mq9pa4fkyy0wqenepkz", "unit_price": { "amount": "19900", "currency_code": "USD" }, "updated_at": "2024-04-09T07:23:10.921392Z", "custom_data": null, "description": "One-time addon", "import_meta": null, "trial_period": null, "billing_cycle": null, "unit_price_overrides": [] }, "quantity": 1, "proration": null } ], "origin": "web", "status": "paid", "details": { "totals": { "fee": "3311", "tax": "5315", "total": "65215", "credit": "0", "balance": "0", "discount": "0", "earnings": "56589", "subtotal": "59900", "grand_total": "65215", "currency_code": "USD", "credit_to_balance": "0" }, "line_items": [ { "id": "txnitm_01hv8wt98jahpbm1t1tzr06z6n", "totals": { "tax": "2662", "total": "32662", "discount": "0", "subtotal": "30000" }, "product": { "id": "pro_01gsz4t5hdjse780zja8vvr7jg", "name": "AeroEdit Pro", "type": "standard", "status": "active", "image_url": "https://paddle.s3.amazonaws.com/user/165798/bT1XUOJAQhOUxGs83cbk_pro.png", "created_at": "2023-02-23T12:43:46.605Z", "updated_at": "2024-04-05T15:53:44.687Z", "custom_data": { "features": { "sso": false, "route_planning": true, "payment_by_invoice": false, "aircraft_performance": true, "compliance_monitoring": true, "flight_log_management": true }, "suggested_addons": [ "pro_01h1vjes1y163xfj1rh1tkfb65", "pro_01gsz97mq9pa4fkyy0wqenepkz" ], "upgrade_description": "Move from Basic to Pro to take advantage of aircraft performance, advanced route planning, and compliance monitoring." }, "description": "Designed for professional pilots, including all features plus in Basic plus compliance monitoring, route optimization, and third-party integrations.", "import_meta": null, "tax_category": "standard" }, "price_id": "pri_01gsz8x8sawmvhz1pv30nge1ke", "quantity": 10, "tax_rate": "0.08875", "unit_totals": { "tax": "266", "total": "3266", "discount": "0", "subtotal": "3000" } }, { "id": "txnitm_01hv8wt98jahpbm1t1v1sd067y", "totals": { "tax": "887", "total": "10887", "discount": "0", "subtotal": "10000" }, "product": { "id": "pro_01h1vjes1y163xfj1rh1tkfb65", "name": "Analytics addon", "type": "standard", "status": "active", "image_url": "https://paddle.s3.amazonaws.com/user/165798/97dRpA6SXzcE6ekK9CAr_analytics.png", "created_at": "2023-06-01T13:30:50.302Z", "updated_at": "2024-04-05T15:47:17.163Z", "custom_data": null, "description": "Unlock advanced insights into your flight data with enhanced analytics and reporting features. Includes customizable reporting templates and trend analysis across flights.", "import_meta": null, "tax_category": "standard" }, "price_id": "pri_01h1vjfevh5etwq3rb416a23h2", "quantity": 1, "tax_rate": "0.08875", "unit_totals": { "tax": "887", "total": "10887", "discount": "0", "subtotal": "10000" } }, { "id": "txnitm_01hv8wt98jahpbm1t1v67vqnb6", "totals": { "tax": "1766", "total": "21666", "discount": "0", "subtotal": "19900" }, "product": { "id": "pro_01gsz97mq9pa4fkyy0wqenepkz", "name": "Custom domains", "type": "standard", "status": "active", "image_url": "https://paddle.s3.amazonaws.com/user/165798/XIG7UXoJQHmlIAiKcnkA_custom-domains.png", "created_at": "2023-02-23T14:01:02.441Z", "updated_at": "2024-04-05T15:43:28.971Z", "custom_data": null, "description": "Make AeroEdit truly your own with custom domains. Custom domains reinforce your brand identity and make it easy for your team to access your account.", "import_meta": null, "tax_category": "standard" }, "price_id": "pri_01gsz98e27ak2tyhexptwc58yk", "quantity": 1, "tax_rate": "0.08875", "unit_totals": { "tax": "1766", "total": "21666", "discount": "0", "subtotal": "19900" } } ], "payout_totals": { "fee": "3311", "tax": "5315", "total": "65215", "credit": "0", "balance": "0", "discount": "0", "earnings": "56589", "subtotal": "59900", "grand_total": "65215", "currency_code": "USD", "credit_to_balance": "0" }, "tax_rates_used": [ { "totals": { "tax": "5315", "total": "65215", "discount": "0", "subtotal": "59900" }, "tax_rate": "0.08875" } ], "adjusted_totals": { "fee": "3311", "tax": "5315", "total": "65215", "earnings": "56589", "subtotal": "59900", "grand_total": "65215", "currency_code": "USD" } }, "checkout": { "url": "https://aeroedit.com/pay?_ptxn=txn_01hv8wptq8987qeep44cyrewp9" }, "payments": [ { "amount": "65215", "status": "captured", "created_at": "2024-04-12T10:18:33.579142Z", "error_code": null, "captured_at": "2024-04-12T10:18:47.635628Z", "method_details": { "card": { "type": "visa", "last4": "3184", "expiry_year": 2025, "expiry_month": 1, "cardholder_name": "Michael McGovern" }, "type": "card" }, "payment_method_id": "paymtd_01hv8x1tpjfnttxddw73xnqx6s", "payment_attempt_id": "937640dd-e3dc-40df-a16c-bb75aafd8f71", "stored_payment_method_id": "281ff2ca-8550-42b9-bf39-15948e7de62d" }, { "amount": "65215", "status": "error", "created_at": "2024-04-12T10:15:57.888183Z", "error_code": "declined", "captured_at": null, "method_details": { "card": { "type": "visa", "last4": "0002", "expiry_year": 2025, "expiry_month": 1, "cardholder_name": "Michael McGovern" }, "type": "card" }, "payment_method_id": "paymtd_01hv8wx2mka7dfsqjjsxh1ne7z", "payment_attempt_id": "8f72cfa6-26b4-4a57-91dc-8f2708f7822d", "stored_payment_method_id": "a78ece50-356f-4e0c-b72d-ad5368b0a0d9" } ], "billed_at": "2024-04-12T10:18:48.294633Z", "address_id": "add_01hv8gq3318ktkfengj2r75gfx", "created_at": "2024-04-12T10:12:33.2014Z", "invoice_id": "inv_01hv8x29nsh54c2pgt0hnq0zkx", "updated_at": "2024-04-12T10:18:49.738971238Z", "business_id": null, "custom_data": null, "customer_id": "ctm_01hv6y1jedq4p1n0yqn5ba3ky4", "discount_id": null, "currency_code": "USD", "billing_period": { "ends_at": "2024-05-12T10:18:47.635628Z", "starts_at": "2024-04-12T10:18:47.635628Z" }, "invoice_number": "325-10566", "billing_details": null, "collection_mode": "automatic", "subscription_id": "sub_01hv8x29kz0t586xy6zn1a62ny" }, "request": { "body": "{\"event_id\":\"ntfsimevt_01j82zmtpmfd5v4bhajxs43hce\",\"event_type\":\"transaction.updated\",\"occurred_at\":\"2024-09-18T16:32:30.420614Z\",\"data\":{\"id\":\"txn_01hv8wptq8987qeep44cyrewp9\",\"items\":[{\"price\":{\"id\":\"pri_01gsz8x8sawmvhz1pv30nge1ke\",\"name\":\"Monthly (per seat)\",\"type\":\"standard\",\"status\":\"active\",\"quantity\":{\"maximum\":999,\"minimum\":1},\"tax_mode\":\"account_setting\",\"created_at\":\"2023-02-23T13:55:22.538367Z\",\"product_id\":\"pro_01gsz4t5hdjse780zja8vvr7jg\",\"unit_price\":{\"amount\":\"3000\",\"currency_code\":\"USD\"},\"updated_at\":\"2024-04-11T13:54:52.254748Z\",\"custom_data\":null,\"description\":\"Monthly\",\"import_meta\":null,\"trial_period\":null,\"billing_cycle\":{\"interval\":\"month\",\"frequency\":1},\"unit_price_overrides\":[]},\"quantity\":10,\"proration\":null},{\"price\":{\"id\":\"pri_01h1vjfevh5etwq3rb416a23h2\",\"name\":\"Monthly (recurring addon)\",\"type\":\"standard\",\"status\":\"active\",\"quantity\":{\"maximum\":100,\"minimum\":1},\"tax_mode\":\"account_setting\",\"created_at\":\"2023-06-01T13:31:12.625056Z\",\"product_id\":\"pro_01h1vjes1y163xfj1rh1tkfb65\",\"unit_price\":{\"amount\":\"10000\",\"currency_code\":\"USD\"},\"updated_at\":\"2024-04-09T07:23:00.907834Z\",\"custom_data\":null,\"description\":\"Monthly\",\"import_meta\":null,\"trial_period\":null,\"billing_cycle\":{\"interval\":\"month\",\"frequency\":1},\"unit_price_overrides\":[]},\"quantity\":1,\"proration\":null},{\"price\":{\"id\":\"pri_01gsz98e27ak2tyhexptwc58yk\",\"name\":\"One-time addon\",\"type\":\"standard\",\"status\":\"active\",\"quantity\":{\"maximum\":1,\"minimum\":1},\"tax_mode\":\"account_setting\",\"created_at\":\"2023-02-23T14:01:28.391712Z\",\"product_id\":\"pro_01gsz97mq9pa4fkyy0wqenepkz\",\"unit_price\":{\"amount\":\"19900\",\"currency_code\":\"USD\"},\"updated_at\":\"2024-04-09T07:23:10.921392Z\",\"custom_data\":null,\"description\":\"One-time addon\",\"import_meta\":null,\"trial_period\":null,\"billing_cycle\":null,\"unit_price_overrides\":[]},\"quantity\":1,\"proration\":null}],\"origin\":\"web\",\"status\":\"paid\",\"details\":{\"totals\":{\"fee\":\"3311\",\"tax\":\"5315\",\"total\":\"65215\",\"credit\":\"0\",\"balance\":\"0\",\"discount\":\"0\",\"earnings\":\"56589\",\"subtotal\":\"59900\",\"grand_total\":\"65215\",\"currency_code\":\"USD\",\"credit_to_balance\":\"0\"},\"line_items\":[{\"id\":\"txnitm_01hv8wt98jahpbm1t1tzr06z6n\",\"totals\":{\"tax\":\"2662\",\"total\":\"32662\",\"discount\":\"0\",\"subtotal\":\"30000\"},\"product\":{\"id\":\"pro_01gsz4t5hdjse780zja8vvr7jg\",\"name\":\"AeroEdit Pro\",\"type\":\"standard\",\"status\":\"active\",\"image_url\":\"https://paddle.s3.amazonaws.com/user/165798/bT1XUOJAQhOUxGs83cbk_pro.png\",\"created_at\":\"2023-02-23T12:43:46.605Z\",\"updated_at\":\"2024-04-05T15:53:44.687Z\",\"custom_data\":{\"features\":{\"sso\":false,\"route_planning\":true,\"payment_by_invoice\":false,\"aircraft_performance\":true,\"compliance_monitoring\":true,\"flight_log_management\":true},\"suggested_addons\":[\"pro_01h1vjes1y163xfj1rh1tkfb65\",\"pro_01gsz97mq9pa4fkyy0wqenepkz\"],\"upgrade_description\":\"Move from Basic to Pro to take advantage of aircraft performance, advanced route planning, and compliance monitoring.\"},\"description\":\"Designed for professional pilots, including all features plus in Basic plus compliance monitoring, route optimization, and third-party integrations.\",\"import_meta\":null,\"tax_category\":\"standard\"},\"price_id\":\"pri_01gsz8x8sawmvhz1pv30nge1ke\",\"quantity\":10,\"tax_rate\":\"0.08875\",\"unit_totals\":{\"tax\":\"266\",\"total\":\"3266\",\"discount\":\"0\",\"subtotal\":\"3000\"}},{\"id\":\"txnitm_01hv8wt98jahpbm1t1v1sd067y\",\"totals\":{\"tax\":\"887\",\"total\":\"10887\",\"discount\":\"0\",\"subtotal\":\"10000\"},\"product\":{\"id\":\"pro_01h1vjes1y163xfj1rh1tkfb65\",\"name\":\"Analytics addon\",\"type\":\"standard\",\"status\":\"active\",\"image_url\":\"https://paddle.s3.amazonaws.com/user/165798/97dRpA6SXzcE6ekK9CAr_analytics.png\",\"created_at\":\"2023-06-01T13:30:50.302Z\",\"updated_at\":\"2024-04-05T15:47:17.163Z\",\"custom_data\":null,\"description\":\"Unlock advanced insights into your flight data with enhanced analytics and reporting features. Includes customizable reporting templates and trend analysis across flights.\",\"import_meta\":null,\"tax_category\":\"standard\"},\"price_id\":\"pri_01h1vjfevh5etwq3rb416a23h2\",\"quantity\":1,\"tax_rate\":\"0.08875\",\"unit_totals\":{\"tax\":\"887\",\"total\":\"10887\",\"discount\":\"0\",\"subtotal\":\"10000\"}},{\"id\":\"txnitm_01hv8wt98jahpbm1t1v67vqnb6\",\"totals\":{\"tax\":\"1766\",\"total\":\"21666\",\"discount\":\"0\",\"subtotal\":\"19900\"},\"product\":{\"id\":\"pro_01gsz97mq9pa4fkyy0wqenepkz\",\"name\":\"Custom domains\",\"type\":\"standard\",\"status\":\"active\",\"image_url\":\"https://paddle.s3.amazonaws.com/user/165798/XIG7UXoJQHmlIAiKcnkA_custom-domains.png\",\"created_at\":\"2023-02-23T14:01:02.441Z\",\"updated_at\":\"2024-04-05T15:43:28.971Z\",\"custom_data\":null,\"description\":\"Make AeroEdit truly your own with custom domains. Custom domains reinforce your brand identity and make it easy for your team to access your account.\",\"import_meta\":null,\"tax_category\":\"standard\"},\"price_id\":\"pri_01gsz98e27ak2tyhexptwc58yk\",\"quantity\":1,\"tax_rate\":\"0.08875\",\"unit_totals\":{\"tax\":\"1766\",\"total\":\"21666\",\"discount\":\"0\",\"subtotal\":\"19900\"}}],\"payout_totals\":{\"fee\":\"3311\",\"tax\":\"5315\",\"total\":\"65215\",\"credit\":\"0\",\"balance\":\"0\",\"discount\":\"0\",\"earnings\":\"56589\",\"subtotal\":\"59900\",\"grand_total\":\"65215\",\"currency_code\":\"USD\",\"credit_to_balance\":\"0\"},\"tax_rates_used\":[{\"totals\":{\"tax\":\"5315\",\"total\":\"65215\",\"discount\":\"0\",\"subtotal\":\"59900\"},\"tax_rate\":\"0.08875\"}],\"adjusted_totals\":{\"fee\":\"3311\",\"tax\":\"5315\",\"total\":\"65215\",\"earnings\":\"56589\",\"subtotal\":\"59900\",\"grand_total\":\"65215\",\"currency_code\":\"USD\"}},\"checkout\":{\"url\":\"https://aeroedit.com/pay?_ptxn=txn_01hv8wptq8987qeep44cyrewp9\"},\"payments\":[{\"amount\":\"65215\",\"status\":\"captured\",\"created_at\":\"2024-04-12T10:18:33.579142Z\",\"error_code\":null,\"captured_at\":\"2024-04-12T10:18:47.635628Z\",\"method_details\":{\"card\":{\"type\":\"visa\",\"last4\":\"3184\",\"expiry_year\":2025,\"expiry_month\":1,\"cardholder_name\":\"Michael McGovern\"},\"type\":\"card\"},\"payment_method_id\":\"paymtd_01hv8x1tpjfnttxddw73xnqx6s\",\"payment_attempt_id\":\"937640dd-e3dc-40df-a16c-bb75aafd8f71\",\"stored_payment_method_id\":\"281ff2ca-8550-42b9-bf39-15948e7de62d\"},{\"amount\":\"65215\",\"status\":\"error\",\"created_at\":\"2024-04-12T10:15:57.888183Z\",\"error_code\":\"declined\",\"captured_at\":null,\"method_details\":{\"card\":{\"type\":\"visa\",\"last4\":\"0002\",\"expiry_year\":2025,\"expiry_month\":1,\"cardholder_name\":\"Michael McGovern\"},\"type\":\"card\"},\"payment_method_id\":\"paymtd_01hv8wx2mka7dfsqjjsxh1ne7z\",\"payment_attempt_id\":\"8f72cfa6-26b4-4a57-91dc-8f2708f7822d\",\"stored_payment_method_id\":\"a78ece50-356f-4e0c-b72d-ad5368b0a0d9\"}],\"billed_at\":\"2024-04-12T10:18:48.294633Z\",\"address_id\":\"add_01hv8gq3318ktkfengj2r75gfx\",\"created_at\":\"2024-04-12T10:12:33.2014Z\",\"invoice_id\":\"inv_01hv8x29nsh54c2pgt0hnq0zkx\",\"updated_at\":\"2024-04-12T10:18:49.738971238Z\",\"business_id\":null,\"custom_data\":null,\"customer_id\":\"ctm_01hv6y1jedq4p1n0yqn5ba3ky4\",\"discount_id\":null,\"currency_code\":\"USD\",\"billing_period\":{\"ends_at\":\"2024-05-12T10:18:47.635628Z\",\"starts_at\":\"2024-04-12T10:18:47.635628Z\"},\"invoice_number\":\"325-10566\",\"billing_details\":null,\"collection_mode\":\"automatic\",\"subscription_id\":\"sub_01hv8x29kz0t586xy6zn1a62ny\"}}", "headers": { "Paddle-Version": 1 } }, "response": { "body": "{\"status\":\"NOTICE\",\"message\":\"Unknown source ID. If you just created that source, it can take a minute to propagate. Be assured that if the source is valid, the webhook was handled successfully. Check your dashboard to inspect the request: https://dashboard.hookdeck.com/\",\"request_id\":\"req_tWgAqg2K33HIoNUSDKGv\"}", "statusCode": 200, "headers": { "Date": ["Wed, 18 Sep 2024 16:32:39 GMT"], "CF-RAY": ["8c52bbb83cf33938-IAD"], "Server": ["cloudflare"], "Connection": ["keep-alive"], "Content-Type": ["application/json"], "Content-Length": ["346"], "Access-Control-Max-Age": ["86400"], "Access-Control-Allow-Origin": ["*"], "Access-Control-Allow-Methods": [ "GET, HEAD, PUT, PATCH, DELETE, POST, OPTIONS" ] } }, "created_at": "2024-09-18T16:32:30.420614Z", "updated_at": "2024-09-18T16:32:39.758585Z" }, { "id": "ntfsimevt_01j82zmtndajcg9mff1qc9tbfq", "status": "success", "event_type": "subscription.activated", "payload": { "id": "sub_01hv8x29kz0t586xy6zn1a62ny", "items": [ { "price": { "id": "pri_01gsz8x8sawmvhz1pv30nge1ke", "name": "Monthly (per seat)", "type": "standard", "status": "active", "quantity": { "maximum": 999, "minimum": 1 }, "tax_mode": "account_setting", "created_at": "2023-02-23T13:55:22.538367Z", "product_id": "pro_01gsz4t5hdjse780zja8vvr7jg", "unit_price": { "amount": "3000", "currency_code": "USD" }, "updated_at": "2024-04-11T13:54:52.254748Z", "custom_data": null, "description": "Monthly", "import_meta": null, "trial_period": null, "billing_cycle": { "interval": "month", "frequency": 1 }, "unit_price_overrides": [] }, "status": "active", "product": { "id": "pro_01gsz4t5hdjse780zja8vvr7jg", "name": "AeroEdit Pro", "type": "standard", "status": "active", "image_url": "https://paddle.s3.amazonaws.com/user/165798/bT1XUOJAQhOUxGs83cbk_pro.png", "created_at": "2023-02-23T12:43:46.605Z", "updated_at": "2024-04-05T15:53:44.687Z", "custom_data": { "features": { "sso": false, "route_planning": true, "payment_by_invoice": false, "aircraft_performance": true, "compliance_monitoring": true, "flight_log_management": true }, "suggested_addons": [ "pro_01h1vjes1y163xfj1rh1tkfb65", "pro_01gsz97mq9pa4fkyy0wqenepkz" ], "upgrade_description": "Move from Basic to Pro to take advantage of aircraft performance, advanced route planning, and compliance monitoring." }, "description": "Designed for professional pilots, including all features plus in Basic plus compliance monitoring, route optimization, and third-party integrations.", "import_meta": null, "tax_category": "standard" }, "quantity": 10, "recurring": true, "created_at": "2024-04-12T10:18:48.831Z", "updated_at": "2024-04-12T10:18:48.831Z", "trial_dates": null, "next_billed_at": "2024-05-12T10:18:47.635628Z", "previously_billed_at": "2024-04-12T10:18:47.635628Z" }, { "price": { "id": "pri_01h1vjfevh5etwq3rb416a23h2", "name": "Monthly (recurring addon)", "type": "standard", "status": "active", "quantity": { "maximum": 100, "minimum": 1 }, "tax_mode": "account_setting", "created_at": "2023-06-01T13:31:12.625056Z", "product_id": "pro_01h1vjes1y163xfj1rh1tkfb65", "unit_price": { "amount": "10000", "currency_code": "USD" }, "updated_at": "2024-04-09T07:23:00.907834Z", "custom_data": null, "description": "Monthly", "import_meta": null, "trial_period": null, "billing_cycle": { "interval": "month", "frequency": 1 }, "unit_price_overrides": [] }, "status": "active", "product": { "id": "pro_01h1vjes1y163xfj1rh1tkfb65", "name": "Analytics addon", "type": "standard", "status": "active", "image_url": "https://paddle.s3.amazonaws.com/user/165798/97dRpA6SXzcE6ekK9CAr_analytics.png", "created_at": "2023-06-01T13:30:50.302Z", "updated_at": "2024-04-05T15:47:17.163Z", "custom_data": null, "description": "Unlock advanced insights into your flight data with enhanced analytics and reporting features. Includes customizable reporting templates and trend analysis across flights.", "import_meta": null, "tax_category": "standard" }, "quantity": 1, "recurring": true, "created_at": "2024-04-12T10:18:48.831Z", "updated_at": "2024-04-12T10:18:48.831Z", "trial_dates": null, "next_billed_at": "2024-05-12T10:18:47.635628Z", "previously_billed_at": "2024-04-12T10:18:47.635628Z" } ], "status": "active", "discount": null, "paused_at": null, "address_id": "add_01hv8gq3318ktkfengj2r75gfx", "created_at": "2024-04-12T10:18:48.831Z", "started_at": "2024-04-12T10:18:47.635628Z", "updated_at": "2024-04-12T10:18:48.831Z", "business_id": null, "canceled_at": null, "custom_data": null, "customer_id": "ctm_01hv6y1jedq4p1n0yqn5ba3ky4", "import_meta": null, "billing_cycle": { "interval": "month", "frequency": 1 }, "currency_code": "USD", "next_billed_at": "2024-05-12T10:18:47.635628Z", "billing_details": null, "collection_mode": "automatic", "first_billed_at": "2024-04-12T10:18:47.635628Z", "scheduled_change": null, "current_billing_period": { "ends_at": "2024-05-12T10:18:47.635628Z", "starts_at": "2024-04-12T10:18:47.635628Z" } }, "request": { "body": "{\"event_id\":\"ntfsimevt_01j82zmtndajcg9mff1qc9tbfq\",\"event_type\":\"subscription.activated\",\"occurred_at\":\"2024-09-18T16:32:30.381795Z\",\"data\":{\"id\":\"sub_01hv8x29kz0t586xy6zn1a62ny\",\"items\":[{\"price\":{\"id\":\"pri_01gsz8x8sawmvhz1pv30nge1ke\",\"name\":\"Monthly (per seat)\",\"type\":\"standard\",\"status\":\"active\",\"quantity\":{\"maximum\":999,\"minimum\":1},\"tax_mode\":\"account_setting\",\"created_at\":\"2023-02-23T13:55:22.538367Z\",\"product_id\":\"pro_01gsz4t5hdjse780zja8vvr7jg\",\"unit_price\":{\"amount\":\"3000\",\"currency_code\":\"USD\"},\"updated_at\":\"2024-04-11T13:54:52.254748Z\",\"custom_data\":null,\"description\":\"Monthly\",\"import_meta\":null,\"trial_period\":null,\"billing_cycle\":{\"interval\":\"month\",\"frequency\":1},\"unit_price_overrides\":[]},\"status\":\"active\",\"product\":{\"id\":\"pro_01gsz4t5hdjse780zja8vvr7jg\",\"name\":\"AeroEdit Pro\",\"type\":\"standard\",\"status\":\"active\",\"image_url\":\"https://paddle.s3.amazonaws.com/user/165798/bT1XUOJAQhOUxGs83cbk_pro.png\",\"created_at\":\"2023-02-23T12:43:46.605Z\",\"updated_at\":\"2024-04-05T15:53:44.687Z\",\"custom_data\":{\"features\":{\"sso\":false,\"route_planning\":true,\"payment_by_invoice\":false,\"aircraft_performance\":true,\"compliance_monitoring\":true,\"flight_log_management\":true},\"suggested_addons\":[\"pro_01h1vjes1y163xfj1rh1tkfb65\",\"pro_01gsz97mq9pa4fkyy0wqenepkz\"],\"upgrade_description\":\"Move from Basic to Pro to take advantage of aircraft performance, advanced route planning, and compliance monitoring.\"},\"description\":\"Designed for professional pilots, including all features plus in Basic plus compliance monitoring, route optimization, and third-party integrations.\",\"import_meta\":null,\"tax_category\":\"standard\"},\"quantity\":10,\"recurring\":true,\"created_at\":\"2024-04-12T10:18:48.831Z\",\"updated_at\":\"2024-04-12T10:18:48.831Z\",\"trial_dates\":null,\"next_billed_at\":\"2024-05-12T10:18:47.635628Z\",\"previously_billed_at\":\"2024-04-12T10:18:47.635628Z\"},{\"price\":{\"id\":\"pri_01h1vjfevh5etwq3rb416a23h2\",\"name\":\"Monthly (recurring addon)\",\"type\":\"standard\",\"status\":\"active\",\"quantity\":{\"maximum\":100,\"minimum\":1},\"tax_mode\":\"account_setting\",\"created_at\":\"2023-06-01T13:31:12.625056Z\",\"product_id\":\"pro_01h1vjes1y163xfj1rh1tkfb65\",\"unit_price\":{\"amount\":\"10000\",\"currency_code\":\"USD\"},\"updated_at\":\"2024-04-09T07:23:00.907834Z\",\"custom_data\":null,\"description\":\"Monthly\",\"import_meta\":null,\"trial_period\":null,\"billing_cycle\":{\"interval\":\"month\",\"frequency\":1},\"unit_price_overrides\":[]},\"status\":\"active\",\"product\":{\"id\":\"pro_01h1vjes1y163xfj1rh1tkfb65\",\"name\":\"Analytics addon\",\"type\":\"standard\",\"status\":\"active\",\"image_url\":\"https://paddle.s3.amazonaws.com/user/165798/97dRpA6SXzcE6ekK9CAr_analytics.png\",\"created_at\":\"2023-06-01T13:30:50.302Z\",\"updated_at\":\"2024-04-05T15:47:17.163Z\",\"custom_data\":null,\"description\":\"Unlock advanced insights into your flight data with enhanced analytics and reporting features. Includes customizable reporting templates and trend analysis across flights.\",\"import_meta\":null,\"tax_category\":\"standard\"},\"quantity\":1,\"recurring\":true,\"created_at\":\"2024-04-12T10:18:48.831Z\",\"updated_at\":\"2024-04-12T10:18:48.831Z\",\"trial_dates\":null,\"next_billed_at\":\"2024-05-12T10:18:47.635628Z\",\"previously_billed_at\":\"2024-04-12T10:18:47.635628Z\"}],\"status\":\"active\",\"discount\":null,\"paused_at\":null,\"address_id\":\"add_01hv8gq3318ktkfengj2r75gfx\",\"created_at\":\"2024-04-12T10:18:48.831Z\",\"started_at\":\"2024-04-12T10:18:47.635628Z\",\"updated_at\":\"2024-04-12T10:18:48.831Z\",\"business_id\":null,\"canceled_at\":null,\"custom_data\":null,\"customer_id\":\"ctm_01hv6y1jedq4p1n0yqn5ba3ky4\",\"import_meta\":null,\"billing_cycle\":{\"interval\":\"month\",\"frequency\":1},\"currency_code\":\"USD\",\"next_billed_at\":\"2024-05-12T10:18:47.635628Z\",\"billing_details\":null,\"collection_mode\":\"automatic\",\"first_billed_at\":\"2024-04-12T10:18:47.635628Z\",\"scheduled_change\":null,\"current_billing_period\":{\"ends_at\":\"2024-05-12T10:18:47.635628Z\",\"starts_at\":\"2024-04-12T10:18:47.635628Z\"}}}", "headers": { "Paddle-Version": 1 } }, "response": { "body": "{\"status\":\"NOTICE\",\"message\":\"Unknown source ID. If you just created that source, it can take a minute to propagate. Be assured that if the source is valid, the webhook was handled successfully. Check your dashboard to inspect the request: https://dashboard.hookdeck.com/\",\"request_id\":\"req_68qlYJJhQ1MclGoEyfrY\"}", "statusCode": 200, "headers": { "Date": ["Wed, 18 Sep 2024 16:32:38 GMT"], "CF-RAY": ["8c52bbb1ea9858c6-IAD"], "Server": ["cloudflare"], "Connection": ["keep-alive"], "Content-Type": ["application/json"], "Content-Length": ["346"], "Access-Control-Max-Age": ["86400"], "Access-Control-Allow-Origin": ["*"], "Access-Control-Allow-Methods": [ "GET, HEAD, PUT, PATCH, DELETE, POST, OPTIONS" ] } }, "created_at": "2024-09-18T16:32:30.381795Z", "updated_at": "2024-09-18T16:32:38.751274Z" }, { "id": "ntfsimevt_01j82zmtn7h400gg6pa3q3kx73", "status": "success", "event_type": "subscription.created", "payload": { "id": "sub_01hv8x29kz0t586xy6zn1a62ny", "items": [ { "price": { "id": "pri_01gsz8x8sawmvhz1pv30nge1ke", "name": "Monthly (per seat)", "type": "standard", "status": "active", "quantity": { "maximum": 999, "minimum": 1 }, "tax_mode": "account_setting", "created_at": "2023-02-23T13:55:22.538367Z", "product_id": "pro_01gsz4t5hdjse780zja8vvr7jg", "unit_price": { "amount": "3000", "currency_code": "USD" }, "updated_at": "2024-04-11T13:54:52.254748Z", "custom_data": null, "description": "Monthly", "import_meta": null, "trial_period": null, "billing_cycle": { "interval": "month", "frequency": 1 }, "unit_price_overrides": [] }, "status": "active", "product": { "id": "pro_01gsz4t5hdjse780zja8vvr7jg", "name": "AeroEdit Pro", "type": "standard", "status": "active", "image_url": "https://paddle.s3.amazonaws.com/user/165798/bT1XUOJAQhOUxGs83cbk_pro.png", "created_at": "2023-02-23T12:43:46.605Z", "updated_at": "2024-04-05T15:53:44.687Z", "custom_data": { "features": { "sso": false, "route_planning": true, "payment_by_invoice": false, "aircraft_performance": true, "compliance_monitoring": true, "flight_log_management": true }, "suggested_addons": [ "pro_01h1vjes1y163xfj1rh1tkfb65", "pro_01gsz97mq9pa4fkyy0wqenepkz" ], "upgrade_description": "Move from Basic to Pro to take advantage of aircraft performance, advanced route planning, and compliance monitoring." }, "description": "Designed for professional pilots, including all features plus in Basic plus compliance monitoring, route optimization, and third-party integrations.", "import_meta": null, "tax_category": "standard" }, "quantity": 10, "recurring": true, "created_at": "2024-04-12T10:18:48.831Z", "updated_at": "2024-04-12T10:18:48.831Z", "trial_dates": null, "next_billed_at": "2024-05-12T10:18:47.635628Z", "previously_billed_at": "2024-04-12T10:18:47.635628Z" }, { "price": { "id": "pri_01h1vjfevh5etwq3rb416a23h2", "name": "Monthly (recurring addon)", "type": "standard", "status": "active", "quantity": { "maximum": 100, "minimum": 1 }, "tax_mode": "account_setting", "created_at": "2023-06-01T13:31:12.625056Z", "product_id": "pro_01h1vjes1y163xfj1rh1tkfb65", "unit_price": { "amount": "10000", "currency_code": "USD" }, "updated_at": "2024-04-09T07:23:00.907834Z", "custom_data": null, "description": "Monthly", "import_meta": null, "trial_period": null, "billing_cycle": { "interval": "month", "frequency": 1 }, "unit_price_overrides": [] }, "status": "active", "product": { "id": "pro_01h1vjes1y163xfj1rh1tkfb65", "name": "Analytics addon", "type": "standard", "status": "active", "image_url": "https://paddle.s3.amazonaws.com/user/165798/97dRpA6SXzcE6ekK9CAr_analytics.png", "created_at": "2023-06-01T13:30:50.302Z", "updated_at": "2024-04-05T15:47:17.163Z", "custom_data": null, "description": "Unlock advanced insights into your flight data with enhanced analytics and reporting features. Includes customizable reporting templates and trend analysis across flights.", "import_meta": null, "tax_category": "standard" }, "quantity": 1, "recurring": true, "created_at": "2024-04-12T10:18:48.831Z", "updated_at": "2024-04-12T10:18:48.831Z", "trial_dates": null, "next_billed_at": "2024-05-12T10:18:47.635628Z", "previously_billed_at": "2024-04-12T10:18:47.635628Z" } ], "status": "active", "discount": null, "paused_at": null, "address_id": "add_01hv8gq3318ktkfengj2r75gfx", "created_at": "2024-04-12T10:18:48.831Z", "started_at": "2024-04-12T10:18:47.635628Z", "updated_at": "2024-04-12T10:18:48.831Z", "business_id": null, "canceled_at": null, "custom_data": null, "customer_id": "ctm_01hv6y1jedq4p1n0yqn5ba3ky4", "import_meta": null, "billing_cycle": { "interval": "month", "frequency": 1 }, "currency_code": "USD", "next_billed_at": "2024-05-12T10:18:47.635628Z", "transaction_id": "txn_01hv8wptq8987qeep44cyrewp9", "billing_details": null, "collection_mode": "automatic", "first_billed_at": "2024-04-12T10:18:47.635628Z", "scheduled_change": null, "current_billing_period": { "ends_at": "2024-05-12T10:18:47.635628Z", "starts_at": "2024-04-12T10:18:47.635628Z" } }, "request": { "body": "{\"event_id\":\"ntfsimevt_01j82zmtn7h400gg6pa3q3kx73\",\"event_type\":\"subscription.created\",\"occurred_at\":\"2024-09-18T16:32:30.375614Z\",\"data\":{\"id\":\"sub_01hv8x29kz0t586xy6zn1a62ny\",\"items\":[{\"price\":{\"id\":\"pri_01gsz8x8sawmvhz1pv30nge1ke\",\"name\":\"Monthly (per seat)\",\"type\":\"standard\",\"status\":\"active\",\"quantity\":{\"maximum\":999,\"minimum\":1},\"tax_mode\":\"account_setting\",\"created_at\":\"2023-02-23T13:55:22.538367Z\",\"product_id\":\"pro_01gsz4t5hdjse780zja8vvr7jg\",\"unit_price\":{\"amount\":\"3000\",\"currency_code\":\"USD\"},\"updated_at\":\"2024-04-11T13:54:52.254748Z\",\"custom_data\":null,\"description\":\"Monthly\",\"import_meta\":null,\"trial_period\":null,\"billing_cycle\":{\"interval\":\"month\",\"frequency\":1},\"unit_price_overrides\":[]},\"status\":\"active\",\"product\":{\"id\":\"pro_01gsz4t5hdjse780zja8vvr7jg\",\"name\":\"AeroEdit Pro\",\"type\":\"standard\",\"status\":\"active\",\"image_url\":\"https://paddle.s3.amazonaws.com/user/165798/bT1XUOJAQhOUxGs83cbk_pro.png\",\"created_at\":\"2023-02-23T12:43:46.605Z\",\"updated_at\":\"2024-04-05T15:53:44.687Z\",\"custom_data\":{\"features\":{\"sso\":false,\"route_planning\":true,\"payment_by_invoice\":false,\"aircraft_performance\":true,\"compliance_monitoring\":true,\"flight_log_management\":true},\"suggested_addons\":[\"pro_01h1vjes1y163xfj1rh1tkfb65\",\"pro_01gsz97mq9pa4fkyy0wqenepkz\"],\"upgrade_description\":\"Move from Basic to Pro to take advantage of aircraft performance, advanced route planning, and compliance monitoring.\"},\"description\":\"Designed for professional pilots, including all features plus in Basic plus compliance monitoring, route optimization, and third-party integrations.\",\"import_meta\":null,\"tax_category\":\"standard\"},\"quantity\":10,\"recurring\":true,\"created_at\":\"2024-04-12T10:18:48.831Z\",\"updated_at\":\"2024-04-12T10:18:48.831Z\",\"trial_dates\":null,\"next_billed_at\":\"2024-05-12T10:18:47.635628Z\",\"previously_billed_at\":\"2024-04-12T10:18:47.635628Z\"},{\"price\":{\"id\":\"pri_01h1vjfevh5etwq3rb416a23h2\",\"name\":\"Monthly (recurring addon)\",\"type\":\"standard\",\"status\":\"active\",\"quantity\":{\"maximum\":100,\"minimum\":1},\"tax_mode\":\"account_setting\",\"created_at\":\"2023-06-01T13:31:12.625056Z\",\"product_id\":\"pro_01h1vjes1y163xfj1rh1tkfb65\",\"unit_price\":{\"amount\":\"10000\",\"currency_code\":\"USD\"},\"updated_at\":\"2024-04-09T07:23:00.907834Z\",\"custom_data\":null,\"description\":\"Monthly\",\"import_meta\":null,\"trial_period\":null,\"billing_cycle\":{\"interval\":\"month\",\"frequency\":1},\"unit_price_overrides\":[]},\"status\":\"active\",\"product\":{\"id\":\"pro_01h1vjes1y163xfj1rh1tkfb65\",\"name\":\"Analytics addon\",\"type\":\"standard\",\"status\":\"active\",\"image_url\":\"https://paddle.s3.amazonaws.com/user/165798/97dRpA6SXzcE6ekK9CAr_analytics.png\",\"created_at\":\"2023-06-01T13:30:50.302Z\",\"updated_at\":\"2024-04-05T15:47:17.163Z\",\"custom_data\":null,\"description\":\"Unlock advanced insights into your flight data with enhanced analytics and reporting features. Includes customizable reporting templates and trend analysis across flights.\",\"import_meta\":null,\"tax_category\":\"standard\"},\"quantity\":1,\"recurring\":true,\"created_at\":\"2024-04-12T10:18:48.831Z\",\"updated_at\":\"2024-04-12T10:18:48.831Z\",\"trial_dates\":null,\"next_billed_at\":\"2024-05-12T10:18:47.635628Z\",\"previously_billed_at\":\"2024-04-12T10:18:47.635628Z\"}],\"status\":\"active\",\"discount\":null,\"paused_at\":null,\"address_id\":\"add_01hv8gq3318ktkfengj2r75gfx\",\"created_at\":\"2024-04-12T10:18:48.831Z\",\"started_at\":\"2024-04-12T10:18:47.635628Z\",\"updated_at\":\"2024-04-12T10:18:48.831Z\",\"business_id\":null,\"canceled_at\":null,\"custom_data\":null,\"customer_id\":\"ctm_01hv6y1jedq4p1n0yqn5ba3ky4\",\"import_meta\":null,\"billing_cycle\":{\"interval\":\"month\",\"frequency\":1},\"currency_code\":\"USD\",\"next_billed_at\":\"2024-05-12T10:18:47.635628Z\",\"transaction_id\":\"txn_01hv8wptq8987qeep44cyrewp9\",\"billing_details\":null,\"collection_mode\":\"automatic\",\"first_billed_at\":\"2024-04-12T10:18:47.635628Z\",\"scheduled_change\":null,\"current_billing_period\":{\"ends_at\":\"2024-05-12T10:18:47.635628Z\",\"starts_at\":\"2024-04-12T10:18:47.635628Z\"}}}", "headers": { "Paddle-Version": 1 } }, "response": { "body": "{\"status\":\"NOTICE\",\"message\":\"Unknown source ID. If you just created that source, it can take a minute to propagate. Be assured that if the source is valid, the webhook was handled successfully. Check your dashboard to inspect the request: https://dashboard.hookdeck.com/\",\"request_id\":\"req_z4T5WqgzbYDNLBOqAqU4\"}", "statusCode": 200, "headers": { "Date": ["Wed, 18 Sep 2024 16:32:37 GMT"], "CF-RAY": ["8c52bbacfd0438dd-IAD"], "Server": ["cloudflare"], "Connection": ["keep-alive"], "Content-Type": ["application/json"], "Content-Length": ["346"], "Access-Control-Max-Age": ["86400"], "Access-Control-Allow-Origin": ["*"], "Access-Control-Allow-Methods": [ "GET, HEAD, PUT, PATCH, DELETE, POST, OPTIONS" ] } }, "created_at": "2024-09-18T16:32:30.375614Z", "updated_at": "2024-09-18T16:32:37.972626Z" }, { "id": "ntfsimevt_01j82zmtm7msntsffbts57bqtx", "status": "success", "event_type": "transaction.paid", "payload": { "id": "txn_01hv8wptq8987qeep44cyrewp9", "items": [ { "price": { "id": "pri_01gsz8x8sawmvhz1pv30nge1ke", "name": "Monthly (per seat)", "type": "standard", "status": "active", "quantity": { "maximum": 999, "minimum": 1 }, "tax_mode": "account_setting", "created_at": "2023-02-23T13:55:22.538367Z", "product_id": "pro_01gsz4t5hdjse780zja8vvr7jg", "unit_price": { "amount": "3000", "currency_code": "USD" }, "updated_at": "2024-04-11T13:54:52.254748Z", "custom_data": null, "description": "Monthly", "import_meta": null, "trial_period": null, "billing_cycle": { "interval": "month", "frequency": 1 }, "unit_price_overrides": [] }, "quantity": 10, "proration": null }, { "price": { "id": "pri_01h1vjfevh5etwq3rb416a23h2", "name": "Monthly (recurring addon)", "type": "standard", "status": "active", "quantity": { "maximum": 100, "minimum": 1 }, "tax_mode": "account_setting", "created_at": "2023-06-01T13:31:12.625056Z", "product_id": "pro_01h1vjes1y163xfj1rh1tkfb65", "unit_price": { "amount": "10000", "currency_code": "USD" }, "updated_at": "2024-04-09T07:23:00.907834Z", "custom_data": null, "description": "Monthly", "import_meta": null, "trial_period": null, "billing_cycle": { "interval": "month", "frequency": 1 }, "unit_price_overrides": [] }, "quantity": 1, "proration": null }, { "price": { "id": "pri_01gsz98e27ak2tyhexptwc58yk", "name": "One-time addon", "type": "standard", "status": "active", "quantity": { "maximum": 1, "minimum": 1 }, "tax_mode": "account_setting", "created_at": "2023-02-23T14:01:28.391712Z", "product_id": "pro_01gsz97mq9pa4fkyy0wqenepkz", "unit_price": { "amount": "19900", "currency_code": "USD" }, "updated_at": "2024-04-09T07:23:10.921392Z", "custom_data": null, "description": "One-time addon", "import_meta": null, "trial_period": null, "billing_cycle": null, "unit_price_overrides": [] }, "quantity": 1, "proration": null } ], "origin": "web", "status": "paid", "details": { "totals": { "fee": null, "tax": "5315", "total": "65215", "credit": "0", "balance": "0", "discount": "0", "earnings": null, "subtotal": "59900", "grand_total": "65215", "currency_code": "USD", "credit_to_balance": "0" }, "line_items": [ { "id": "txnitm_01hv8wt98jahpbm1t1tzr06z6n", "totals": { "tax": "2662", "total": "32662", "discount": "0", "subtotal": "30000" }, "product": { "id": "pro_01gsz4t5hdjse780zja8vvr7jg", "name": "AeroEdit Pro", "type": "standard", "status": "active", "image_url": "https://paddle.s3.amazonaws.com/user/165798/bT1XUOJAQhOUxGs83cbk_pro.png", "created_at": "2023-02-23T12:43:46.605Z", "updated_at": "2024-04-05T15:53:44.687Z", "custom_data": { "features": { "sso": false, "route_planning": true, "payment_by_invoice": false, "aircraft_performance": true, "compliance_monitoring": true, "flight_log_management": true }, "suggested_addons": [ "pro_01h1vjes1y163xfj1rh1tkfb65", "pro_01gsz97mq9pa4fkyy0wqenepkz" ], "upgrade_description": "Move from Basic to Pro to take advantage of aircraft performance, advanced route planning, and compliance monitoring." }, "description": "Designed for professional pilots, including all features plus in Basic plus compliance monitoring, route optimization, and third-party integrations.", "import_meta": null, "tax_category": "standard" }, "price_id": "pri_01gsz8x8sawmvhz1pv30nge1ke", "quantity": 10, "tax_rate": "0.08875", "unit_totals": { "tax": "266", "total": "3266", "discount": "0", "subtotal": "3000" } }, { "id": "txnitm_01hv8wt98jahpbm1t1v1sd067y", "totals": { "tax": "887", "total": "10887", "discount": "0", "subtotal": "10000" }, "product": { "id": "pro_01h1vjes1y163xfj1rh1tkfb65", "name": "Analytics addon", "type": "standard", "status": "active", "image_url": "https://paddle.s3.amazonaws.com/user/165798/97dRpA6SXzcE6ekK9CAr_analytics.png", "created_at": "2023-06-01T13:30:50.302Z", "updated_at": "2024-04-05T15:47:17.163Z", "custom_data": null, "description": "Unlock advanced insights into your flight data with enhanced analytics and reporting features. Includes customizable reporting templates and trend analysis across flights.", "import_meta": null, "tax_category": "standard" }, "price_id": "pri_01h1vjfevh5etwq3rb416a23h2", "quantity": 1, "tax_rate": "0.08875", "unit_totals": { "tax": "887", "total": "10887", "discount": "0", "subtotal": "10000" } }, { "id": "txnitm_01hv8wt98jahpbm1t1v67vqnb6", "totals": { "tax": "1766", "total": "21666", "discount": "0", "subtotal": "19900" }, "product": { "id": "pro_01gsz97mq9pa4fkyy0wqenepkz", "name": "Custom domains", "type": "standard", "status": "active", "image_url": "https://paddle.s3.amazonaws.com/user/165798/XIG7UXoJQHmlIAiKcnkA_custom-domains.png", "created_at": "2023-02-23T14:01:02.441Z", "updated_at": "2024-04-05T15:43:28.971Z", "custom_data": null, "description": "Make AeroEdit truly your own with custom domains. Custom domains reinforce your brand identity and make it easy for your team to access your account.", "import_meta": null, "tax_category": "standard" }, "price_id": "pri_01gsz98e27ak2tyhexptwc58yk", "quantity": 1, "tax_rate": "0.08875", "unit_totals": { "tax": "1766", "total": "21666", "discount": "0", "subtotal": "19900" } } ], "payout_totals": null, "tax_rates_used": [ { "totals": { "tax": "5315", "total": "65215", "discount": "0", "subtotal": "59900" }, "tax_rate": "0.08875" } ], "adjusted_totals": { "fee": "0", "tax": "5315", "total": "65215", "earnings": "0", "subtotal": "59900", "grand_total": "65215", "currency_code": "USD" } }, "checkout": { "url": "https://aeroedit.com/pay?_ptxn=txn_01hv8wptq8987qeep44cyrewp9" }, "payments": [ { "amount": "65215", "status": "captured", "created_at": "2024-04-12T10:18:33.579142Z", "error_code": null, "captured_at": "2024-04-12T10:18:47.635628Z", "method_details": { "card": { "type": "visa", "last4": "3184", "expiry_year": 2025, "expiry_month": 1, "cardholder_name": "Michael McGovern" }, "type": "card" }, "payment_method_id": "paymtd_01hv8x1tpjfnttxddw73xnqx6s", "payment_attempt_id": "937640dd-e3dc-40df-a16c-bb75aafd8f71", "stored_payment_method_id": "281ff2ca-8550-42b9-bf39-15948e7de62d" }, { "amount": "65215", "status": "error", "created_at": "2024-04-12T10:15:57.888183Z", "error_code": "declined", "captured_at": null, "method_details": { "card": { "type": "visa", "last4": "0002", "expiry_year": 2025, "expiry_month": 1, "cardholder_name": "Michael McGovern" }, "type": "card" }, "payment_method_id": "paymtd_01hv8wx2mka7dfsqjjsxh1ne7z", "payment_attempt_id": "8f72cfa6-26b4-4a57-91dc-8f2708f7822d", "stored_payment_method_id": "a78ece50-356f-4e0c-b72d-ad5368b0a0d9" } ], "billed_at": "2024-04-12T10:18:48.294633821Z", "address_id": "add_01hv8gq3318ktkfengj2r75gfx", "created_at": "2024-04-12T10:12:33.2014Z", "invoice_id": null, "updated_at": "2024-04-12T10:18:48.294635093Z", "business_id": null, "custom_data": null, "customer_id": "ctm_01hv6y1jedq4p1n0yqn5ba3ky4", "discount_id": null, "currency_code": "USD", "billing_period": null, "invoice_number": null, "billing_details": null, "collection_mode": "automatic", "subscription_id": null }, "request": { "body": "{\"event_id\":\"ntfsimevt_01j82zmtm7msntsffbts57bqtx\",\"event_type\":\"transaction.paid\",\"occurred_at\":\"2024-09-18T16:32:30.343541Z\",\"data\":{\"id\":\"txn_01hv8wptq8987qeep44cyrewp9\",\"items\":[{\"price\":{\"id\":\"pri_01gsz8x8sawmvhz1pv30nge1ke\",\"name\":\"Monthly (per seat)\",\"type\":\"standard\",\"status\":\"active\",\"quantity\":{\"maximum\":999,\"minimum\":1},\"tax_mode\":\"account_setting\",\"created_at\":\"2023-02-23T13:55:22.538367Z\",\"product_id\":\"pro_01gsz4t5hdjse780zja8vvr7jg\",\"unit_price\":{\"amount\":\"3000\",\"currency_code\":\"USD\"},\"updated_at\":\"2024-04-11T13:54:52.254748Z\",\"custom_data\":null,\"description\":\"Monthly\",\"import_meta\":null,\"trial_period\":null,\"billing_cycle\":{\"interval\":\"month\",\"frequency\":1},\"unit_price_overrides\":[]},\"quantity\":10,\"proration\":null},{\"price\":{\"id\":\"pri_01h1vjfevh5etwq3rb416a23h2\",\"name\":\"Monthly (recurring addon)\",\"type\":\"standard\",\"status\":\"active\",\"quantity\":{\"maximum\":100,\"minimum\":1},\"tax_mode\":\"account_setting\",\"created_at\":\"2023-06-01T13:31:12.625056Z\",\"product_id\":\"pro_01h1vjes1y163xfj1rh1tkfb65\",\"unit_price\":{\"amount\":\"10000\",\"currency_code\":\"USD\"},\"updated_at\":\"2024-04-09T07:23:00.907834Z\",\"custom_data\":null,\"description\":\"Monthly\",\"import_meta\":null,\"trial_period\":null,\"billing_cycle\":{\"interval\":\"month\",\"frequency\":1},\"unit_price_overrides\":[]},\"quantity\":1,\"proration\":null},{\"price\":{\"id\":\"pri_01gsz98e27ak2tyhexptwc58yk\",\"name\":\"One-time addon\",\"type\":\"standard\",\"status\":\"active\",\"quantity\":{\"maximum\":1,\"minimum\":1},\"tax_mode\":\"account_setting\",\"created_at\":\"2023-02-23T14:01:28.391712Z\",\"product_id\":\"pro_01gsz97mq9pa4fkyy0wqenepkz\",\"unit_price\":{\"amount\":\"19900\",\"currency_code\":\"USD\"},\"updated_at\":\"2024-04-09T07:23:10.921392Z\",\"custom_data\":null,\"description\":\"One-time addon\",\"import_meta\":null,\"trial_period\":null,\"billing_cycle\":null,\"unit_price_overrides\":[]},\"quantity\":1,\"proration\":null}],\"origin\":\"web\",\"status\":\"paid\",\"details\":{\"totals\":{\"fee\":null,\"tax\":\"5315\",\"total\":\"65215\",\"credit\":\"0\",\"balance\":\"0\",\"discount\":\"0\",\"earnings\":null,\"subtotal\":\"59900\",\"grand_total\":\"65215\",\"currency_code\":\"USD\",\"credit_to_balance\":\"0\"},\"line_items\":[{\"id\":\"txnitm_01hv8wt98jahpbm1t1tzr06z6n\",\"totals\":{\"tax\":\"2662\",\"total\":\"32662\",\"discount\":\"0\",\"subtotal\":\"30000\"},\"product\":{\"id\":\"pro_01gsz4t5hdjse780zja8vvr7jg\",\"name\":\"AeroEdit Pro\",\"type\":\"standard\",\"status\":\"active\",\"image_url\":\"https://paddle.s3.amazonaws.com/user/165798/bT1XUOJAQhOUxGs83cbk_pro.png\",\"created_at\":\"2023-02-23T12:43:46.605Z\",\"updated_at\":\"2024-04-05T15:53:44.687Z\",\"custom_data\":{\"features\":{\"sso\":false,\"route_planning\":true,\"payment_by_invoice\":false,\"aircraft_performance\":true,\"compliance_monitoring\":true,\"flight_log_management\":true},\"suggested_addons\":[\"pro_01h1vjes1y163xfj1rh1tkfb65\",\"pro_01gsz97mq9pa4fkyy0wqenepkz\"],\"upgrade_description\":\"Move from Basic to Pro to take advantage of aircraft performance, advanced route planning, and compliance monitoring.\"},\"description\":\"Designed for professional pilots, including all features plus in Basic plus compliance monitoring, route optimization, and third-party integrations.\",\"import_meta\":null,\"tax_category\":\"standard\"},\"price_id\":\"pri_01gsz8x8sawmvhz1pv30nge1ke\",\"quantity\":10,\"tax_rate\":\"0.08875\",\"unit_totals\":{\"tax\":\"266\",\"total\":\"3266\",\"discount\":\"0\",\"subtotal\":\"3000\"}},{\"id\":\"txnitm_01hv8wt98jahpbm1t1v1sd067y\",\"totals\":{\"tax\":\"887\",\"total\":\"10887\",\"discount\":\"0\",\"subtotal\":\"10000\"},\"product\":{\"id\":\"pro_01h1vjes1y163xfj1rh1tkfb65\",\"name\":\"Analytics addon\",\"type\":\"standard\",\"status\":\"active\",\"image_url\":\"https://paddle.s3.amazonaws.com/user/165798/97dRpA6SXzcE6ekK9CAr_analytics.png\",\"created_at\":\"2023-06-01T13:30:50.302Z\",\"updated_at\":\"2024-04-05T15:47:17.163Z\",\"custom_data\":null,\"description\":\"Unlock advanced insights into your flight data with enhanced analytics and reporting features. Includes customizable reporting templates and trend analysis across flights.\",\"import_meta\":null,\"tax_category\":\"standard\"},\"price_id\":\"pri_01h1vjfevh5etwq3rb416a23h2\",\"quantity\":1,\"tax_rate\":\"0.08875\",\"unit_totals\":{\"tax\":\"887\",\"total\":\"10887\",\"discount\":\"0\",\"subtotal\":\"10000\"}},{\"id\":\"txnitm_01hv8wt98jahpbm1t1v67vqnb6\",\"totals\":{\"tax\":\"1766\",\"total\":\"21666\",\"discount\":\"0\",\"subtotal\":\"19900\"},\"product\":{\"id\":\"pro_01gsz97mq9pa4fkyy0wqenepkz\",\"name\":\"Custom domains\",\"type\":\"standard\",\"status\":\"active\",\"image_url\":\"https://paddle.s3.amazonaws.com/user/165798/XIG7UXoJQHmlIAiKcnkA_custom-domains.png\",\"created_at\":\"2023-02-23T14:01:02.441Z\",\"updated_at\":\"2024-04-05T15:43:28.971Z\",\"custom_data\":null,\"description\":\"Make AeroEdit truly your own with custom domains. Custom domains reinforce your brand identity and make it easy for your team to access your account.\",\"import_meta\":null,\"tax_category\":\"standard\"},\"price_id\":\"pri_01gsz98e27ak2tyhexptwc58yk\",\"quantity\":1,\"tax_rate\":\"0.08875\",\"unit_totals\":{\"tax\":\"1766\",\"total\":\"21666\",\"discount\":\"0\",\"subtotal\":\"19900\"}}],\"payout_totals\":null,\"tax_rates_used\":[{\"totals\":{\"tax\":\"5315\",\"total\":\"65215\",\"discount\":\"0\",\"subtotal\":\"59900\"},\"tax_rate\":\"0.08875\"}],\"adjusted_totals\":{\"fee\":\"0\",\"tax\":\"5315\",\"total\":\"65215\",\"earnings\":\"0\",\"subtotal\":\"59900\",\"grand_total\":\"65215\",\"currency_code\":\"USD\"}},\"checkout\":{\"url\":\"https://aeroedit.com/pay?_ptxn=txn_01hv8wptq8987qeep44cyrewp9\"},\"payments\":[{\"amount\":\"65215\",\"status\":\"captured\",\"created_at\":\"2024-04-12T10:18:33.579142Z\",\"error_code\":null,\"captured_at\":\"2024-04-12T10:18:47.635628Z\",\"method_details\":{\"card\":{\"type\":\"visa\",\"last4\":\"3184\",\"expiry_year\":2025,\"expiry_month\":1,\"cardholder_name\":\"Michael McGovern\"},\"type\":\"card\"},\"payment_method_id\":\"paymtd_01hv8x1tpjfnttxddw73xnqx6s\",\"payment_attempt_id\":\"937640dd-e3dc-40df-a16c-bb75aafd8f71\",\"stored_payment_method_id\":\"281ff2ca-8550-42b9-bf39-15948e7de62d\"},{\"amount\":\"65215\",\"status\":\"error\",\"created_at\":\"2024-04-12T10:15:57.888183Z\",\"error_code\":\"declined\",\"captured_at\":null,\"method_details\":{\"card\":{\"type\":\"visa\",\"last4\":\"0002\",\"expiry_year\":2025,\"expiry_month\":1,\"cardholder_name\":\"Michael McGovern\"},\"type\":\"card\"},\"payment_method_id\":\"paymtd_01hv8wx2mka7dfsqjjsxh1ne7z\",\"payment_attempt_id\":\"8f72cfa6-26b4-4a57-91dc-8f2708f7822d\",\"stored_payment_method_id\":\"a78ece50-356f-4e0c-b72d-ad5368b0a0d9\"}],\"billed_at\":\"2024-04-12T10:18:48.294633821Z\",\"address_id\":\"add_01hv8gq3318ktkfengj2r75gfx\",\"created_at\":\"2024-04-12T10:12:33.2014Z\",\"invoice_id\":null,\"updated_at\":\"2024-04-12T10:18:48.294635093Z\",\"business_id\":null,\"custom_data\":null,\"customer_id\":\"ctm_01hv6y1jedq4p1n0yqn5ba3ky4\",\"discount_id\":null,\"currency_code\":\"USD\",\"billing_period\":null,\"invoice_number\":null,\"billing_details\":null,\"collection_mode\":\"automatic\",\"subscription_id\":null}}", "headers": { "Paddle-Version": 1 } }, "response": { "body": "{\"status\":\"NOTICE\",\"message\":\"Unknown source ID. If you just created that source, it can take a minute to propagate. Be assured that if the source is valid, the webhook was handled successfully. Check your dashboard to inspect the request: https://dashboard.hookdeck.com/\",\"request_id\":\"req_HLa1znzsA6e3TPSFcFKS\"}", "statusCode": 200, "headers": { "Date": ["Wed, 18 Sep 2024 16:32:36 GMT"], "CF-RAY": ["8c52bba55b3c201e-IAD"], "Server": ["cloudflare"], "Connection": ["keep-alive"], "Content-Type": ["application/json"], "Content-Length": ["346"], "Access-Control-Max-Age": ["86400"], "Access-Control-Allow-Origin": ["*"], "Access-Control-Allow-Methods": [ "GET, HEAD, PUT, PATCH, DELETE, POST, OPTIONS" ] } }, "created_at": "2024-09-18T16:32:30.343541Z", "updated_at": "2024-09-18T16:32:36.767367Z" }, { "id": "ntfsimevt_01j82zmtk763zrdkq9xawqcrf7", "status": "success", "event_type": "transaction.updated", "payload": { "id": "txn_01hv8wptq8987qeep44cyrewp9", "items": [ { "price": { "id": "pri_01gsz8x8sawmvhz1pv30nge1ke", "name": "Monthly (per seat)", "type": "standard", "status": "active", "quantity": { "maximum": 999, "minimum": 1 }, "tax_mode": "account_setting", "created_at": "2023-02-23T13:55:22.538367Z", "product_id": "pro_01gsz4t5hdjse780zja8vvr7jg", "unit_price": { "amount": "3000", "currency_code": "USD" }, "updated_at": "2024-04-11T13:54:52.254748Z", "custom_data": null, "description": "Monthly", "import_meta": null, "trial_period": null, "billing_cycle": { "interval": "month", "frequency": 1 }, "unit_price_overrides": [] }, "quantity": 10, "proration": null }, { "price": { "id": "pri_01h1vjfevh5etwq3rb416a23h2", "name": "Monthly (recurring addon)", "type": "standard", "status": "active", "quantity": { "maximum": 100, "minimum": 1 }, "tax_mode": "account_setting", "created_at": "2023-06-01T13:31:12.625056Z", "product_id": "pro_01h1vjes1y163xfj1rh1tkfb65", "unit_price": { "amount": "10000", "currency_code": "USD" }, "updated_at": "2024-04-09T07:23:00.907834Z", "custom_data": null, "description": "Monthly", "import_meta": null, "trial_period": null, "billing_cycle": { "interval": "month", "frequency": 1 }, "unit_price_overrides": [] }, "quantity": 1, "proration": null }, { "price": { "id": "pri_01gsz98e27ak2tyhexptwc58yk", "name": "One-time addon", "type": "standard", "status": "active", "quantity": { "maximum": 1, "minimum": 1 }, "tax_mode": "account_setting", "created_at": "2023-02-23T14:01:28.391712Z", "product_id": "pro_01gsz97mq9pa4fkyy0wqenepkz", "unit_price": { "amount": "19900", "currency_code": "USD" }, "updated_at": "2024-04-09T07:23:10.921392Z", "custom_data": null, "description": "One-time addon", "import_meta": null, "trial_period": null, "billing_cycle": null, "unit_price_overrides": [] }, "quantity": 1, "proration": null } ], "origin": "web", "status": "paid", "details": { "totals": { "fee": null, "tax": "5315", "total": "65215", "credit": "0", "balance": "0", "discount": "0", "earnings": null, "subtotal": "59900", "grand_total": "65215", "currency_code": "USD", "credit_to_balance": "0" }, "line_items": [ { "id": "txnitm_01hv8wt98jahpbm1t1tzr06z6n", "totals": { "tax": "2662", "total": "32662", "discount": "0", "subtotal": "30000" }, "product": { "id": "pro_01gsz4t5hdjse780zja8vvr7jg", "name": "AeroEdit Pro", "type": "standard", "status": "active", "image_url": "https://paddle.s3.amazonaws.com/user/165798/bT1XUOJAQhOUxGs83cbk_pro.png", "created_at": "2023-02-23T12:43:46.605Z", "updated_at": "2024-04-05T15:53:44.687Z", "custom_data": { "features": { "sso": false, "route_planning": true, "payment_by_invoice": false, "aircraft_performance": true, "compliance_monitoring": true, "flight_log_management": true }, "suggested_addons": [ "pro_01h1vjes1y163xfj1rh1tkfb65", "pro_01gsz97mq9pa4fkyy0wqenepkz" ], "upgrade_description": "Move from Basic to Pro to take advantage of aircraft performance, advanced route planning, and compliance monitoring." }, "description": "Designed for professional pilots, including all features plus in Basic plus compliance monitoring, route optimization, and third-party integrations.", "import_meta": null, "tax_category": "standard" }, "price_id": "pri_01gsz8x8sawmvhz1pv30nge1ke", "quantity": 10, "tax_rate": "0.08875", "unit_totals": { "tax": "266", "total": "3266", "discount": "0", "subtotal": "3000" } }, { "id": "txnitm_01hv8wt98jahpbm1t1v1sd067y", "totals": { "tax": "887", "total": "10887", "discount": "0", "subtotal": "10000" }, "product": { "id": "pro_01h1vjes1y163xfj1rh1tkfb65", "name": "Analytics addon", "type": "standard", "status": "active", "image_url": "https://paddle.s3.amazonaws.com/user/165798/97dRpA6SXzcE6ekK9CAr_analytics.png", "created_at": "2023-06-01T13:30:50.302Z", "updated_at": "2024-04-05T15:47:17.163Z", "custom_data": null, "description": "Unlock advanced insights into your flight data with enhanced analytics and reporting features. Includes customizable reporting templates and trend analysis across flights.", "import_meta": null, "tax_category": "standard" }, "price_id": "pri_01h1vjfevh5etwq3rb416a23h2", "quantity": 1, "tax_rate": "0.08875", "unit_totals": { "tax": "887", "total": "10887", "discount": "0", "subtotal": "10000" } }, { "id": "txnitm_01hv8wt98jahpbm1t1v67vqnb6", "totals": { "tax": "1766", "total": "21666", "discount": "0", "subtotal": "19900" }, "product": { "id": "pro_01gsz97mq9pa4fkyy0wqenepkz", "name": "Custom domains", "type": "standard", "status": "active", "image_url": "https://paddle.s3.amazonaws.com/user/165798/XIG7UXoJQHmlIAiKcnkA_custom-domains.png", "created_at": "2023-02-23T14:01:02.441Z", "updated_at": "2024-04-05T15:43:28.971Z", "custom_data": null, "description": "Make AeroEdit truly your own with custom domains. Custom domains reinforce your brand identity and make it easy for your team to access your account.", "import_meta": null, "tax_category": "standard" }, "price_id": "pri_01gsz98e27ak2tyhexptwc58yk", "quantity": 1, "tax_rate": "0.08875", "unit_totals": { "tax": "1766", "total": "21666", "discount": "0", "subtotal": "19900" } } ], "payout_totals": null, "tax_rates_used": [ { "totals": { "tax": "5315", "total": "65215", "discount": "0", "subtotal": "59900" }, "tax_rate": "0.08875" } ], "adjusted_totals": { "fee": "0", "tax": "5315", "total": "65215", "earnings": "0", "subtotal": "59900", "grand_total": "65215", "currency_code": "USD" } }, "checkout": { "url": "https://aeroedit.com/pay?_ptxn=txn_01hv8wptq8987qeep44cyrewp9" }, "payments": [ { "amount": "65215", "status": "captured", "created_at": "2024-04-12T10:18:33.579142Z", "error_code": null, "captured_at": "2024-04-12T10:18:47.635628Z", "method_details": { "card": { "type": "visa", "last4": "3184", "expiry_year": 2025, "expiry_month": 1, "cardholder_name": "Michael McGovern" }, "type": "card" }, "payment_method_id": "paymtd_01hv8x1tpjfnttxddw73xnqx6s", "payment_attempt_id": "937640dd-e3dc-40df-a16c-bb75aafd8f71", "stored_payment_method_id": "281ff2ca-8550-42b9-bf39-15948e7de62d" }, { "amount": "65215", "status": "error", "created_at": "2024-04-12T10:15:57.888183Z", "error_code": "declined", "captured_at": null, "method_details": { "card": { "type": "visa", "last4": "0002", "expiry_year": 2025, "expiry_month": 1, "cardholder_name": "Michael McGovern" }, "type": "card" }, "payment_method_id": "paymtd_01hv8wx2mka7dfsqjjsxh1ne7z", "payment_attempt_id": "8f72cfa6-26b4-4a57-91dc-8f2708f7822d", "stored_payment_method_id": "a78ece50-356f-4e0c-b72d-ad5368b0a0d9" } ], "billed_at": "2024-04-12T10:18:48.294633821Z", "address_id": "add_01hv8gq3318ktkfengj2r75gfx", "created_at": "2024-04-12T10:12:33.2014Z", "invoice_id": null, "updated_at": "2024-04-12T10:18:48.294635093Z", "business_id": null, "custom_data": null, "customer_id": "ctm_01hv6y1jedq4p1n0yqn5ba3ky4", "discount_id": null, "currency_code": "USD", "billing_period": null, "invoice_number": null, "billing_details": null, "collection_mode": "automatic", "subscription_id": null }, "request": { "body": "{\"event_id\":\"ntfsimevt_01j82zmtk763zrdkq9xawqcrf7\",\"event_type\":\"transaction.updated\",\"occurred_at\":\"2024-09-18T16:32:30.311470Z\",\"data\":{\"id\":\"txn_01hv8wptq8987qeep44cyrewp9\",\"items\":[{\"price\":{\"id\":\"pri_01gsz8x8sawmvhz1pv30nge1ke\",\"name\":\"Monthly (per seat)\",\"type\":\"standard\",\"status\":\"active\",\"quantity\":{\"maximum\":999,\"minimum\":1},\"tax_mode\":\"account_setting\",\"created_at\":\"2023-02-23T13:55:22.538367Z\",\"product_id\":\"pro_01gsz4t5hdjse780zja8vvr7jg\",\"unit_price\":{\"amount\":\"3000\",\"currency_code\":\"USD\"},\"updated_at\":\"2024-04-11T13:54:52.254748Z\",\"custom_data\":null,\"description\":\"Monthly\",\"import_meta\":null,\"trial_period\":null,\"billing_cycle\":{\"interval\":\"month\",\"frequency\":1},\"unit_price_overrides\":[]},\"quantity\":10,\"proration\":null},{\"price\":{\"id\":\"pri_01h1vjfevh5etwq3rb416a23h2\",\"name\":\"Monthly (recurring addon)\",\"type\":\"standard\",\"status\":\"active\",\"quantity\":{\"maximum\":100,\"minimum\":1},\"tax_mode\":\"account_setting\",\"created_at\":\"2023-06-01T13:31:12.625056Z\",\"product_id\":\"pro_01h1vjes1y163xfj1rh1tkfb65\",\"unit_price\":{\"amount\":\"10000\",\"currency_code\":\"USD\"},\"updated_at\":\"2024-04-09T07:23:00.907834Z\",\"custom_data\":null,\"description\":\"Monthly\",\"import_meta\":null,\"trial_period\":null,\"billing_cycle\":{\"interval\":\"month\",\"frequency\":1},\"unit_price_overrides\":[]},\"quantity\":1,\"proration\":null},{\"price\":{\"id\":\"pri_01gsz98e27ak2tyhexptwc58yk\",\"name\":\"One-time addon\",\"type\":\"standard\",\"status\":\"active\",\"quantity\":{\"maximum\":1,\"minimum\":1},\"tax_mode\":\"account_setting\",\"created_at\":\"2023-02-23T14:01:28.391712Z\",\"product_id\":\"pro_01gsz97mq9pa4fkyy0wqenepkz\",\"unit_price\":{\"amount\":\"19900\",\"currency_code\":\"USD\"},\"updated_at\":\"2024-04-09T07:23:10.921392Z\",\"custom_data\":null,\"description\":\"One-time addon\",\"import_meta\":null,\"trial_period\":null,\"billing_cycle\":null,\"unit_price_overrides\":[]},\"quantity\":1,\"proration\":null}],\"origin\":\"web\",\"status\":\"paid\",\"details\":{\"totals\":{\"fee\":null,\"tax\":\"5315\",\"total\":\"65215\",\"credit\":\"0\",\"balance\":\"0\",\"discount\":\"0\",\"earnings\":null,\"subtotal\":\"59900\",\"grand_total\":\"65215\",\"currency_code\":\"USD\",\"credit_to_balance\":\"0\"},\"line_items\":[{\"id\":\"txnitm_01hv8wt98jahpbm1t1tzr06z6n\",\"totals\":{\"tax\":\"2662\",\"total\":\"32662\",\"discount\":\"0\",\"subtotal\":\"30000\"},\"product\":{\"id\":\"pro_01gsz4t5hdjse780zja8vvr7jg\",\"name\":\"AeroEdit Pro\",\"type\":\"standard\",\"status\":\"active\",\"image_url\":\"https://paddle.s3.amazonaws.com/user/165798/bT1XUOJAQhOUxGs83cbk_pro.png\",\"created_at\":\"2023-02-23T12:43:46.605Z\",\"updated_at\":\"2024-04-05T15:53:44.687Z\",\"custom_data\":{\"features\":{\"sso\":false,\"route_planning\":true,\"payment_by_invoice\":false,\"aircraft_performance\":true,\"compliance_monitoring\":true,\"flight_log_management\":true},\"suggested_addons\":[\"pro_01h1vjes1y163xfj1rh1tkfb65\",\"pro_01gsz97mq9pa4fkyy0wqenepkz\"],\"upgrade_description\":\"Move from Basic to Pro to take advantage of aircraft performance, advanced route planning, and compliance monitoring.\"},\"description\":\"Designed for professional pilots, including all features plus in Basic plus compliance monitoring, route optimization, and third-party integrations.\",\"import_meta\":null,\"tax_category\":\"standard\"},\"price_id\":\"pri_01gsz8x8sawmvhz1pv30nge1ke\",\"quantity\":10,\"tax_rate\":\"0.08875\",\"unit_totals\":{\"tax\":\"266\",\"total\":\"3266\",\"discount\":\"0\",\"subtotal\":\"3000\"}},{\"id\":\"txnitm_01hv8wt98jahpbm1t1v1sd067y\",\"totals\":{\"tax\":\"887\",\"total\":\"10887\",\"discount\":\"0\",\"subtotal\":\"10000\"},\"product\":{\"id\":\"pro_01h1vjes1y163xfj1rh1tkfb65\",\"name\":\"Analytics addon\",\"type\":\"standard\",\"status\":\"active\",\"image_url\":\"https://paddle.s3.amazonaws.com/user/165798/97dRpA6SXzcE6ekK9CAr_analytics.png\",\"created_at\":\"2023-06-01T13:30:50.302Z\",\"updated_at\":\"2024-04-05T15:47:17.163Z\",\"custom_data\":null,\"description\":\"Unlock advanced insights into your flight data with enhanced analytics and reporting features. Includes customizable reporting templates and trend analysis across flights.\",\"import_meta\":null,\"tax_category\":\"standard\"},\"price_id\":\"pri_01h1vjfevh5etwq3rb416a23h2\",\"quantity\":1,\"tax_rate\":\"0.08875\",\"unit_totals\":{\"tax\":\"887\",\"total\":\"10887\",\"discount\":\"0\",\"subtotal\":\"10000\"}},{\"id\":\"txnitm_01hv8wt98jahpbm1t1v67vqnb6\",\"totals\":{\"tax\":\"1766\",\"total\":\"21666\",\"discount\":\"0\",\"subtotal\":\"19900\"},\"product\":{\"id\":\"pro_01gsz97mq9pa4fkyy0wqenepkz\",\"name\":\"Custom domains\",\"type\":\"standard\",\"status\":\"active\",\"image_url\":\"https://paddle.s3.amazonaws.com/user/165798/XIG7UXoJQHmlIAiKcnkA_custom-domains.png\",\"created_at\":\"2023-02-23T14:01:02.441Z\",\"updated_at\":\"2024-04-05T15:43:28.971Z\",\"custom_data\":null,\"description\":\"Make AeroEdit truly your own with custom domains. Custom domains reinforce your brand identity and make it easy for your team to access your account.\",\"import_meta\":null,\"tax_category\":\"standard\"},\"price_id\":\"pri_01gsz98e27ak2tyhexptwc58yk\",\"quantity\":1,\"tax_rate\":\"0.08875\",\"unit_totals\":{\"tax\":\"1766\",\"total\":\"21666\",\"discount\":\"0\",\"subtotal\":\"19900\"}}],\"payout_totals\":null,\"tax_rates_used\":[{\"totals\":{\"tax\":\"5315\",\"total\":\"65215\",\"discount\":\"0\",\"subtotal\":\"59900\"},\"tax_rate\":\"0.08875\"}],\"adjusted_totals\":{\"fee\":\"0\",\"tax\":\"5315\",\"total\":\"65215\",\"earnings\":\"0\",\"subtotal\":\"59900\",\"grand_total\":\"65215\",\"currency_code\":\"USD\"}},\"checkout\":{\"url\":\"https://aeroedit.com/pay?_ptxn=txn_01hv8wptq8987qeep44cyrewp9\"},\"payments\":[{\"amount\":\"65215\",\"status\":\"captured\",\"created_at\":\"2024-04-12T10:18:33.579142Z\",\"error_code\":null,\"captured_at\":\"2024-04-12T10:18:47.635628Z\",\"method_details\":{\"card\":{\"type\":\"visa\",\"last4\":\"3184\",\"expiry_year\":2025,\"expiry_month\":1,\"cardholder_name\":\"Michael McGovern\"},\"type\":\"card\"},\"payment_method_id\":\"paymtd_01hv8x1tpjfnttxddw73xnqx6s\",\"payment_attempt_id\":\"937640dd-e3dc-40df-a16c-bb75aafd8f71\",\"stored_payment_method_id\":\"281ff2ca-8550-42b9-bf39-15948e7de62d\"},{\"amount\":\"65215\",\"status\":\"error\",\"created_at\":\"2024-04-12T10:15:57.888183Z\",\"error_code\":\"declined\",\"captured_at\":null,\"method_details\":{\"card\":{\"type\":\"visa\",\"last4\":\"0002\",\"expiry_year\":2025,\"expiry_month\":1,\"cardholder_name\":\"Michael McGovern\"},\"type\":\"card\"},\"payment_method_id\":\"paymtd_01hv8wx2mka7dfsqjjsxh1ne7z\",\"payment_attempt_id\":\"8f72cfa6-26b4-4a57-91dc-8f2708f7822d\",\"stored_payment_method_id\":\"a78ece50-356f-4e0c-b72d-ad5368b0a0d9\"}],\"billed_at\":\"2024-04-12T10:18:48.294633821Z\",\"address_id\":\"add_01hv8gq3318ktkfengj2r75gfx\",\"created_at\":\"2024-04-12T10:12:33.2014Z\",\"invoice_id\":null,\"updated_at\":\"2024-04-12T10:18:48.294635093Z\",\"business_id\":null,\"custom_data\":null,\"customer_id\":\"ctm_01hv6y1jedq4p1n0yqn5ba3ky4\",\"discount_id\":null,\"currency_code\":\"USD\",\"billing_period\":null,\"invoice_number\":null,\"billing_details\":null,\"collection_mode\":\"automatic\",\"subscription_id\":null}}", "headers": { "Paddle-Version": 1 } }, "response": { "body": "{\"status\":\"NOTICE\",\"message\":\"Unknown source ID. If you just created that source, it can take a minute to propagate. Be assured that if the source is valid, the webhook was handled successfully. Check your dashboard to inspect the request: https://dashboard.hookdeck.com/\",\"request_id\":\"req_T3my7IzEbiVuqLbQ4I7k\"}", "statusCode": 200, "headers": { "Date": ["Wed, 18 Sep 2024 16:32:35 GMT"], "CF-RAY": ["8c52bb9ea94457dc-IAD"], "Server": ["cloudflare"], "Connection": ["keep-alive"], "Content-Type": ["application/json"], "Content-Length": ["346"], "Access-Control-Max-Age": ["86400"], "Access-Control-Allow-Origin": ["*"], "Access-Control-Allow-Methods": [ "GET, HEAD, PUT, PATCH, DELETE, POST, OPTIONS" ] } }, "created_at": "2024-09-18T16:32:30.311470Z", "updated_at": "2024-09-18T16:32:35.689284Z" }, { "id": "ntfsimevt_01j82zmtjsvyqwjc6ta232nb2s", "status": "success", "event_type": "transaction.ready", "payload": { "id": "txn_01hv8wptq8987qeep44cyrewp9", "items": [ { "price": { "id": "pri_01gsz8x8sawmvhz1pv30nge1ke", "name": "Monthly (per seat)", "type": "standard", "status": "active", "quantity": { "maximum": 999, "minimum": 1 }, "tax_mode": "account_setting", "created_at": "2023-02-23T13:55:22.538367Z", "product_id": "pro_01gsz4t5hdjse780zja8vvr7jg", "unit_price": { "amount": "3000", "currency_code": "USD" }, "updated_at": "2024-04-11T13:54:52.254748Z", "custom_data": null, "description": "Monthly", "import_meta": null, "trial_period": null, "billing_cycle": { "interval": "month", "frequency": 1 }, "unit_price_overrides": [] }, "quantity": 10, "proration": null }, { "price": { "id": "pri_01h1vjfevh5etwq3rb416a23h2", "name": "Monthly (recurring addon)", "type": "standard", "status": "active", "quantity": { "maximum": 100, "minimum": 1 }, "tax_mode": "account_setting", "created_at": "2023-06-01T13:31:12.625056Z", "product_id": "pro_01h1vjes1y163xfj1rh1tkfb65", "unit_price": { "amount": "10000", "currency_code": "USD" }, "updated_at": "2024-04-09T07:23:00.907834Z", "custom_data": null, "description": "Monthly", "import_meta": null, "trial_period": null, "billing_cycle": { "interval": "month", "frequency": 1 }, "unit_price_overrides": [] }, "quantity": 1, "proration": null }, { "price": { "id": "pri_01gsz98e27ak2tyhexptwc58yk", "name": "One-time addon", "type": "standard", "status": "active", "quantity": { "maximum": 1, "minimum": 1 }, "tax_mode": "account_setting", "created_at": "2023-02-23T14:01:28.391712Z", "product_id": "pro_01gsz97mq9pa4fkyy0wqenepkz", "unit_price": { "amount": "19900", "currency_code": "USD" }, "updated_at": "2024-04-09T07:23:10.921392Z", "custom_data": null, "description": "One-time addon", "import_meta": null, "trial_period": null, "billing_cycle": null, "unit_price_overrides": [] }, "quantity": 1, "proration": null } ], "origin": "web", "status": "ready", "details": { "totals": { "fee": null, "tax": "5315", "total": "65215", "credit": "0", "balance": "65215", "discount": "0", "earnings": null, "subtotal": "59900", "grand_total": "65215", "currency_code": "USD", "credit_to_balance": "0" }, "line_items": [ { "id": "txnitm_01hv8wt98jahpbm1t1tzr06z6n", "totals": { "tax": "2662", "total": "32662", "discount": "0", "subtotal": "30000" }, "product": { "id": "pro_01gsz4t5hdjse780zja8vvr7jg", "name": "AeroEdit Pro", "type": "standard", "status": "active", "image_url": "https://paddle.s3.amazonaws.com/user/165798/bT1XUOJAQhOUxGs83cbk_pro.png", "created_at": "2023-02-23T12:43:46.605Z", "updated_at": "2024-04-05T15:53:44.687Z", "custom_data": { "features": { "sso": false, "route_planning": true, "payment_by_invoice": false, "aircraft_performance": true, "compliance_monitoring": true, "flight_log_management": true }, "suggested_addons": [ "pro_01h1vjes1y163xfj1rh1tkfb65", "pro_01gsz97mq9pa4fkyy0wqenepkz" ], "upgrade_description": "Move from Basic to Pro to take advantage of aircraft performance, advanced route planning, and compliance monitoring." }, "description": "Designed for professional pilots, including all features plus in Basic plus compliance monitoring, route optimization, and third-party integrations.", "import_meta": null, "tax_category": "standard" }, "price_id": "pri_01gsz8x8sawmvhz1pv30nge1ke", "quantity": 10, "tax_rate": "0.08875", "unit_totals": { "tax": "266", "total": "3266", "discount": "0", "subtotal": "3000" } }, { "id": "txnitm_01hv8wt98jahpbm1t1v1sd067y", "totals": { "tax": "887", "total": "10887", "discount": "0", "subtotal": "10000" }, "product": { "id": "pro_01h1vjes1y163xfj1rh1tkfb65", "name": "Analytics addon", "type": "standard", "status": "active", "image_url": "https://paddle.s3.amazonaws.com/user/165798/97dRpA6SXzcE6ekK9CAr_analytics.png", "created_at": "2023-06-01T13:30:50.302Z", "updated_at": "2024-04-05T15:47:17.163Z", "custom_data": null, "description": "Unlock advanced insights into your flight data with enhanced analytics and reporting features. Includes customizable reporting templates and trend analysis across flights.", "import_meta": null, "tax_category": "standard" }, "price_id": "pri_01h1vjfevh5etwq3rb416a23h2", "quantity": 1, "tax_rate": "0.08875", "unit_totals": { "tax": "887", "total": "10887", "discount": "0", "subtotal": "10000" } }, { "id": "txnitm_01hv8wt98jahpbm1t1v67vqnb6", "totals": { "tax": "1766", "total": "21666", "discount": "0", "subtotal": "19900" }, "product": { "id": "pro_01gsz97mq9pa4fkyy0wqenepkz", "name": "Custom domains", "type": "standard", "status": "active", "image_url": "https://paddle.s3.amazonaws.com/user/165798/XIG7UXoJQHmlIAiKcnkA_custom-domains.png", "created_at": "2023-02-23T14:01:02.441Z", "updated_at": "2024-04-05T15:43:28.971Z", "custom_data": null, "description": "Make AeroEdit truly your own with custom domains. Custom domains reinforce your brand identity and make it easy for your team to access your account.", "import_meta": null, "tax_category": "standard" }, "price_id": "pri_01gsz98e27ak2tyhexptwc58yk", "quantity": 1, "tax_rate": "0.08875", "unit_totals": { "tax": "1766", "total": "21666", "discount": "0", "subtotal": "19900" } } ], "payout_totals": null, "tax_rates_used": [ { "totals": { "tax": "5315", "total": "65215", "discount": "0", "subtotal": "59900" }, "tax_rate": "0.08875" } ], "adjusted_totals": { "fee": "0", "tax": "5315", "total": "65215", "earnings": "0", "subtotal": "59900", "grand_total": "65215", "currency_code": "USD" } }, "checkout": { "url": "https://aeroedit.com/pay?_ptxn=txn_01hv8wptq8987qeep44cyrewp9" }, "payments": [], "billed_at": null, "address_id": "add_01hv8gq3318ktkfengj2r75gfx", "created_at": "2024-04-12T10:12:33.2014Z", "invoice_id": null, "updated_at": "2024-04-12T10:14:26.325076344Z", "business_id": null, "custom_data": null, "customer_id": "ctm_01hv6y1jedq4p1n0yqn5ba3ky4", "discount_id": null, "currency_code": "USD", "billing_period": null, "invoice_number": null, "billing_details": null, "collection_mode": "automatic", "subscription_id": null }, "request": { "body": "{\"event_id\":\"ntfsimevt_01j82zmtjsvyqwjc6ta232nb2s\",\"event_type\":\"transaction.ready\",\"occurred_at\":\"2024-09-18T16:32:30.297995Z\",\"data\":{\"id\":\"txn_01hv8wptq8987qeep44cyrewp9\",\"items\":[{\"price\":{\"id\":\"pri_01gsz8x8sawmvhz1pv30nge1ke\",\"name\":\"Monthly (per seat)\",\"type\":\"standard\",\"status\":\"active\",\"quantity\":{\"maximum\":999,\"minimum\":1},\"tax_mode\":\"account_setting\",\"created_at\":\"2023-02-23T13:55:22.538367Z\",\"product_id\":\"pro_01gsz4t5hdjse780zja8vvr7jg\",\"unit_price\":{\"amount\":\"3000\",\"currency_code\":\"USD\"},\"updated_at\":\"2024-04-11T13:54:52.254748Z\",\"custom_data\":null,\"description\":\"Monthly\",\"import_meta\":null,\"trial_period\":null,\"billing_cycle\":{\"interval\":\"month\",\"frequency\":1},\"unit_price_overrides\":[]},\"quantity\":10,\"proration\":null},{\"price\":{\"id\":\"pri_01h1vjfevh5etwq3rb416a23h2\",\"name\":\"Monthly (recurring addon)\",\"type\":\"standard\",\"status\":\"active\",\"quantity\":{\"maximum\":100,\"minimum\":1},\"tax_mode\":\"account_setting\",\"created_at\":\"2023-06-01T13:31:12.625056Z\",\"product_id\":\"pro_01h1vjes1y163xfj1rh1tkfb65\",\"unit_price\":{\"amount\":\"10000\",\"currency_code\":\"USD\"},\"updated_at\":\"2024-04-09T07:23:00.907834Z\",\"custom_data\":null,\"description\":\"Monthly\",\"import_meta\":null,\"trial_period\":null,\"billing_cycle\":{\"interval\":\"month\",\"frequency\":1},\"unit_price_overrides\":[]},\"quantity\":1,\"proration\":null},{\"price\":{\"id\":\"pri_01gsz98e27ak2tyhexptwc58yk\",\"name\":\"One-time addon\",\"type\":\"standard\",\"status\":\"active\",\"quantity\":{\"maximum\":1,\"minimum\":1},\"tax_mode\":\"account_setting\",\"created_at\":\"2023-02-23T14:01:28.391712Z\",\"product_id\":\"pro_01gsz97mq9pa4fkyy0wqenepkz\",\"unit_price\":{\"amount\":\"19900\",\"currency_code\":\"USD\"},\"updated_at\":\"2024-04-09T07:23:10.921392Z\",\"custom_data\":null,\"description\":\"One-time addon\",\"import_meta\":null,\"trial_period\":null,\"billing_cycle\":null,\"unit_price_overrides\":[]},\"quantity\":1,\"proration\":null}],\"origin\":\"web\",\"status\":\"ready\",\"details\":{\"totals\":{\"fee\":null,\"tax\":\"5315\",\"total\":\"65215\",\"credit\":\"0\",\"balance\":\"65215\",\"discount\":\"0\",\"earnings\":null,\"subtotal\":\"59900\",\"grand_total\":\"65215\",\"currency_code\":\"USD\",\"credit_to_balance\":\"0\"},\"line_items\":[{\"id\":\"txnitm_01hv8wt98jahpbm1t1tzr06z6n\",\"totals\":{\"tax\":\"2662\",\"total\":\"32662\",\"discount\":\"0\",\"subtotal\":\"30000\"},\"product\":{\"id\":\"pro_01gsz4t5hdjse780zja8vvr7jg\",\"name\":\"AeroEdit Pro\",\"type\":\"standard\",\"status\":\"active\",\"image_url\":\"https://paddle.s3.amazonaws.com/user/165798/bT1XUOJAQhOUxGs83cbk_pro.png\",\"created_at\":\"2023-02-23T12:43:46.605Z\",\"updated_at\":\"2024-04-05T15:53:44.687Z\",\"custom_data\":{\"features\":{\"sso\":false,\"route_planning\":true,\"payment_by_invoice\":false,\"aircraft_performance\":true,\"compliance_monitoring\":true,\"flight_log_management\":true},\"suggested_addons\":[\"pro_01h1vjes1y163xfj1rh1tkfb65\",\"pro_01gsz97mq9pa4fkyy0wqenepkz\"],\"upgrade_description\":\"Move from Basic to Pro to take advantage of aircraft performance, advanced route planning, and compliance monitoring.\"},\"description\":\"Designed for professional pilots, including all features plus in Basic plus compliance monitoring, route optimization, and third-party integrations.\",\"import_meta\":null,\"tax_category\":\"standard\"},\"price_id\":\"pri_01gsz8x8sawmvhz1pv30nge1ke\",\"quantity\":10,\"tax_rate\":\"0.08875\",\"unit_totals\":{\"tax\":\"266\",\"total\":\"3266\",\"discount\":\"0\",\"subtotal\":\"3000\"}},{\"id\":\"txnitm_01hv8wt98jahpbm1t1v1sd067y\",\"totals\":{\"tax\":\"887\",\"total\":\"10887\",\"discount\":\"0\",\"subtotal\":\"10000\"},\"product\":{\"id\":\"pro_01h1vjes1y163xfj1rh1tkfb65\",\"name\":\"Analytics addon\",\"type\":\"standard\",\"status\":\"active\",\"image_url\":\"https://paddle.s3.amazonaws.com/user/165798/97dRpA6SXzcE6ekK9CAr_analytics.png\",\"created_at\":\"2023-06-01T13:30:50.302Z\",\"updated_at\":\"2024-04-05T15:47:17.163Z\",\"custom_data\":null,\"description\":\"Unlock advanced insights into your flight data with enhanced analytics and reporting features. Includes customizable reporting templates and trend analysis across flights.\",\"import_meta\":null,\"tax_category\":\"standard\"},\"price_id\":\"pri_01h1vjfevh5etwq3rb416a23h2\",\"quantity\":1,\"tax_rate\":\"0.08875\",\"unit_totals\":{\"tax\":\"887\",\"total\":\"10887\",\"discount\":\"0\",\"subtotal\":\"10000\"}},{\"id\":\"txnitm_01hv8wt98jahpbm1t1v67vqnb6\",\"totals\":{\"tax\":\"1766\",\"total\":\"21666\",\"discount\":\"0\",\"subtotal\":\"19900\"},\"product\":{\"id\":\"pro_01gsz97mq9pa4fkyy0wqenepkz\",\"name\":\"Custom domains\",\"type\":\"standard\",\"status\":\"active\",\"image_url\":\"https://paddle.s3.amazonaws.com/user/165798/XIG7UXoJQHmlIAiKcnkA_custom-domains.png\",\"created_at\":\"2023-02-23T14:01:02.441Z\",\"updated_at\":\"2024-04-05T15:43:28.971Z\",\"custom_data\":null,\"description\":\"Make AeroEdit truly your own with custom domains. Custom domains reinforce your brand identity and make it easy for your team to access your account.\",\"import_meta\":null,\"tax_category\":\"standard\"},\"price_id\":\"pri_01gsz98e27ak2tyhexptwc58yk\",\"quantity\":1,\"tax_rate\":\"0.08875\",\"unit_totals\":{\"tax\":\"1766\",\"total\":\"21666\",\"discount\":\"0\",\"subtotal\":\"19900\"}}],\"payout_totals\":null,\"tax_rates_used\":[{\"totals\":{\"tax\":\"5315\",\"total\":\"65215\",\"discount\":\"0\",\"subtotal\":\"59900\"},\"tax_rate\":\"0.08875\"}],\"adjusted_totals\":{\"fee\":\"0\",\"tax\":\"5315\",\"total\":\"65215\",\"earnings\":\"0\",\"subtotal\":\"59900\",\"grand_total\":\"65215\",\"currency_code\":\"USD\"}},\"checkout\":{\"url\":\"https://aeroedit.com/pay?_ptxn=txn_01hv8wptq8987qeep44cyrewp9\"},\"payments\":[],\"billed_at\":null,\"address_id\":\"add_01hv8gq3318ktkfengj2r75gfx\",\"created_at\":\"2024-04-12T10:12:33.2014Z\",\"invoice_id\":null,\"updated_at\":\"2024-04-12T10:14:26.325076344Z\",\"business_id\":null,\"custom_data\":null,\"customer_id\":\"ctm_01hv6y1jedq4p1n0yqn5ba3ky4\",\"discount_id\":null,\"currency_code\":\"USD\",\"billing_period\":null,\"invoice_number\":null,\"billing_details\":null,\"collection_mode\":\"automatic\",\"subscription_id\":null}}", "headers": { "Paddle-Version": 1 } }, "response": { "body": "{\"status\":\"NOTICE\",\"message\":\"Unknown source ID. If you just created that source, it can take a minute to propagate. Be assured that if the source is valid, the webhook was handled successfully. Check your dashboard to inspect the request: https://dashboard.hookdeck.com/\",\"request_id\":\"req_DfgiuxXeSTYwCbSx9ld3\"}", "statusCode": 200, "headers": { "Date": ["Wed, 18 Sep 2024 16:32:34 GMT"], "CF-RAY": ["8c52bb997d42c942-IAD"], "Server": ["cloudflare"], "Connection": ["keep-alive"], "Content-Type": ["application/json"], "Content-Length": ["346"], "Access-Control-Max-Age": ["86400"], "Access-Control-Allow-Origin": ["*"], "Access-Control-Allow-Methods": [ "GET, HEAD, PUT, PATCH, DELETE, POST, OPTIONS" ] } }, "created_at": "2024-09-18T16:32:30.297995Z", "updated_at": "2024-09-18T16:32:34.844881Z" }, { "id": "ntfsimevt_01j82zmtjntyt9yk2bw9e4zc86", "status": "success", "event_type": "transaction.updated", "payload": { "id": "txn_01hv8wptq8987qeep44cyrewp9", "items": [ { "price": { "id": "pri_01gsz8x8sawmvhz1pv30nge1ke", "name": "Monthly (per seat)", "type": "standard", "status": "active", "quantity": { "maximum": 999, "minimum": 1 }, "tax_mode": "account_setting", "created_at": "2023-02-23T13:55:22.538367Z", "product_id": "pro_01gsz4t5hdjse780zja8vvr7jg", "unit_price": { "amount": "3000", "currency_code": "USD" }, "updated_at": "2024-04-11T13:54:52.254748Z", "custom_data": null, "description": "Monthly", "import_meta": null, "trial_period": null, "billing_cycle": { "interval": "month", "frequency": 1 }, "unit_price_overrides": [] }, "quantity": 10, "proration": null }, { "price": { "id": "pri_01h1vjfevh5etwq3rb416a23h2", "name": "Monthly (recurring addon)", "type": "standard", "status": "active", "quantity": { "maximum": 100, "minimum": 1 }, "tax_mode": "account_setting", "created_at": "2023-06-01T13:31:12.625056Z", "product_id": "pro_01h1vjes1y163xfj1rh1tkfb65", "unit_price": { "amount": "10000", "currency_code": "USD" }, "updated_at": "2024-04-09T07:23:00.907834Z", "custom_data": null, "description": "Monthly", "import_meta": null, "trial_period": null, "billing_cycle": { "interval": "month", "frequency": 1 }, "unit_price_overrides": [] }, "quantity": 1, "proration": null }, { "price": { "id": "pri_01gsz98e27ak2tyhexptwc58yk", "name": "One-time addon", "type": "standard", "status": "active", "quantity": { "maximum": 1, "minimum": 1 }, "tax_mode": "account_setting", "created_at": "2023-02-23T14:01:28.391712Z", "product_id": "pro_01gsz97mq9pa4fkyy0wqenepkz", "unit_price": { "amount": "19900", "currency_code": "USD" }, "updated_at": "2024-04-09T07:23:10.921392Z", "custom_data": null, "description": "One-time addon", "import_meta": null, "trial_period": null, "billing_cycle": null, "unit_price_overrides": [] }, "quantity": 1, "proration": null } ], "origin": "web", "status": "ready", "details": { "totals": { "fee": null, "tax": "5315", "total": "65215", "credit": "0", "balance": "65215", "discount": "0", "earnings": null, "subtotal": "59900", "grand_total": "65215", "currency_code": "USD", "credit_to_balance": "0" }, "line_items": [ { "id": "txnitm_01hv8wt98jahpbm1t1tzr06z6n", "totals": { "tax": "2662", "total": "32662", "discount": "0", "subtotal": "30000" }, "product": { "id": "pro_01gsz4t5hdjse780zja8vvr7jg", "name": "AeroEdit Pro", "type": "standard", "status": "active", "image_url": "https://paddle.s3.amazonaws.com/user/165798/bT1XUOJAQhOUxGs83cbk_pro.png", "created_at": "2023-02-23T12:43:46.605Z", "updated_at": "2024-04-05T15:53:44.687Z", "custom_data": { "features": { "sso": false, "route_planning": true, "payment_by_invoice": false, "aircraft_performance": true, "compliance_monitoring": true, "flight_log_management": true }, "suggested_addons": [ "pro_01h1vjes1y163xfj1rh1tkfb65", "pro_01gsz97mq9pa4fkyy0wqenepkz" ], "upgrade_description": "Move from Basic to Pro to take advantage of aircraft performance, advanced route planning, and compliance monitoring." }, "description": "Designed for professional pilots, including all features plus in Basic plus compliance monitoring, route optimization, and third-party integrations.", "import_meta": null, "tax_category": "standard" }, "price_id": "pri_01gsz8x8sawmvhz1pv30nge1ke", "quantity": 10, "tax_rate": "0.08875", "unit_totals": { "tax": "266", "total": "3266", "discount": "0", "subtotal": "3000" } }, { "id": "txnitm_01hv8wt98jahpbm1t1v1sd067y", "totals": { "tax": "887", "total": "10887", "discount": "0", "subtotal": "10000" }, "product": { "id": "pro_01h1vjes1y163xfj1rh1tkfb65", "name": "Analytics addon", "type": "standard", "status": "active", "image_url": "https://paddle.s3.amazonaws.com/user/165798/97dRpA6SXzcE6ekK9CAr_analytics.png", "created_at": "2023-06-01T13:30:50.302Z", "updated_at": "2024-04-05T15:47:17.163Z", "custom_data": null, "description": "Unlock advanced insights into your flight data with enhanced analytics and reporting features. Includes customizable reporting templates and trend analysis across flights.", "import_meta": null, "tax_category": "standard" }, "price_id": "pri_01h1vjfevh5etwq3rb416a23h2", "quantity": 1, "tax_rate": "0.08875", "unit_totals": { "tax": "887", "total": "10887", "discount": "0", "subtotal": "10000" } }, { "id": "txnitm_01hv8wt98jahpbm1t1v67vqnb6", "totals": { "tax": "1766", "total": "21666", "discount": "0", "subtotal": "19900" }, "product": { "id": "pro_01gsz97mq9pa4fkyy0wqenepkz", "name": "Custom domains", "type": "standard", "status": "active", "image_url": "https://paddle.s3.amazonaws.com/user/165798/XIG7UXoJQHmlIAiKcnkA_custom-domains.png", "created_at": "2023-02-23T14:01:02.441Z", "updated_at": "2024-04-05T15:43:28.971Z", "custom_data": null, "description": "Make AeroEdit truly your own with custom domains. Custom domains reinforce your brand identity and make it easy for your team to access your account.", "import_meta": null, "tax_category": "standard" }, "price_id": "pri_01gsz98e27ak2tyhexptwc58yk", "quantity": 1, "tax_rate": "0.08875", "unit_totals": { "tax": "1766", "total": "21666", "discount": "0", "subtotal": "19900" } } ], "payout_totals": null, "tax_rates_used": [ { "totals": { "tax": "5315", "total": "65215", "discount": "0", "subtotal": "59900" }, "tax_rate": "0.08875" } ], "adjusted_totals": { "fee": "0", "tax": "5315", "total": "65215", "earnings": "0", "subtotal": "59900", "grand_total": "65215", "currency_code": "USD" } }, "checkout": { "url": "https://aeroedit.com/pay?_ptxn=txn_01hv8wptq8987qeep44cyrewp9" }, "payments": [], "billed_at": null, "address_id": "add_01hv8gq3318ktkfengj2r75gfx", "created_at": "2024-04-12T10:12:33.2014Z", "invoice_id": null, "updated_at": "2024-04-12T10:14:26.325076344Z", "business_id": null, "custom_data": null, "customer_id": "ctm_01hv6y1jedq4p1n0yqn5ba3ky4", "discount_id": null, "currency_code": "USD", "billing_period": null, "invoice_number": null, "billing_details": null, "collection_mode": "automatic", "subscription_id": null }, "request": { "body": "{\"event_id\":\"ntfsimevt_01j82zmtjntyt9yk2bw9e4zc86\",\"event_type\":\"transaction.updated\",\"occurred_at\":\"2024-09-18T16:32:30.293767Z\",\"data\":{\"id\":\"txn_01hv8wptq8987qeep44cyrewp9\",\"items\":[{\"price\":{\"id\":\"pri_01gsz8x8sawmvhz1pv30nge1ke\",\"name\":\"Monthly (per seat)\",\"type\":\"standard\",\"status\":\"active\",\"quantity\":{\"maximum\":999,\"minimum\":1},\"tax_mode\":\"account_setting\",\"created_at\":\"2023-02-23T13:55:22.538367Z\",\"product_id\":\"pro_01gsz4t5hdjse780zja8vvr7jg\",\"unit_price\":{\"amount\":\"3000\",\"currency_code\":\"USD\"},\"updated_at\":\"2024-04-11T13:54:52.254748Z\",\"custom_data\":null,\"description\":\"Monthly\",\"import_meta\":null,\"trial_period\":null,\"billing_cycle\":{\"interval\":\"month\",\"frequency\":1},\"unit_price_overrides\":[]},\"quantity\":10,\"proration\":null},{\"price\":{\"id\":\"pri_01h1vjfevh5etwq3rb416a23h2\",\"name\":\"Monthly (recurring addon)\",\"type\":\"standard\",\"status\":\"active\",\"quantity\":{\"maximum\":100,\"minimum\":1},\"tax_mode\":\"account_setting\",\"created_at\":\"2023-06-01T13:31:12.625056Z\",\"product_id\":\"pro_01h1vjes1y163xfj1rh1tkfb65\",\"unit_price\":{\"amount\":\"10000\",\"currency_code\":\"USD\"},\"updated_at\":\"2024-04-09T07:23:00.907834Z\",\"custom_data\":null,\"description\":\"Monthly\",\"import_meta\":null,\"trial_period\":null,\"billing_cycle\":{\"interval\":\"month\",\"frequency\":1},\"unit_price_overrides\":[]},\"quantity\":1,\"proration\":null},{\"price\":{\"id\":\"pri_01gsz98e27ak2tyhexptwc58yk\",\"name\":\"One-time addon\",\"type\":\"standard\",\"status\":\"active\",\"quantity\":{\"maximum\":1,\"minimum\":1},\"tax_mode\":\"account_setting\",\"created_at\":\"2023-02-23T14:01:28.391712Z\",\"product_id\":\"pro_01gsz97mq9pa4fkyy0wqenepkz\",\"unit_price\":{\"amount\":\"19900\",\"currency_code\":\"USD\"},\"updated_at\":\"2024-04-09T07:23:10.921392Z\",\"custom_data\":null,\"description\":\"One-time addon\",\"import_meta\":null,\"trial_period\":null,\"billing_cycle\":null,\"unit_price_overrides\":[]},\"quantity\":1,\"proration\":null}],\"origin\":\"web\",\"status\":\"ready\",\"details\":{\"totals\":{\"fee\":null,\"tax\":\"5315\",\"total\":\"65215\",\"credit\":\"0\",\"balance\":\"65215\",\"discount\":\"0\",\"earnings\":null,\"subtotal\":\"59900\",\"grand_total\":\"65215\",\"currency_code\":\"USD\",\"credit_to_balance\":\"0\"},\"line_items\":[{\"id\":\"txnitm_01hv8wt98jahpbm1t1tzr06z6n\",\"totals\":{\"tax\":\"2662\",\"total\":\"32662\",\"discount\":\"0\",\"subtotal\":\"30000\"},\"product\":{\"id\":\"pro_01gsz4t5hdjse780zja8vvr7jg\",\"name\":\"AeroEdit Pro\",\"type\":\"standard\",\"status\":\"active\",\"image_url\":\"https://paddle.s3.amazonaws.com/user/165798/bT1XUOJAQhOUxGs83cbk_pro.png\",\"created_at\":\"2023-02-23T12:43:46.605Z\",\"updated_at\":\"2024-04-05T15:53:44.687Z\",\"custom_data\":{\"features\":{\"sso\":false,\"route_planning\":true,\"payment_by_invoice\":false,\"aircraft_performance\":true,\"compliance_monitoring\":true,\"flight_log_management\":true},\"suggested_addons\":[\"pro_01h1vjes1y163xfj1rh1tkfb65\",\"pro_01gsz97mq9pa4fkyy0wqenepkz\"],\"upgrade_description\":\"Move from Basic to Pro to take advantage of aircraft performance, advanced route planning, and compliance monitoring.\"},\"description\":\"Designed for professional pilots, including all features plus in Basic plus compliance monitoring, route optimization, and third-party integrations.\",\"import_meta\":null,\"tax_category\":\"standard\"},\"price_id\":\"pri_01gsz8x8sawmvhz1pv30nge1ke\",\"quantity\":10,\"tax_rate\":\"0.08875\",\"unit_totals\":{\"tax\":\"266\",\"total\":\"3266\",\"discount\":\"0\",\"subtotal\":\"3000\"}},{\"id\":\"txnitm_01hv8wt98jahpbm1t1v1sd067y\",\"totals\":{\"tax\":\"887\",\"total\":\"10887\",\"discount\":\"0\",\"subtotal\":\"10000\"},\"product\":{\"id\":\"pro_01h1vjes1y163xfj1rh1tkfb65\",\"name\":\"Analytics addon\",\"type\":\"standard\",\"status\":\"active\",\"image_url\":\"https://paddle.s3.amazonaws.com/user/165798/97dRpA6SXzcE6ekK9CAr_analytics.png\",\"created_at\":\"2023-06-01T13:30:50.302Z\",\"updated_at\":\"2024-04-05T15:47:17.163Z\",\"custom_data\":null,\"description\":\"Unlock advanced insights into your flight data with enhanced analytics and reporting features. Includes customizable reporting templates and trend analysis across flights.\",\"import_meta\":null,\"tax_category\":\"standard\"},\"price_id\":\"pri_01h1vjfevh5etwq3rb416a23h2\",\"quantity\":1,\"tax_rate\":\"0.08875\",\"unit_totals\":{\"tax\":\"887\",\"total\":\"10887\",\"discount\":\"0\",\"subtotal\":\"10000\"}},{\"id\":\"txnitm_01hv8wt98jahpbm1t1v67vqnb6\",\"totals\":{\"tax\":\"1766\",\"total\":\"21666\",\"discount\":\"0\",\"subtotal\":\"19900\"},\"product\":{\"id\":\"pro_01gsz97mq9pa4fkyy0wqenepkz\",\"name\":\"Custom domains\",\"type\":\"standard\",\"status\":\"active\",\"image_url\":\"https://paddle.s3.amazonaws.com/user/165798/XIG7UXoJQHmlIAiKcnkA_custom-domains.png\",\"created_at\":\"2023-02-23T14:01:02.441Z\",\"updated_at\":\"2024-04-05T15:43:28.971Z\",\"custom_data\":null,\"description\":\"Make AeroEdit truly your own with custom domains. Custom domains reinforce your brand identity and make it easy for your team to access your account.\",\"import_meta\":null,\"tax_category\":\"standard\"},\"price_id\":\"pri_01gsz98e27ak2tyhexptwc58yk\",\"quantity\":1,\"tax_rate\":\"0.08875\",\"unit_totals\":{\"tax\":\"1766\",\"total\":\"21666\",\"discount\":\"0\",\"subtotal\":\"19900\"}}],\"payout_totals\":null,\"tax_rates_used\":[{\"totals\":{\"tax\":\"5315\",\"total\":\"65215\",\"discount\":\"0\",\"subtotal\":\"59900\"},\"tax_rate\":\"0.08875\"}],\"adjusted_totals\":{\"fee\":\"0\",\"tax\":\"5315\",\"total\":\"65215\",\"earnings\":\"0\",\"subtotal\":\"59900\",\"grand_total\":\"65215\",\"currency_code\":\"USD\"}},\"checkout\":{\"url\":\"https://aeroedit.com/pay?_ptxn=txn_01hv8wptq8987qeep44cyrewp9\"},\"payments\":[],\"billed_at\":null,\"address_id\":\"add_01hv8gq3318ktkfengj2r75gfx\",\"created_at\":\"2024-04-12T10:12:33.2014Z\",\"invoice_id\":null,\"updated_at\":\"2024-04-12T10:14:26.325076344Z\",\"business_id\":null,\"custom_data\":null,\"customer_id\":\"ctm_01hv6y1jedq4p1n0yqn5ba3ky4\",\"discount_id\":null,\"currency_code\":\"USD\",\"billing_period\":null,\"invoice_number\":null,\"billing_details\":null,\"collection_mode\":\"automatic\",\"subscription_id\":null}}", "headers": { "Paddle-Version": 1 } }, "response": { "body": "{\"status\":\"NOTICE\",\"message\":\"Unknown source ID. If you just created that source, it can take a minute to propagate. Be assured that if the source is valid, the webhook was handled successfully. Check your dashboard to inspect the request: https://dashboard.hookdeck.com/\",\"request_id\":\"req_zU8PeWoLS3VSCnDgBsoP\"}", "statusCode": 200, "headers": { "Date": ["Wed, 18 Sep 2024 16:32:33 GMT"], "CF-RAY": ["8c52bb93cef23925-IAD"], "Server": ["cloudflare"], "Connection": ["keep-alive"], "Content-Type": ["application/json"], "Content-Length": ["346"], "Access-Control-Max-Age": ["86400"], "Access-Control-Allow-Origin": ["*"], "Access-Control-Allow-Methods": [ "GET, HEAD, PUT, PATCH, DELETE, POST, OPTIONS" ] } }, "created_at": "2024-09-18T16:32:30.293767Z", "updated_at": "2024-09-18T16:32:33.928398Z" }, { "id": "ntfsimevt_01j82zmtjf6tnzm2ayzyzzrh9z", "status": "success", "event_type": "address.created", "payload": { "id": "add_01hv8gq3318ktkfengj2r75gfx", "city": "New York", "region": "NY", "status": "active", "created_at": "2024-04-12T06:42:58.785Z", "first_line": "4050 Jefferson Plaza, 41st Floor", "updated_at": "2024-04-12T06:42:58.785Z", "custom_data": null, "customer_id": "ctm_01hv6y1jedq4p1n0yqn5ba3ky4", "description": "Head Office", "import_meta": null, "postal_code": "10021", "second_line": null, "country_code": "US" }, "request": { "body": "{\"event_id\":\"ntfsimevt_01j82zmtjf6tnzm2ayzyzzrh9z\",\"event_type\":\"address.created\",\"occurred_at\":\"2024-09-18T16:32:30.287621Z\",\"data\":{\"id\":\"add_01hv8gq3318ktkfengj2r75gfx\",\"city\":\"New York\",\"region\":\"NY\",\"status\":\"active\",\"created_at\":\"2024-04-12T06:42:58.785Z\",\"first_line\":\"4050 Jefferson Plaza, 41st Floor\",\"updated_at\":\"2024-04-12T06:42:58.785Z\",\"custom_data\":null,\"customer_id\":\"ctm_01hv6y1jedq4p1n0yqn5ba3ky4\",\"description\":\"Head Office\",\"import_meta\":null,\"postal_code\":\"10021\",\"second_line\":null,\"country_code\":\"US\"}}", "headers": { "Paddle-Version": 1 } }, "response": { "body": "{\"status\":\"NOTICE\",\"message\":\"Unknown source ID. If you just created that source, it can take a minute to propagate. Be assured that if the source is valid, the webhook was handled successfully. Check your dashboard to inspect the request: https://dashboard.hookdeck.com/\",\"request_id\":\"req_Vrzq1DKV9FUT9YhhePSF\"}", "statusCode": 200, "headers": { "Date": ["Wed, 18 Sep 2024 16:32:32 GMT"], "CF-RAY": ["8c52bb8bfcbb571c-IAD"], "Server": ["cloudflare"], "Connection": ["keep-alive"], "Content-Type": ["application/json"], "Content-Length": ["346"], "Access-Control-Max-Age": ["86400"], "Access-Control-Allow-Origin": ["*"], "Access-Control-Allow-Methods": [ "GET, HEAD, PUT, PATCH, DELETE, POST, OPTIONS" ] } }, "created_at": "2024-09-18T16:32:30.287621Z", "updated_at": "2024-09-18T16:32:32.678926Z" }, { "id": "ntfsimevt_01j82zmtha4k84z051rzy24vf2", "status": "success", "event_type": "customer.created", "payload": { "id": "ctm_01hv6y1jedq4p1n0yqn5ba3ky4", "name": "Jo Brown", "email": "jo@example.com", "locale": "en", "status": "active", "created_at": "2024-04-11T15:57:24.813Z", "updated_at": "2024-04-11T15:57:24.813Z", "custom_data": null, "import_meta": null, "marketing_consent": false }, "request": { "body": "{\"event_id\":\"ntfsimevt_01j82zmtha4k84z051rzy24vf2\",\"event_type\":\"customer.created\",\"occurred_at\":\"2024-09-18T16:32:30.250428Z\",\"data\":{\"id\":\"ctm_01hv6y1jedq4p1n0yqn5ba3ky4\",\"name\":\"Jo Brown\",\"email\":\"jo@example.com\",\"locale\":\"en\",\"status\":\"active\",\"created_at\":\"2024-04-11T15:57:24.813Z\",\"updated_at\":\"2024-04-11T15:57:24.813Z\",\"custom_data\":null,\"import_meta\":null,\"marketing_consent\":false}}", "headers": { "Paddle-Version": 1 } }, "response": { "body": "{\"status\":\"NOTICE\",\"message\":\"Unknown source ID. If you just created that source, it can take a minute to propagate. Be assured that if the source is valid, the webhook was handled successfully. Check your dashboard to inspect the request: https://dashboard.hookdeck.com/\",\"request_id\":\"req_GkBgHc2fl4RuTYs4XPjv\"}", "statusCode": 200, "headers": { "Date": ["Wed, 18 Sep 2024 16:32:31 GMT"], "CF-RAY": ["8c52bb870ad63975-IAD"], "Server": ["cloudflare"], "Connection": ["keep-alive"], "Content-Type": ["application/json"], "Content-Length": ["346"], "Access-Control-Max-Age": ["86400"], "Access-Control-Allow-Origin": ["*"], "Access-Control-Allow-Methods": [ "GET, HEAD, PUT, PATCH, DELETE, POST, OPTIONS" ] } }, "created_at": "2024-09-18T16:32:30.250428Z", "updated_at": "2024-09-18T16:32:31.885201Z" }, { "id": "ntfsimevt_01j82zmtcyffr0rgc1pfbfnqer", "status": "success", "event_type": "transaction.created", "payload": { "id": "txn_01hv8wptq8987qeep44cyrewp9", "items": [ { "price": { "id": "pri_01gsz8x8sawmvhz1pv30nge1ke", "name": "Monthly (per seat)", "type": "standard", "status": "active", "quantity": { "maximum": 999, "minimum": 1 }, "tax_mode": "account_setting", "created_at": "2023-02-23T13:55:22.538367Z", "product_id": "pro_01gsz4t5hdjse780zja8vvr7jg", "unit_price": { "amount": "3000", "currency_code": "USD" }, "updated_at": "2024-04-11T13:54:52.254748Z", "custom_data": null, "description": "Monthly", "import_meta": null, "trial_period": null, "billing_cycle": { "interval": "month", "frequency": 1 }, "unit_price_overrides": [] }, "quantity": 10, "proration": null }, { "price": { "id": "pri_01h1vjfevh5etwq3rb416a23h2", "name": "Monthly (recurring addon)", "type": "standard", "status": "active", "quantity": { "maximum": 100, "minimum": 1 }, "tax_mode": "account_setting", "created_at": "2023-06-01T13:31:12.625056Z", "product_id": "pro_01h1vjes1y163xfj1rh1tkfb65", "unit_price": { "amount": "10000", "currency_code": "USD" }, "updated_at": "2024-04-09T07:23:00.907834Z", "custom_data": null, "description": "Monthly", "import_meta": null, "trial_period": null, "billing_cycle": { "interval": "month", "frequency": 1 }, "unit_price_overrides": [] }, "quantity": 1, "proration": null }, { "price": { "id": "pri_01gsz98e27ak2tyhexptwc58yk", "name": "One-time addon", "type": "standard", "status": "active", "quantity": { "maximum": 1, "minimum": 1 }, "tax_mode": "account_setting", "created_at": "2023-02-23T14:01:28.391712Z", "product_id": "pro_01gsz97mq9pa4fkyy0wqenepkz", "unit_price": { "amount": "19900", "currency_code": "USD" }, "updated_at": "2024-04-09T07:23:10.921392Z", "custom_data": null, "description": "One-time addon", "import_meta": null, "trial_period": null, "billing_cycle": null, "unit_price_overrides": [] }, "quantity": 1, "proration": null } ], "origin": "web", "status": "draft", "details": { "totals": { "fee": null, "tax": "9585", "total": "57509", "credit": "0", "balance": "57509", "discount": "0", "earnings": null, "subtotal": "47924", "grand_total": "57509", "currency_code": "GBP", "credit_to_balance": "0" }, "line_items": [ { "id": "txnitm_01hv8wpts6n6wkcr973fmt6gt7", "totals": { "tax": "4800", "total": "28800", "discount": "0", "subtotal": "24000" }, "product": { "id": "pro_01gsz4t5hdjse780zja8vvr7jg", "name": "AeroEdit Pro", "type": "standard", "status": "active", "image_url": "https://paddle.s3.amazonaws.com/user/165798/bT1XUOJAQhOUxGs83cbk_pro.png", "created_at": "2023-02-23T12:43:46.605Z", "updated_at": "2024-04-05T15:53:44.687Z", "custom_data": { "features": { "sso": false, "route_planning": true, "payment_by_invoice": false, "aircraft_performance": true, "compliance_monitoring": true, "flight_log_management": true }, "suggested_addons": [ "pro_01h1vjes1y163xfj1rh1tkfb65", "pro_01gsz97mq9pa4fkyy0wqenepkz" ], "upgrade_description": "Move from Basic to Pro to take advantage of aircraft performance, advanced route planning, and compliance monitoring." }, "description": "Designed for professional pilots, including all features plus in Basic plus compliance monitoring, route optimization, and third-party integrations.", "import_meta": null, "tax_category": "standard" }, "price_id": "pri_01gsz8x8sawmvhz1pv30nge1ke", "quantity": 10, "tax_rate": "0.2", "unit_totals": { "tax": "480", "total": "2880", "discount": "0", "subtotal": "2400" } }, { "id": "txnitm_01hv8wpts6n6wkcr973jywgjzx", "totals": { "tax": "1600", "total": "9601", "discount": "0", "subtotal": "8001" }, "product": { "id": "pro_01h1vjes1y163xfj1rh1tkfb65", "name": "Analytics addon", "type": "standard", "status": "active", "image_url": "https://paddle.s3.amazonaws.com/user/165798/97dRpA6SXzcE6ekK9CAr_analytics.png", "created_at": "2023-06-01T13:30:50.302Z", "updated_at": "2024-04-05T15:47:17.163Z", "custom_data": null, "description": "Unlock advanced insights into your flight data with enhanced analytics and reporting features. Includes customizable reporting templates and trend analysis across flights.", "import_meta": null, "tax_category": "standard" }, "price_id": "pri_01h1vjfevh5etwq3rb416a23h2", "quantity": 1, "tax_rate": "0.2", "unit_totals": { "tax": "1600", "total": "9601", "discount": "0", "subtotal": "8001" } }, { "id": "txnitm_01hv8wpts6n6wkcr973nc9r7dm", "totals": { "tax": "3185", "total": "19108", "discount": "0", "subtotal": "15923" }, "product": { "id": "pro_01gsz97mq9pa4fkyy0wqenepkz", "name": "Custom domains", "type": "standard", "status": "active", "image_url": "https://paddle.s3.amazonaws.com/user/165798/XIG7UXoJQHmlIAiKcnkA_custom-domains.png", "created_at": "2023-02-23T14:01:02.441Z", "updated_at": "2024-04-05T15:43:28.971Z", "custom_data": null, "description": "Make AeroEdit truly your own with custom domains. Custom domains reinforce your brand identity and make it easy for your team to access your account.", "import_meta": null, "tax_category": "standard" }, "price_id": "pri_01gsz98e27ak2tyhexptwc58yk", "quantity": 1, "tax_rate": "0.2", "unit_totals": { "tax": "3185", "total": "19108", "discount": "0", "subtotal": "15923" } } ], "payout_totals": null, "tax_rates_used": [ { "totals": { "tax": "9585", "total": "57509", "discount": "0", "subtotal": "47924" }, "tax_rate": "0.2" } ], "adjusted_totals": { "fee": "0", "tax": "9585", "total": "57509", "earnings": "0", "subtotal": "47924", "grand_total": "57509", "currency_code": "GBP" } }, "checkout": { "url": "https://aeroedit.com/pay?_ptxn=txn_01hv8wptq8987qeep44cyrewp9" }, "payments": [], "billed_at": null, "address_id": null, "created_at": "2024-04-12T10:12:33.201400507Z", "invoice_id": null, "updated_at": "2024-04-12T10:12:33.201400507Z", "business_id": null, "custom_data": null, "customer_id": null, "discount_id": null, "currency_code": "GBP", "billing_period": null, "invoice_number": null, "billing_details": null, "collection_mode": "automatic", "subscription_id": null }, "request": { "body": "{\"event_id\":\"ntfsimevt_01j82zmtcyffr0rgc1pfbfnqer\",\"event_type\":\"transaction.created\",\"occurred_at\":\"2024-09-18T16:32:30.111060Z\",\"data\":{\"id\":\"txn_01hv8wptq8987qeep44cyrewp9\",\"items\":[{\"price\":{\"id\":\"pri_01gsz8x8sawmvhz1pv30nge1ke\",\"name\":\"Monthly (per seat)\",\"type\":\"standard\",\"status\":\"active\",\"quantity\":{\"maximum\":999,\"minimum\":1},\"tax_mode\":\"account_setting\",\"created_at\":\"2023-02-23T13:55:22.538367Z\",\"product_id\":\"pro_01gsz4t5hdjse780zja8vvr7jg\",\"unit_price\":{\"amount\":\"3000\",\"currency_code\":\"USD\"},\"updated_at\":\"2024-04-11T13:54:52.254748Z\",\"custom_data\":null,\"description\":\"Monthly\",\"import_meta\":null,\"trial_period\":null,\"billing_cycle\":{\"interval\":\"month\",\"frequency\":1},\"unit_price_overrides\":[]},\"quantity\":10,\"proration\":null},{\"price\":{\"id\":\"pri_01h1vjfevh5etwq3rb416a23h2\",\"name\":\"Monthly (recurring addon)\",\"type\":\"standard\",\"status\":\"active\",\"quantity\":{\"maximum\":100,\"minimum\":1},\"tax_mode\":\"account_setting\",\"created_at\":\"2023-06-01T13:31:12.625056Z\",\"product_id\":\"pro_01h1vjes1y163xfj1rh1tkfb65\",\"unit_price\":{\"amount\":\"10000\",\"currency_code\":\"USD\"},\"updated_at\":\"2024-04-09T07:23:00.907834Z\",\"custom_data\":null,\"description\":\"Monthly\",\"import_meta\":null,\"trial_period\":null,\"billing_cycle\":{\"interval\":\"month\",\"frequency\":1},\"unit_price_overrides\":[]},\"quantity\":1,\"proration\":null},{\"price\":{\"id\":\"pri_01gsz98e27ak2tyhexptwc58yk\",\"name\":\"One-time addon\",\"type\":\"standard\",\"status\":\"active\",\"quantity\":{\"maximum\":1,\"minimum\":1},\"tax_mode\":\"account_setting\",\"created_at\":\"2023-02-23T14:01:28.391712Z\",\"product_id\":\"pro_01gsz97mq9pa4fkyy0wqenepkz\",\"unit_price\":{\"amount\":\"19900\",\"currency_code\":\"USD\"},\"updated_at\":\"2024-04-09T07:23:10.921392Z\",\"custom_data\":null,\"description\":\"One-time addon\",\"import_meta\":null,\"trial_period\":null,\"billing_cycle\":null,\"unit_price_overrides\":[]},\"quantity\":1,\"proration\":null}],\"origin\":\"web\",\"status\":\"draft\",\"details\":{\"totals\":{\"fee\":null,\"tax\":\"9585\",\"total\":\"57509\",\"credit\":\"0\",\"balance\":\"57509\",\"discount\":\"0\",\"earnings\":null,\"subtotal\":\"47924\",\"grand_total\":\"57509\",\"currency_code\":\"GBP\",\"credit_to_balance\":\"0\"},\"line_items\":[{\"id\":\"txnitm_01hv8wpts6n6wkcr973fmt6gt7\",\"totals\":{\"tax\":\"4800\",\"total\":\"28800\",\"discount\":\"0\",\"subtotal\":\"24000\"},\"product\":{\"id\":\"pro_01gsz4t5hdjse780zja8vvr7jg\",\"name\":\"AeroEdit Pro\",\"type\":\"standard\",\"status\":\"active\",\"image_url\":\"https://paddle.s3.amazonaws.com/user/165798/bT1XUOJAQhOUxGs83cbk_pro.png\",\"created_at\":\"2023-02-23T12:43:46.605Z\",\"updated_at\":\"2024-04-05T15:53:44.687Z\",\"custom_data\":{\"features\":{\"sso\":false,\"route_planning\":true,\"payment_by_invoice\":false,\"aircraft_performance\":true,\"compliance_monitoring\":true,\"flight_log_management\":true},\"suggested_addons\":[\"pro_01h1vjes1y163xfj1rh1tkfb65\",\"pro_01gsz97mq9pa4fkyy0wqenepkz\"],\"upgrade_description\":\"Move from Basic to Pro to take advantage of aircraft performance, advanced route planning, and compliance monitoring.\"},\"description\":\"Designed for professional pilots, including all features plus in Basic plus compliance monitoring, route optimization, and third-party integrations.\",\"import_meta\":null,\"tax_category\":\"standard\"},\"price_id\":\"pri_01gsz8x8sawmvhz1pv30nge1ke\",\"quantity\":10,\"tax_rate\":\"0.2\",\"unit_totals\":{\"tax\":\"480\",\"total\":\"2880\",\"discount\":\"0\",\"subtotal\":\"2400\"}},{\"id\":\"txnitm_01hv8wpts6n6wkcr973jywgjzx\",\"totals\":{\"tax\":\"1600\",\"total\":\"9601\",\"discount\":\"0\",\"subtotal\":\"8001\"},\"product\":{\"id\":\"pro_01h1vjes1y163xfj1rh1tkfb65\",\"name\":\"Analytics addon\",\"type\":\"standard\",\"status\":\"active\",\"image_url\":\"https://paddle.s3.amazonaws.com/user/165798/97dRpA6SXzcE6ekK9CAr_analytics.png\",\"created_at\":\"2023-06-01T13:30:50.302Z\",\"updated_at\":\"2024-04-05T15:47:17.163Z\",\"custom_data\":null,\"description\":\"Unlock advanced insights into your flight data with enhanced analytics and reporting features. Includes customizable reporting templates and trend analysis across flights.\",\"import_meta\":null,\"tax_category\":\"standard\"},\"price_id\":\"pri_01h1vjfevh5etwq3rb416a23h2\",\"quantity\":1,\"tax_rate\":\"0.2\",\"unit_totals\":{\"tax\":\"1600\",\"total\":\"9601\",\"discount\":\"0\",\"subtotal\":\"8001\"}},{\"id\":\"txnitm_01hv8wpts6n6wkcr973nc9r7dm\",\"totals\":{\"tax\":\"3185\",\"total\":\"19108\",\"discount\":\"0\",\"subtotal\":\"15923\"},\"product\":{\"id\":\"pro_01gsz97mq9pa4fkyy0wqenepkz\",\"name\":\"Custom domains\",\"type\":\"standard\",\"status\":\"active\",\"image_url\":\"https://paddle.s3.amazonaws.com/user/165798/XIG7UXoJQHmlIAiKcnkA_custom-domains.png\",\"created_at\":\"2023-02-23T14:01:02.441Z\",\"updated_at\":\"2024-04-05T15:43:28.971Z\",\"custom_data\":null,\"description\":\"Make AeroEdit truly your own with custom domains. Custom domains reinforce your brand identity and make it easy for your team to access your account.\",\"import_meta\":null,\"tax_category\":\"standard\"},\"price_id\":\"pri_01gsz98e27ak2tyhexptwc58yk\",\"quantity\":1,\"tax_rate\":\"0.2\",\"unit_totals\":{\"tax\":\"3185\",\"total\":\"19108\",\"discount\":\"0\",\"subtotal\":\"15923\"}}],\"payout_totals\":null,\"tax_rates_used\":[{\"totals\":{\"tax\":\"9585\",\"total\":\"57509\",\"discount\":\"0\",\"subtotal\":\"47924\"},\"tax_rate\":\"0.2\"}],\"adjusted_totals\":{\"fee\":\"0\",\"tax\":\"9585\",\"total\":\"57509\",\"earnings\":\"0\",\"subtotal\":\"47924\",\"grand_total\":\"57509\",\"currency_code\":\"GBP\"}},\"checkout\":{\"url\":\"https://aeroedit.com/pay?_ptxn=txn_01hv8wptq8987qeep44cyrewp9\"},\"payments\":[],\"billed_at\":null,\"address_id\":null,\"created_at\":\"2024-04-12T10:12:33.201400507Z\",\"invoice_id\":null,\"updated_at\":\"2024-04-12T10:12:33.201400507Z\",\"business_id\":null,\"custom_data\":null,\"customer_id\":null,\"discount_id\":null,\"currency_code\":\"GBP\",\"billing_period\":null,\"invoice_number\":null,\"billing_details\":null,\"collection_mode\":\"automatic\",\"subscription_id\":null}}", "headers": { "Paddle-Version": 1 } }, "response": { "body": "{\"status\":\"NOTICE\",\"message\":\"Unknown source ID. If you just created that source, it can take a minute to propagate. Be assured that if the source is valid, the webhook was handled successfully. Check your dashboard to inspect the request: https://dashboard.hookdeck.com/\",\"request_id\":\"req_uPWRYtc8vJKss8Yo4OdB\"}", "statusCode": 200, "headers": { "Date": ["Wed, 18 Sep 2024 16:32:30 GMT"], "CF-RAY": ["8c52bb7f8f0782a4-IAD"], "Server": ["cloudflare"], "Connection": ["keep-alive"], "Content-Type": ["application/json"], "Content-Length": ["346"], "Access-Control-Max-Age": ["86400"], "Access-Control-Allow-Origin": ["*"], "Access-Control-Allow-Methods": [ "GET, HEAD, PUT, PATCH, DELETE, POST, OPTIONS" ] } }, "created_at": "2024-09-18T16:32:30.111060Z", "updated_at": "2024-09-18T16:32:30.847532Z" } ], "meta": { "pagination": { "per_page": 200, "estimated_total": 1, "next": "https://api.paddle.dev/simulations/ntfsim_01j82zcm3ffc0pyvvb9tjsbvec/runs/ntfsimrun_01j82zmt9ejr5h7nd7a6a6henj/events?after=ntfsimevt_01j82zmtcyffr0rgc1pfbfnqer", "has_more": false }, "request_id": "fe5db007-8fdc-44e9-8c0a-45927738965e" }}Troubleshooting
If you provide an item or transaction with a trialing price, a subscription.trialing webhook notification is sent in place of a subscription.activated webhook notification.
Providing a customer doesn't mean any associated business or address is automatically added. You must add a business_id or address_id manually. These must be related to the given customer.
Discounts may have no effect on the cost of a transaction if the provided discount isn't valid against any of the items in the transaction. Check the discount to see its restrictions and compare to the items in the transaction.
Only one transaction.payment_failed webhook notification is sent when you specify that the payment has failed (payment_outcome: failed). In live implementations, you can receive a new notification for each subsequent payment retry that fails up until dunning is exhausted.
If you provide a subscription, the most recent transaction associated with that subscription is used.
When you provide a subscription, Paddle sets the subscription status to best match the scenario and its configuration. This means the status may be different to the status of the subscription provided.
For example, when simulating resuming a subscription, the subscription status is paused initially to mirror behavior in live implementations.
Other data for the subscription, like the latest transaction, is used as normal.
We'd love to hear from you. Let us know which flows you want to simulate using the feedback button at the top-right.