Build an overlay checkout
Get a step-by-step overview of how to build a complete overlay checkout — including initializing Paddle.js, passing settings and items, prefilling customer information, and next steps.
The checkout is where customers make purchases. For SaaS businesses, it's the process where customers enter their details and payment information, and confirm that they'd like to sign up for a subscription with you.
You can use Paddle.js to quickly add an overlay checkout into your app. Overlay checkout lets you present customers with an overlay that handles all parts of the checkout process — minimal frontend coding required.
Explore the code for this tutorial and test right away using our overlay checkout pen.
What are we building?
In this tutorial, we'll launch a multi-page overlay checkout for two items in our product catalog, then we'll extend it by passing customer information.
We'll learn how to:
- Include and set up Paddle.js using a client-side token
- Pass items to overlay checkout using
Paddle.Checkout.open()or HTML data attributes - Take a test payment
- Prefill customer information using
Paddle.Checkout.open()or HTML data attributes
If you like, you can copy-paste the sample code in your editor or view on CodePen and follow along.
12345678910111213141516171819201<!DOCTYPE html>
2<html lang="en" color-mode="user">
3<head>
4  <title>Overlay checkout demo</title>
5  <meta charset="utf-8">
6  <meta name="viewport" content="width=device-width, initial-scale=1">
7  <script src="https://cdn.paddle.com/paddle/v2/paddle.js"></script>
8  <style>
9    .page-container {
10      max-width: 900px;
11      margin: auto;
12      text-align: center;
13      margin-top: 2em;
14      padding-left: 1em;
15      padding-right: 1em;
16    }
17    .grid {
18      display: block;
19      margin-bottom: 1em;
20    }
Before you begin
Choose a checkout implementation
This tutorial walks through creating an overlay checkout. You can also create inline checkouts, which lets you build Paddle Checkout right into your app or website.
We recommend building an overlay checkout if you're new to Paddle. Inline checkouts use the same JavaScript methods as overlay checkouts, so you can switch to an inline checkout later.
Overlay checkout
Integrate Paddle in just a few lines of code. Launches an overlay to capture payment.
Inline checkout
Get complete control of the checkout experience. Captures payment directly in your app.
To learn more about the differences between overlay and inline checkouts, see Paddle Checkout
Create products and prices
Paddle Checkout works with products and prices to say what a customer is purchasing, so you'll need to create a product and at least one related price to pass to your checkout.
Set your default payment link
You'll also need to:
- Set your default payment link under Paddle > Checkout > Checkout settings > Default payment link.
- Get your default payment link domain approved, if you're working with the live environment.
We recommend starting the domain approval early in your integration process, so your domains are approved for when you're ready to go-live.
Overview
Add an overlay checkout to your website or app in four steps:
Include and initialize Paddle.js
Add Paddle.js to your app or website, so you can securely capture payment information and build subscription billing experiences.
Add an overlay checkout button
Set any element on your page as a launcher for Paddle Checkout.
Make sure that your checkout loads successfully, then take a test payment.
Prefill customer information — optional
Extend your checkout by prefilling customer and address information.
1Include and initialize Paddle.js
Paddle.js is a lightweight JavaScript library that lets you build rich, integrated subscription billing experiences using Paddle. We can use Paddle.js to securely work with products and prices in our Paddle system, as well as opening checkouts and capturing payment information.
Include Paddle.js script
Start with a blank webpage, or an existing page on your website. Then, include Paddle.js by adding this script to the <head>:
<script src="https://cdn.paddle.com/paddle/v2/paddle.js"></script>Set environment (optional)
We recommend signing up for a sandbox account to test and build your integration, then switching to a live account later when you're ready to go live.
If you're testing with the sandbox, call Paddle.Environment.set() and set your environment to sandbox:
12341<script src="https://cdn.paddle.com/paddle/v2/paddle.js"></script>
2<script type="text/javascript">
3  Paddle.Environment.set("sandbox");
4</script>
Pass a client-side token
Next, go to Paddle > Developer tools > Authentication and create a client-side token. Client-side tokens let you interact with the Paddle platform in frontend code, like webpages or mobile apps. They have limited access to the data in your system, so they're safe to publish.
In your page, call Paddle.Initialize() and pass your client-side token as token. For best performance, do this just after calling Paddle.Environment.set(), like this:
12345671<script src="https://cdn.paddle.com/paddle/v2/paddle.js"></script>
2<script type="text/javascript">
3  Paddle.Environment.set("sandbox");
4  Paddle.Initialize({
5    token: "test_7d279f61a3499fed520f7cd8c08" // replace with a client-side token
6  });
7</script>
Client-side tokens are separate for your sandbox and live accounts. You'll need to create a new client-side token for your live account. Sandbox tokens start with
test_to make them easy to distinguish.
2Add an overlay checkout button
Next, we'll set an element on our page as a launcher for our overlay checkout. Overlay checkout works by presenting an overlay to handle the entire checkout process. When our button or other launcher element is clicked, Paddle.js launches a checkout for us.
Create checkout button element
Any element can be a launcher for an overlay checkout. In our sample, we're using a link (<a>) that points to #. This means it doesn't open a new page.
11<a href='#'>Sign up now</a>Set as a checkout launcher
Next, we'll make our checkout element open an overlay checkout by making it a launcher.
You can do this in two ways:
Paddle.Checkout.open() method

- Works using JavaScript to open a checkout when an element is clicked.
- You can pass items and settings as parameters to
Paddle.Checkout.open(). - Recommended in most cases.
- No styles applied to your element.
- Best for passing multiple attributes.
HTML data attributes

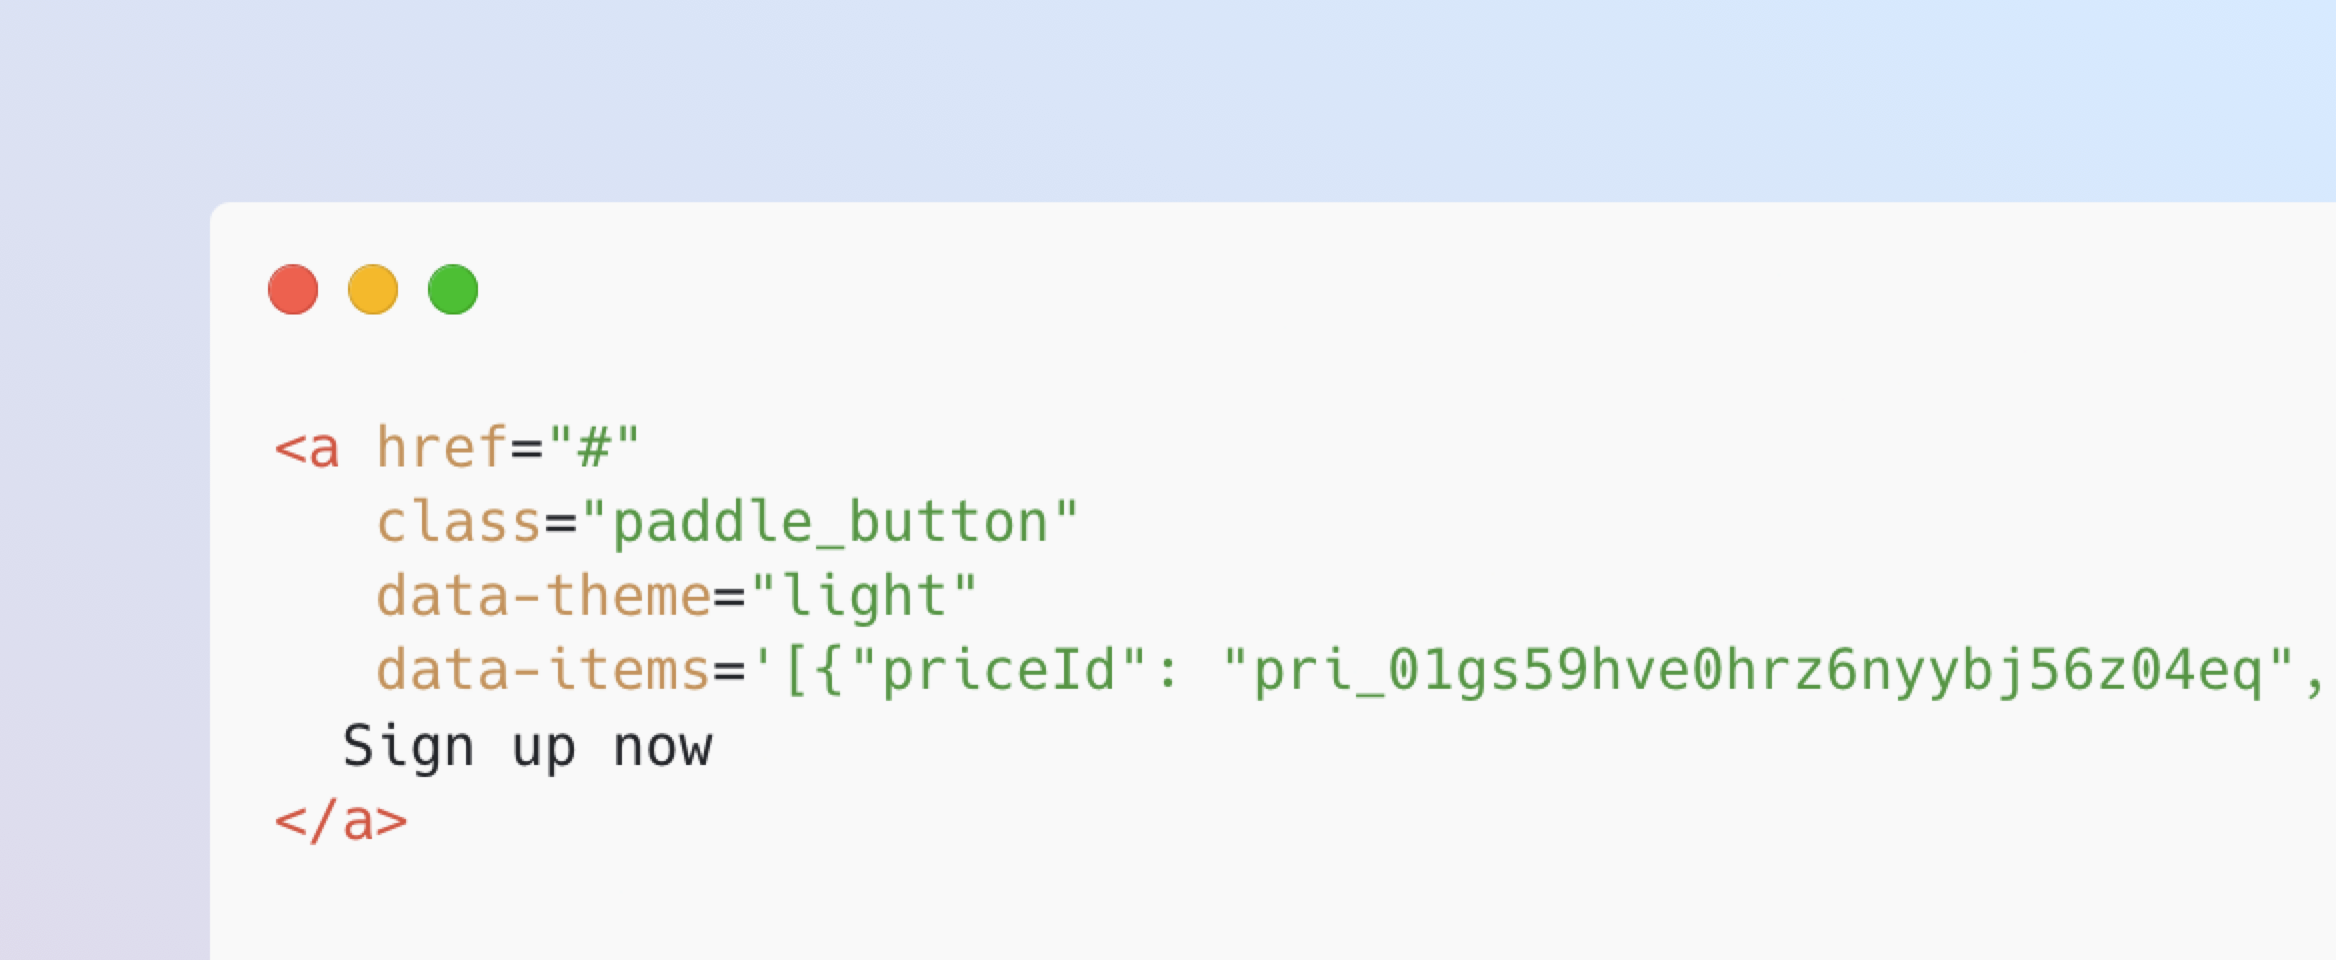
- Works by adding a
paddle_buttonclass to an element, which Paddle.js turns into a checkout launcher. - You can pass items and settings as data attributes against the element.
- Recommended when you can't use JavaScript.
- Optionally styles your element to look like a button.
- Best for passing few attributes.
In general, we recommend using the Paddle.Checkout.open() method, but you can choose the option that makes the most sense for you.
Paddle.js comes with the Paddle.Checkout.open() method, which lets you open a checkout with settings, items, and customer information.
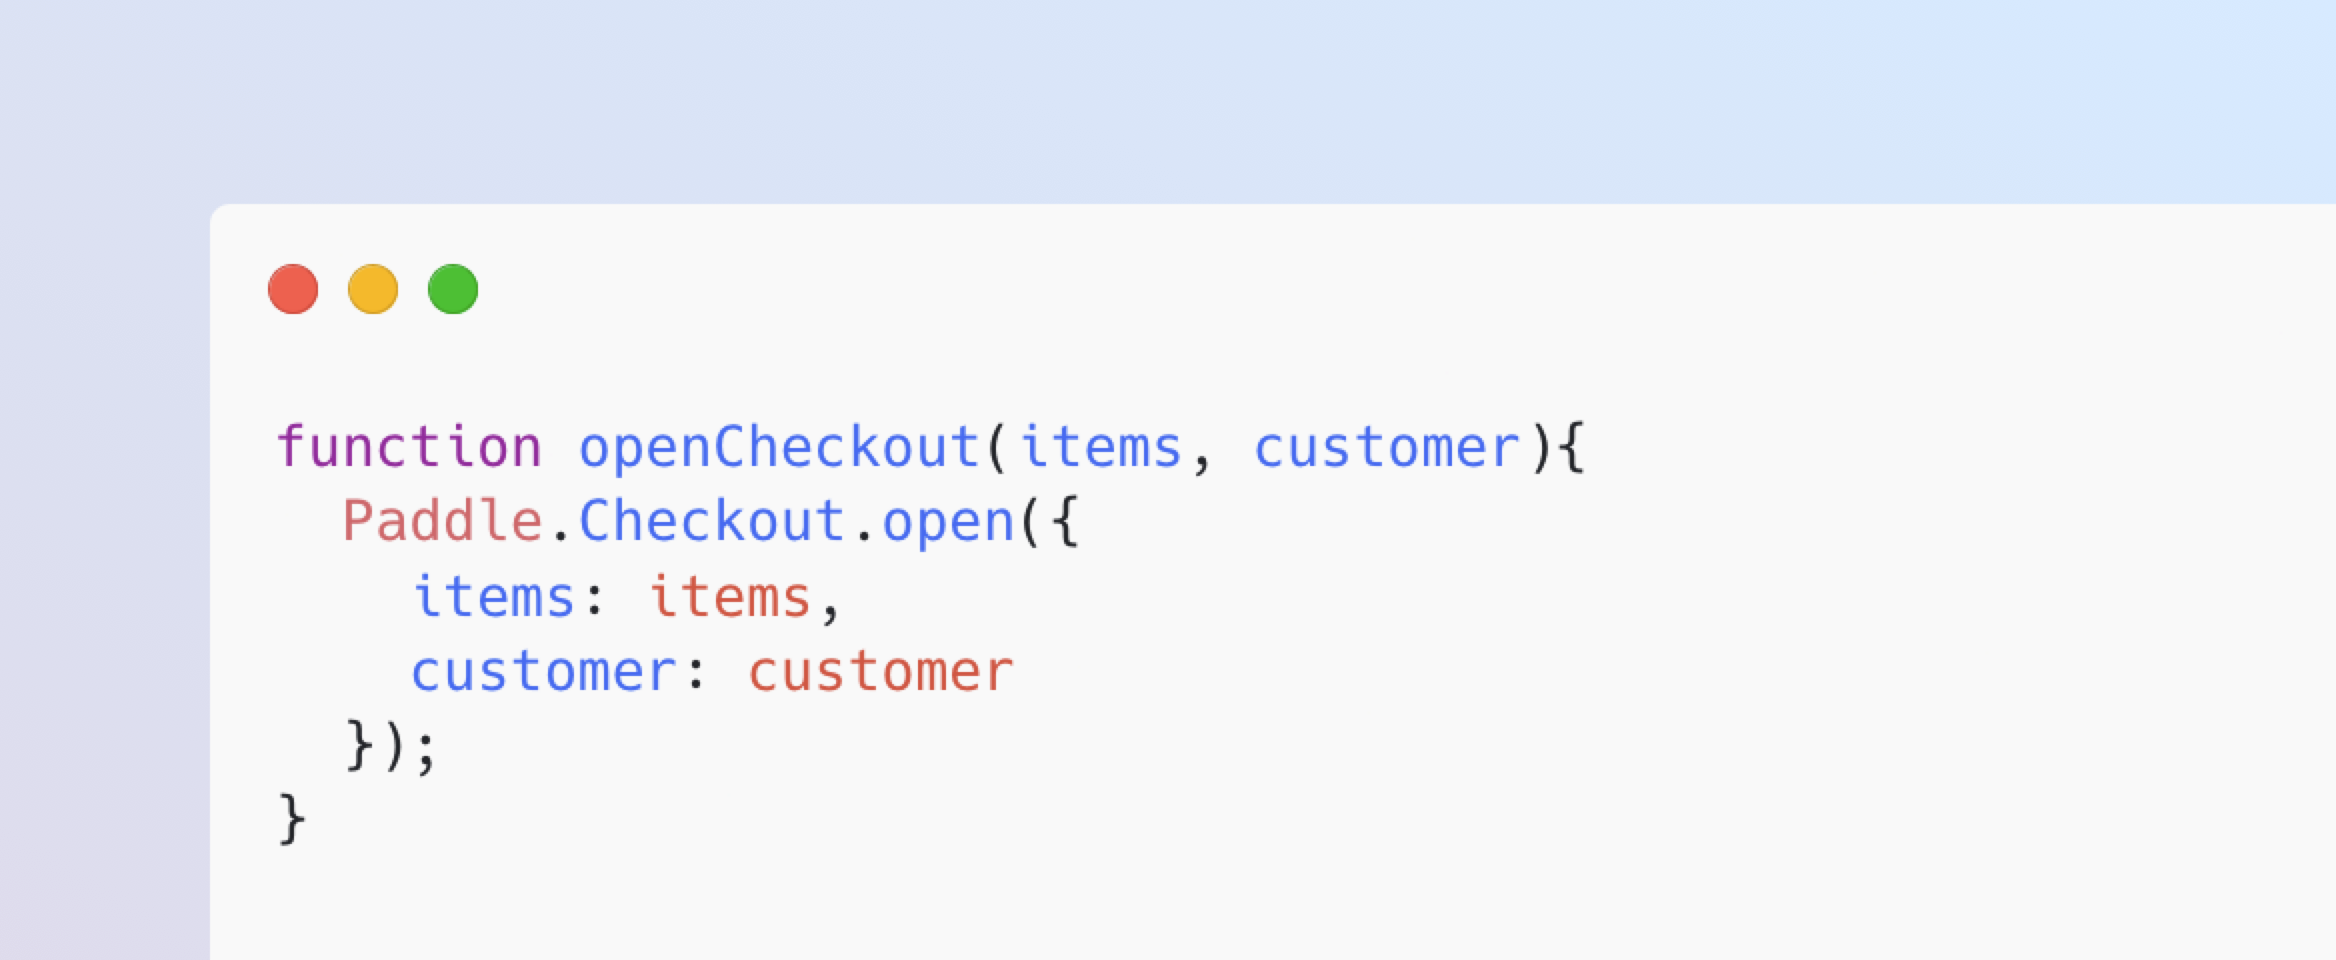
In our sample, we've created a function called openCheckout() to open a checkout. Here's how it works:
We create a variable called
itemsListand pass an array of objects, where each object contains apriceIdandquantity.We create a function called
openCheckout()that takes a parameter calleditems.In our
openCheckout()function, we callPaddle.Checkout.open(), passing the value ofitemsas the items list for the checkout.We add an
onclickevent to our checkout button to callopenCheckout()when clicked, passing ouritemsListvariable as a parameter.
Recurring items on a checkout must have the same billing interval. For example, you can't have a checkout with some prices that are billed monthly and some products that are billed annually.
12345678910111213141516171819201<script type="text/javascript">
2  Paddle.Environment.set("sandbox");
3  Paddle.Initialize({
4    token: "test_7d279f61a3499fed520f7cd8c08" // replace with a client-side token
5  });
6
7  // define items
8  let itemsList = [
9    {
10      priceId: "pri_01gsz8ntc6z7npqqp6j4ys0w1w",
11      quantity: 5
12    },
13    {
14      priceId: "pri_01h1vjfevh5etwq3rb416a23h2",
15      quantity: 1
16    }
17  ];
18
19  // open checkout
20  function openCheckout(items){
3Take a test payment
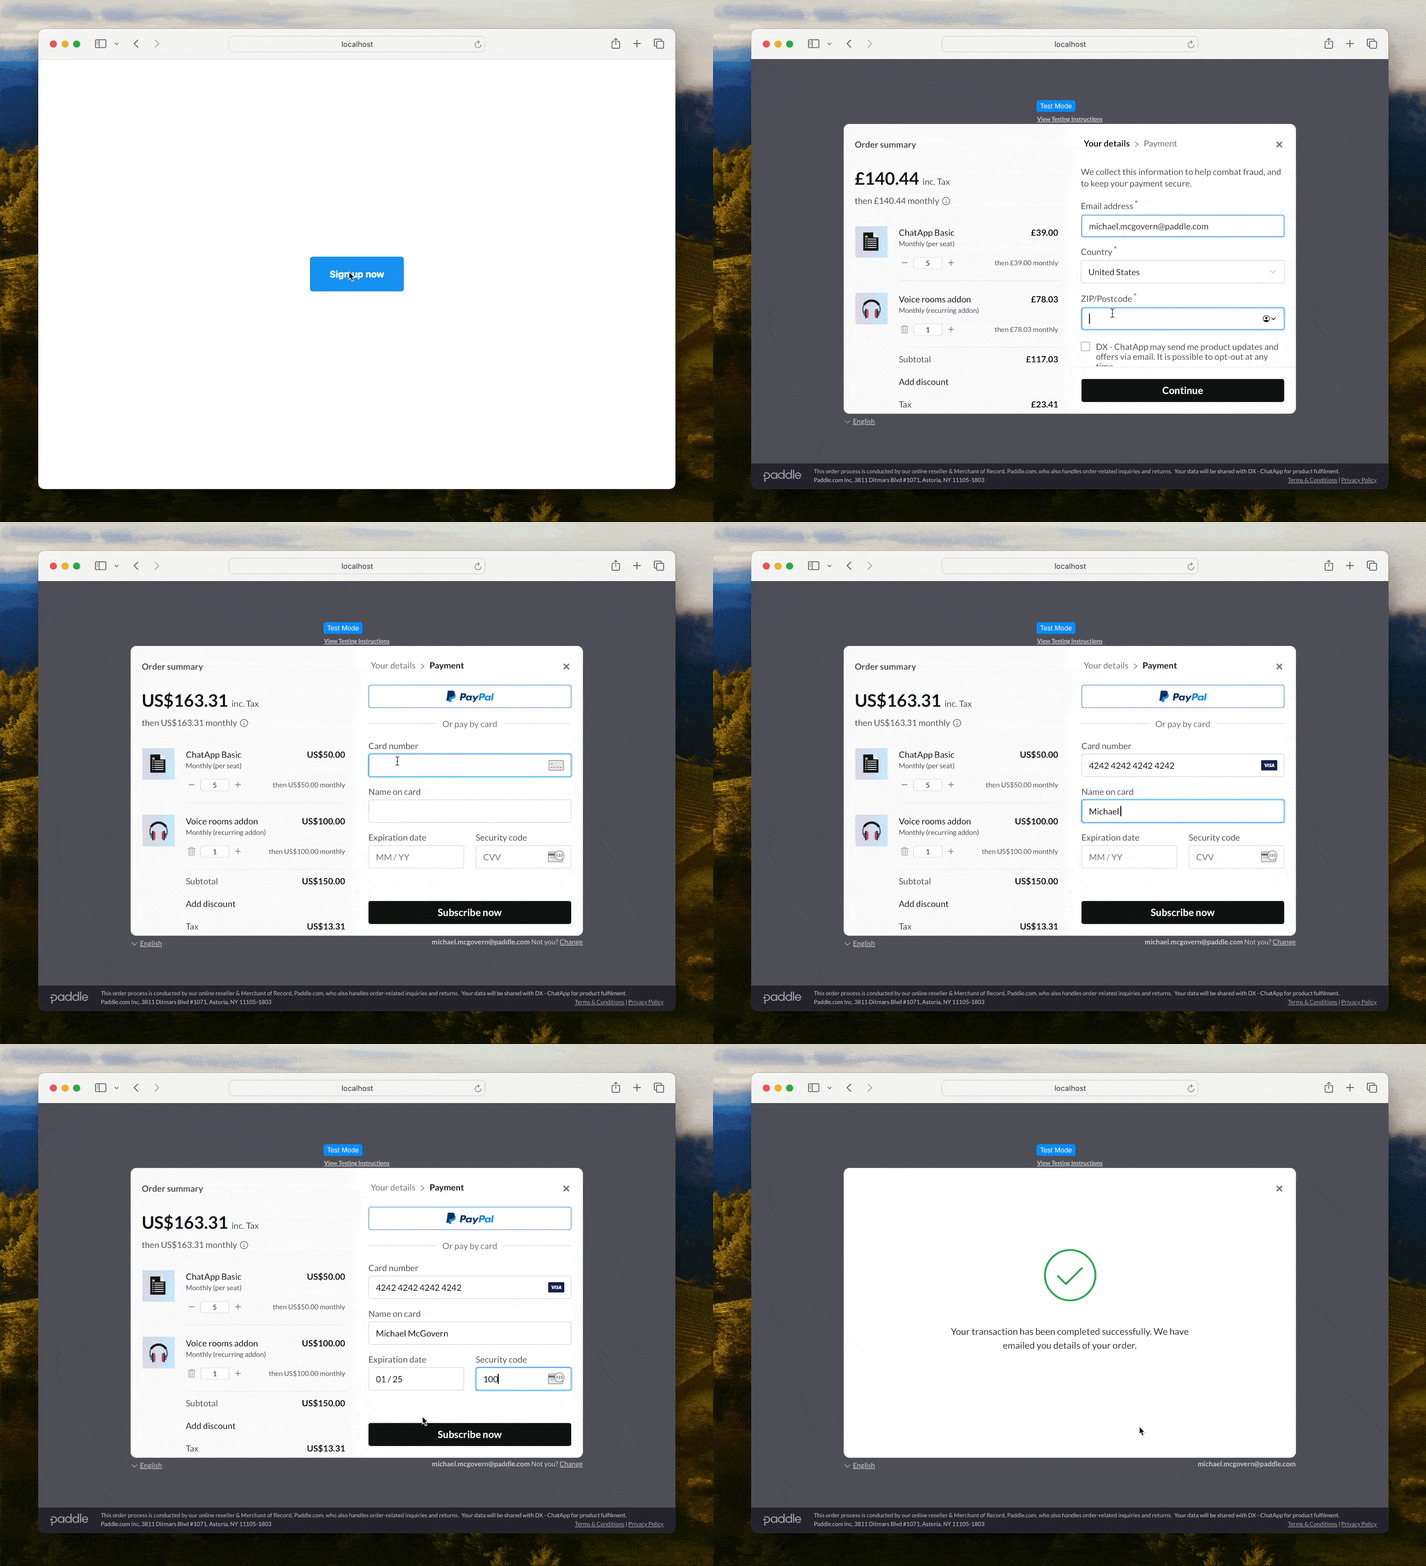
We're now ready to test. Save your page, then open it in your browser. Click on your "Sign up now" button and Paddle.js should open an overlay checkout for the items that we passed.
If you're using a sandbox account, you can take a test payment using our test card details:
| Email address | An email address you own |
| Country | Any valid country supported by Paddle |
| ZIP code (if required) | Any valid ZIP or postal code |
| Card number | 4242 4242 4242 4242 |
| Name on card | Any name |
| Expiration date | Any valid date in the future. |
| Security code | 100 |

If the checkout doesn't appear, or you get a message saying "Something went wrong," you can open your browser console to see any specific error messages from Paddle.js to help you troubleshoot.
Use
⌘ Command+⌥ Option+J(Mac) orCtrl+⇧ Shift+J(Windows) to quickly open your browser console in Google Chrome.
Common problems
Check that:
- You added a default payment link to your checkout under Paddle > Checkout > Checkout settings > Default payment link, and that this matches the domain where you're testing. You can use
localhostif you're testing locally on sandbox. - You included Paddle.js correctly. If you're moving from Paddle Classic, the CDN URL has changed.
- Your client-side token is correct and passed to
Paddle.Initialize(). - You set the correct environment.
- The Paddle IDs for price entities that you passed are correct. Sandbox and live systems are separate, so make sure you're passing price IDs for the environment that you're working in.
- If you're using HTML data attributes, you used single quotation marks around the value of
data-items, and double quotation marks around the property names and string values inside it
4Prefill customer information Optional
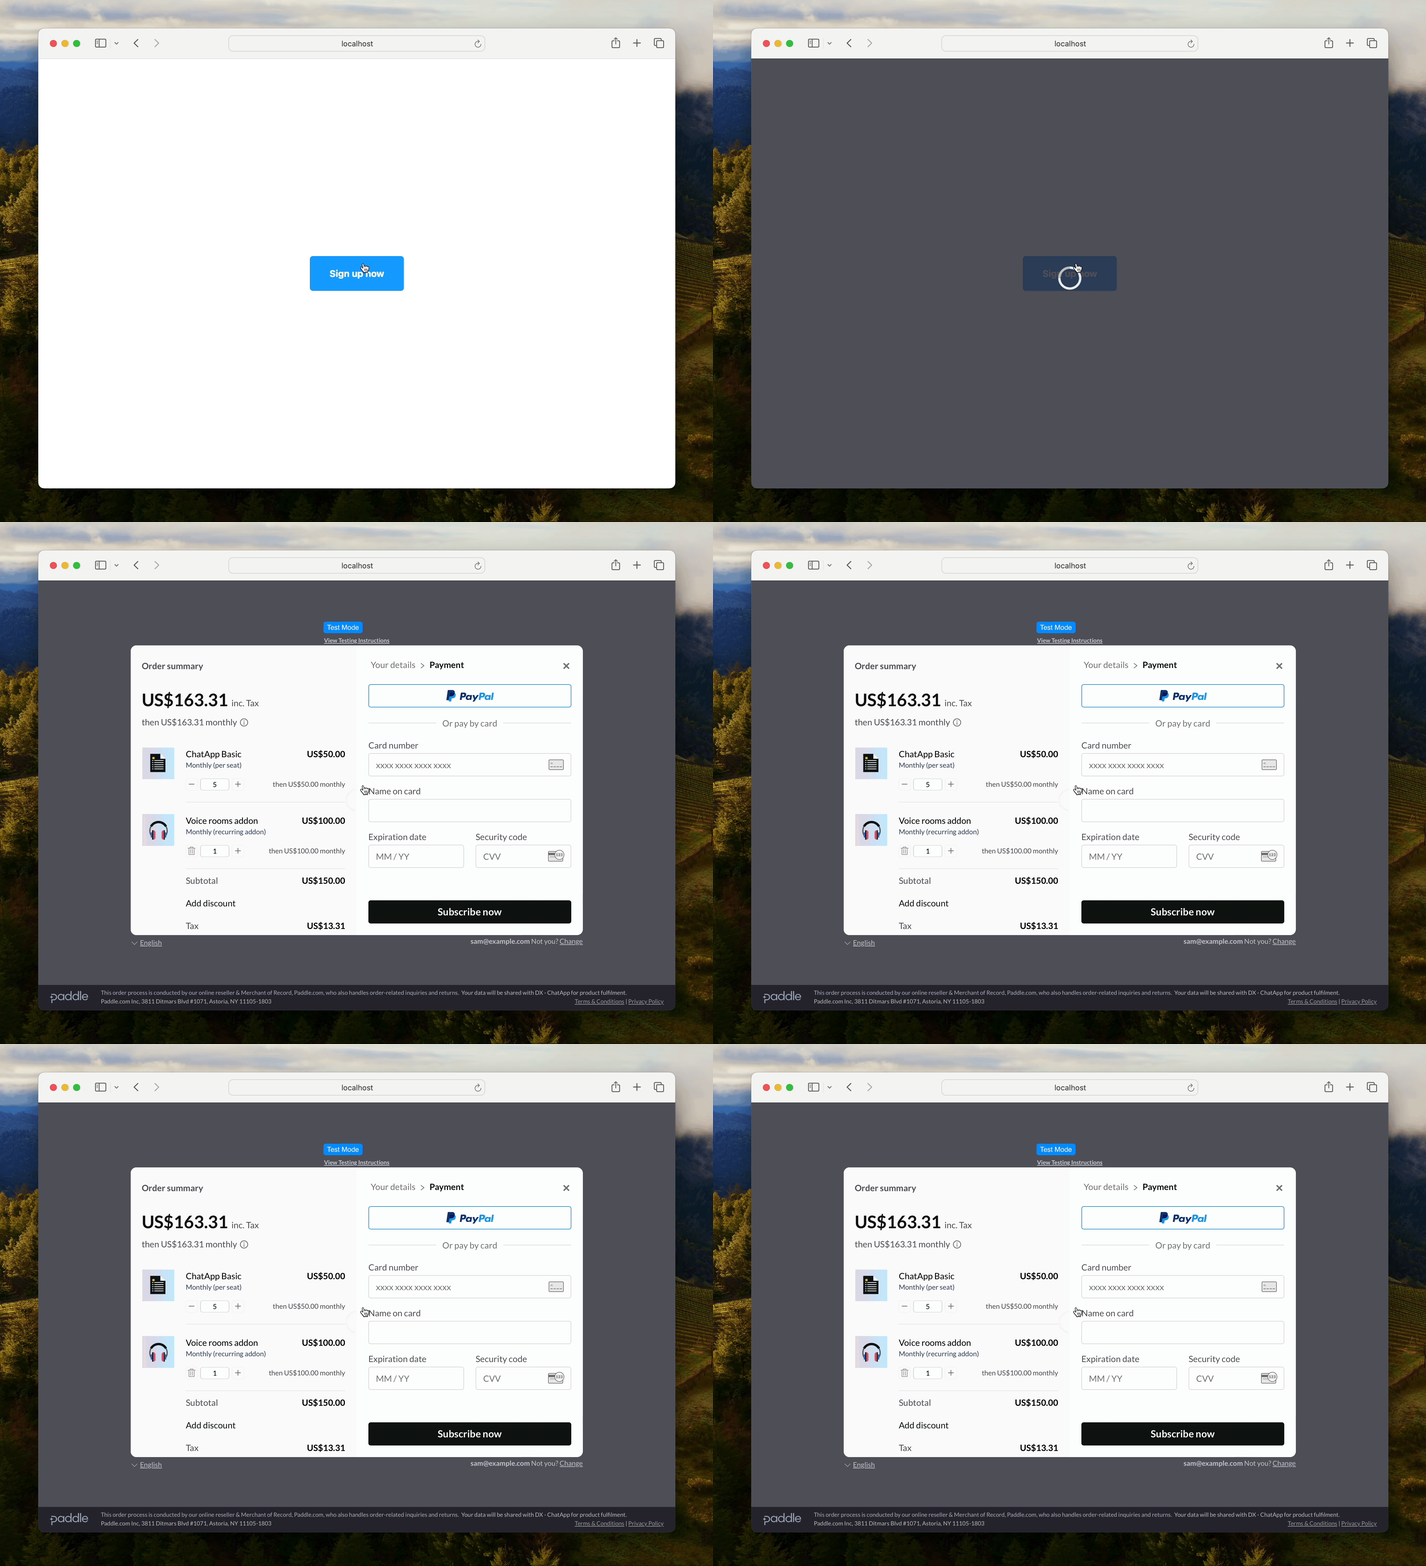
At this point, we've passed items to our checkout. When we click our launcher, Paddle opens a checkout for the items that we passed.
Paddle.js also lets you pass customer information to a checkout. When we click our launcher, Paddle opens a checkout with the customer information prefilled. This means the first page of checkout is skipped entirely, so customers land on a screen where they can enter their payment information.
You can present customers with a one-page checkout experience by passing
variantwith the valueone-pageas a checkout setting. You don't need to prefill information.
Paddle.Checkout.open() takes a customer parameter, which lets you pass customer and address information.
In our sample, we've extended our openCheckout() function so that it passes customer and address information to our checkout. Here's what's going on:
We create a variable called
customerInfo, with anemailkey and an object foraddress. You may also pass Paddle IDs for an existing customer or address here.We update our
openCheckout()function so it takes another parameter calledcustomer.In our
openCheckout()function, we added thecustomerparameter and passing the value ofcustomerto this.We updated the
onClickevent on our checkout button to pass ourcustomerInfovariable as the parameter forcustomer.
12345678910111213141516171819201<script type="text/javascript">
2  Paddle.Environment.set("sandbox");
3  Paddle.Initialize({
4    token: "test_7d279f61a3499fed520f7cd8c08" // replace with a client-side token
5  });
6
7  // define items
8  let itemsList = [
9    {
10      priceId: "pri_01gsz8ntc6z7npqqp6j4ys0w1w",
11      quantity: 5
12    },
13    {
14      priceId: "pri_01h1vjfevh5etwq3rb416a23h2",
15      quantity: 1
16    }
17  ];
18
19  // define customer details
20  let customerInfo = {
Test your work
Save your page, then open it in your browser. Click on your "Sign up now" button and Paddle.js should open an overlay checkout with the customer information prefilled. You should land on the second screen, ready to enter payment information.

Where there's a problem passing optional information to a checkout, Paddle.js opens the checkout but emits a checkout.warning event. This means customers are always able to complete a purchase provided you've initialized Paddle.js and passed items successfully.
You can use the eventCallback parameter for Paddle.Initialize() to work with events emitted by Paddle.js. To print events emitted by Paddle.js to the console, update your Paddle.Initialize() function so it looks like this.
12345671Paddle.Initialize({
2  token: "test_7d279f61a3499fed520f7cd8c08", // replace with a client-side token
3  // prints events to console for debugging
4  eventCallback: function(data) {
5    console.log(data);
6  }
7});
Then, open your browser console and check for events with the name checkout.warning. They should tell you what the problem is.
Use
⌘ Command+⌥ Option+J(Mac) orCtrl+⇧ Shift+J(Windows) to quickly open your browser console in Google Chrome.
Common problems
Check that:
- The email address that you passed is formatted correctly. Email addresses must not include spaces or non-ASCII characters.
- If you passed an address country, you also passed a ZIP/postal code if the country requires it. Most countries don't require a ZIP/postal code, but it's required in some places for tax calculation and fraud prevention.
- The Paddle IDs for customer, address, or business entities that you passed are correct. Sandbox and live systems are separate, so make sure you're passing Paddle IDs for the environment that you're working in.
Next steps
That's it. Now you've built a checkout, you might like to extend Paddle Checkout by automatically applying a discount, passing optional checkout settings, or building a success workflow.
Automatically apply a discount
Extend your checkout by passing a discount. When we click our launcher, Paddle opens a checkout with the discount automatically applied (where it's valid).
Pass checkout settings
You don't need to pass checkout settings when working with overlay checkout, but you can use them to give you more control over how opened checkouts work. For example, you can set the language that Paddle Checkout uses, hide the option to add a discount, or restrict payment methods shown to customers.
Build a success workflow
When customers complete checkout, Paddle Checkout has a final screen that lets customers know that their purchase was successful. If you like, you can redirect customers to your own page or use JavaScript event callbacks to build a more advanced success workflow.
- Build an overlay checkout
- What are we building?
- Before you begin
- Choose a checkout implementation
- Create products and prices
- Set your default payment link
- Overview
- Include and initialize Paddle.js
- Include Paddle.js script
- Set environment (optional)
- Pass a client-side token
- Add an overlay checkout button
- Create checkout button element
- Set as a checkout launcher
- Take a test payment
- Prefill customer information
- Test your work
- Next steps
- Automatically apply a discount
- Pass checkout settings
- Build a success workflow


